Cellphone Battery Mouse Modification

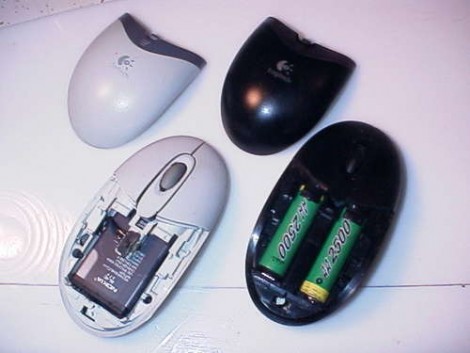
Ever wanted to increase the battery performance in your wireless mouse? [Davetech] shows you the way with this guide for converting a mouse from AA to lithium batteries. We were delighted by his hack-tacular approach that seems to have a nice little work-around at each step in the process. He grinds down the plastic battery housing that is molded into the original mouse body, then uses an old Compact Flash card connector as a set of spring terminals for a Nokia cellphone battery. This battery has more capacity and recharges faster than non-Lithium AA cells. But unfortunately the spring terminals didn’t quite reach the recessed batter contact. No problem, he just builds up solder on the battery to bridge the gap.

[Davetech] manages to fit the entire battery inside the mouse and the pointing-device still works. Your mileage may vary by model (both battery and mouse). It is necessary to take the battery out of the mouse for recharging, but since this only happen about every couple of weeks thanks to the extended capacity it’s not too much of a hassle. Perhaps someone could carry this to the next level by adding a USB port and the necessary charging circuitry?

Build A Spinning POV In A Day

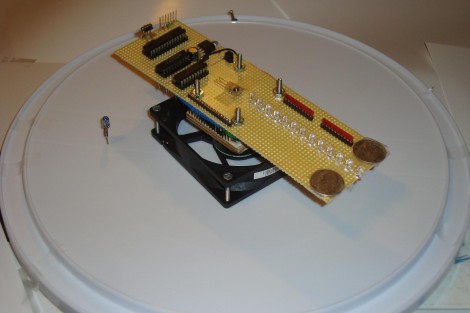
We love spinning POV displays but have yet to build one to call our very own. This project might be the one that we end up building. It’s looks good and it’s the only persistence of vision display that comes to mind which can be built in twelve hours.

The spinning is taken care of by a PC fan. This actually helps with some of the calculations as this fan spins at a know RPM. That information, along with a bit of geometry, can be used to calculate the timer interrupts for syncing the display. A reference point for this device is provided by an IR receiver/emitter pair which is easy to wire up since you already need a voltage source for the fan itself. The rest of the hardware is pretty common: a battery holder is centered on the axis for proper weight distribution and protoboard houses the components such as a PIC 18F252, 74LS373 data latches, and the LEDs themselves. The circuit is wire-wrapped, and works like a charm as evidenced in the clip after the break.

Continue reading “Build A Spinning POV In A Day”

Guitar Teaches You To Play Using LEDs

guitarduino

[Andrew] is an electrical engineering student at UIC, and decided that he would build a MIDI guitar for his senior design project. After tinkering for awhile, things were not looking good, and the MIDI guitar idea was scrapped. With his deadline creeping up, he came up with a new idea, the Guitarduino. His new project is a guitar that teaches you how to play chords and scales by showing you the proper notes to play via LEDs embedded in the guitar’s neck.

He removed the neck, and carefully drilled the holes that would eventually house his 130+ LEDs. The LEDs were wired to his Arduino via some multiplexing circuitry that resides on the back of the guitar’s body. The Arduino was mounted on the front of the guitar along with a shield used for communicating with his LED array. He built another shield that serves as the LCD display as well as the input board for his guitar.

The final result of all his work is fantastic. The user simply needs to dial in the chord or scale that he wants to learn, and the guitar lights up, showing the proper finger positions on the fretboard. We could see this coming in quite handy for anyone just starting to learn how to play.

Check out the video below to see a demonstration and walkthrough [Andrew] put together highlighting his guitar’s features.

Continue reading “Guitar Teaches You To Play Using LEDs”

Laser Tripwire Alarm System Uses Mirrors To Increase Coverage

laser_tripwire_alarm

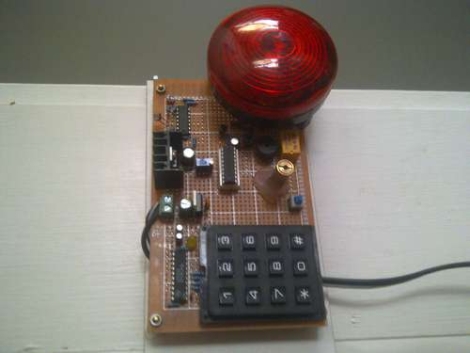
Instructables user [EngineeringShock] has been hard at work building a laser trip wire security system, complete with a combination lock. The security system works just like you see in the movies, employing an array of mirrors to bounce the laser across an opening several times in order to secure the space.

A PIC18F1220 micro controller sits at the center of the alarm and handles the majority of its functions. It takes input from the laser detection circuit, triggers the buzzer, as well as arms and disarms the entire alarm system. An LS7222 digital lock handles the passcode verification side of things, taking input from a 16-button matrix keypad, and telling the PIC when the proper code has been entered.

As you can see in the video below, the alarm system works and the buzzer is quite loud. There is one small problem however – the alarm only arms itself after the proper code has been entered and the lights have been turned off. The light sensing circuit he uses is too sensitive and can only operate in darkness, though he discusses the ability to add a more accurate sensing solution.

If you are interested in reading more about laser tripwire security systems, check out this similar passcode-based system, this alarm system built into a toy, and this Arduino-based alarm system.

Continue reading “Laser Tripwire Alarm System Uses Mirrors To Increase Coverage”

Laser Camera Sees Around Corners

After reading over the proceedings of the 2005 SIGGRAPH, [Dan] realized he could reproduce one of the projects with $50 worth of equipment and some extreme cleverness.

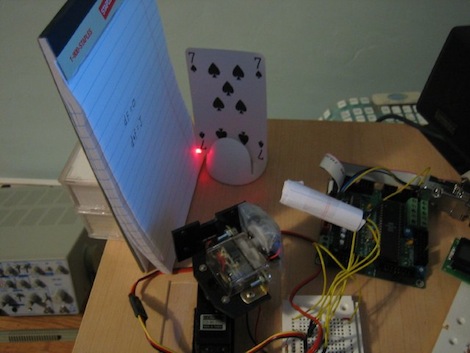
[Dan]’s dual scanning laser camera operates by scanning a laser across an object. The light reflected from the object illuminates a flat surface, and this light is measured by a photocell. After measuring the resistance of the photocell, an image can be reconstructed from the light reflected off the flat surface. The result is quite ingenious, and we’re very grateful [Dan] gave us a great walkthrough with the code and theory of operation.

The project was covered in this Slashdot story a from a few years ago, and we’re surprise no one has bothered to cobble this project together. It’s a very simple build – two servos to control the x and y axes of the laser scanner, a photocell, and an ATMega board. Dan says the microcontroller isn’t even necessary, and this ‘remote imaging’ could be done with an ADC hooked up to a parallel port.

[Dan] was kind enough to to give us a video of his contraption in action. A very nice build from a very accomplished guy.

Nixie Tube Conference Badge

troopers11_badge

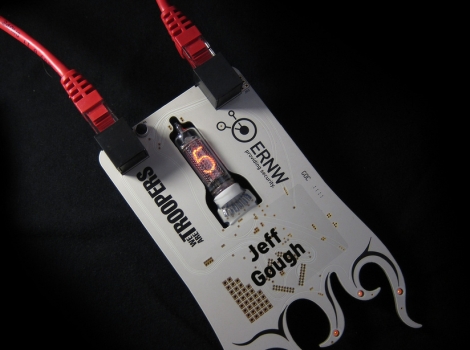
Maker [Jeffrey Gough] was recently asked to construct a set of badges for the TROOPERS11 IT security conference held in Heidelberg last month. The badges were to reflect the overall theme of this year’s conference – personal progression, education, and striving to become better IT security professionals. To do this, he designed a badge that tracked a conference attendee’s participation in various activities.

The badge sports a center-mounted nixie tube that is used to show the attendee’s score. It is worn around the neck using a Cat-5 cable that acts as a LANyard as well serves as a power switch for the badge. The badge can be plugged in to a special programmer used by conference organizers, which updates the attendee’s score after completing each activity.

[Jeffrey] made sure to add all sorts of extra goodies to the badge, including a capacitive touch button that displays a secret message via the nixie, as well as plenty of hole and SMT pads so that hackers could get their game on.

Overall, the reception of the badge was extremely positive. All of the conference attendees had lots of fun exploiting the badges as well as adding components such as LEDs and speakers.

Continue reading to check out a quick demonstration video [Jeffrey] put together, highlighting the badge’s features.

Continue reading “Nixie Tube Conference Badge”

Xerox Phaser Drum Unit Hacked, Lives To Print Another Day

Faced with a printer that would stop printing for no apparent reason, Finnish pirate and hacker [Janne] decided he had had enough. After doing a bit of research, he disassembled the drum assembly and replaced some components. The end result? Supposedly ‘broken’ printers started working again.

Continue reading “Xerox Phaser Drum Unit Hacked, Lives To Print Another Day”