Propeller Proto Board Has You Flying In No Time

propeller_proto_board

[Parker] was in need of a Propeller development board to make working on his projects easier. More often than not, when he needed to prototype something, he would pull the only one he had on hand from his home made pinball machine, and replace it when finished. This was time consuming and cumbersome, so he decided he needed a better way of doing things.

He looked into purchasing a Gadget Gangster proto board which allows you to use a Propeller much like an Arduino, complete with support for shields and the like. Unfortunately, they were sold out and he was in a hurry to finish up a project. Rather than wait, he decided to build his own proto board, which would be more flexible than the COTS version – allowing him to add things like an Analog to Digital converter without having to use a shield.

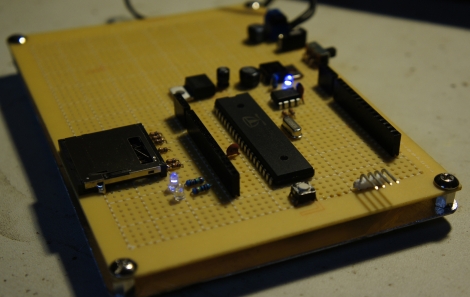
He looked around online and found some schematics to follow, and had his proto board constructed in no time. It gets the job done and looks quite clean, considering it was put together using perf board.

Keep reading to see a video walkthrough of the Propeller development board construction.

Continue reading “Propeller Proto Board Has You Flying In No Time”

Super Pong Table Doubles The Fun

super_pong

While Pong has traditionally been a game played between two individuals, Instructables user [Brad] has put together a variation that doubles the fun.  His Pong coffee table has the ability to support up to four users at once, and makes for quite the living room centerpiece.

The table is made from sheets of MDF and incorporates a grid of 900 LEDs, all controlled by a PIC18 micro controller. The MCU is installed on a control board he designed, along with the other additional bits required to drive the LED array. A set of old Atari paddle controllers were disassembled and installed around the table, making this a true retro Pong experience.

As you can see in the video, the action is pretty frantic. It’s hard to tell who is winning until the game is over, but [Brad] says that a scoreboard will come in a future revision.

4-way Pong is a really cool idea! , but it looks like there are no open source schematics or code for the control board. We’re hoping someone sees this project and puts together a version for all to use, free of charge.

We were mistaken about the status of this project in relation to whether or not it was open source. [Brad] wrote to us letting us know that his code was not originally included with the Instructable as a result of a late night omission. As always, his projects are open source, and you can now download all of the source code and schematics at the page linked above (and in the first step of the Instructable, no less). Mea culpas all around, thanks for the update, [Brad]!

Continue reading “Super Pong Table Doubles The Fun”

How A HP VFD Module Was Reverse Engineered

We all love getting a good deal on sweet parts, but not all of them are documented. Some of us have trained our eyes and brains to spot “timesinks”, having been burned before. The rest sit down with whatever pile of stuff they have on hand, and figure out how to talk to that HP Media Center VFD.

[Jayeson] found some good deals on some Vacuum Fluorescent Displays from a HP Media Center computer as “new”, from some (unmentioned) shady dealers. Once receiving his B stock displays he needed to figure out a way to make them work.

Fun and excitement includes: figuring out the pins, first attempts of communication, getting the data sheet for a house brand chip… that still has the Atmel stamp on it, sniffing traffic with a logic analyzer, and deciphering that data. All that while being a pretty interesting read, good showing of willpower, and resulting in a couple Arduino Libraries as a bonus.

Portable Bench Supply Carries Around 10 Amp-hours Of Juice

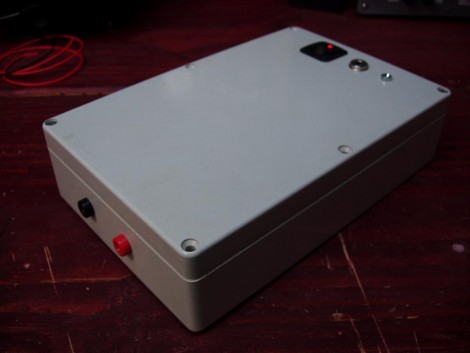
[Punish3r] wanted to have power for prototyping on the go. What he came up with is this little thing above. Inside you’ll find common components that let the unit provide 10 amp hours of current with a 12V 500mA output.

The storage capacity is provided by a dozen Lithium batteries. These 3.7V cheapies are wired in parallel behind a protection board. For charging and discharging, a Sparkfun LiPo charger board was used, taking care of all the work necessary to top off the batteries using a wall-wort. The final piece in the puzzle is a boost converter that provides the regulated 12v connected to the red and black banana plug receivers on the bottom of the case.

This is very much a plug-and-play design… just make sure you hook the parts up correctly and you’re up and running. We would love to see a roll-your-own boost converter circuit that include a switch or dial that lets you select common PSU voltage levels. If you’re going to the trouble to make your own board you might as well incorporate the charging circuit at the same time.

[Thanks Paul]

PS3 Gun/controller Hybrid

[Luis] is very particular about his gaming controllers. He wanted to mod a Six Axis controller to fit into a Nerf gun body but there wasn’t really enough room for all of the components. After shopping around for a while he discovered a wired gun controller made by Namco which was developed for use with the game Time Crisis. He picked one up and went to work replacing the guts with a set pulled from a wireless controller.

The majority of the work on a mod like this one comes in extending the reach of each component. After cracking open the gun controller’s case, [Luis] begins preparing and soldering all twenty contact on the Six Axis controller PCB, then completing the connections necessary for each relocated component. This does make us wonder if there won’t be some element of noise introduced to the signals coming from the analog sticks? He mentions that one of them is ‘glitchy’ but that could be because he started with a used controller from eBay.

We took a couple of good tips out of this. Since the plastic housing is designed to hold each of the original PCBs securely, [Luis] reused them as a mounting surface for the replacement components. A little creative use of protoboard and some time in the paint shop and you’re done. Check out a video of the entire process, which also shares the finished results, after the break.

Continue reading “PS3 Gun/controller Hybrid”

Keeping Beer Chilled From Keg To Tap

beer_chiller

[Stan] was putting together his nano-brewery, and while waiting for his beer to finish fermenting, he decided to work on the storage portion of his project. He built a kegerator to store his forthcoming brews but realized that since it was about 10 feet away from his tap tower, the beer was becoming unacceptably warm and frothy in transit.

In commercial tap systems, a separate line of chilled propylene glycol is bundled with the beer lines, keeping it cool as it travels from keg to tap. [Stan] decided to replicate this setup, and after three different iterations, he nailed it.

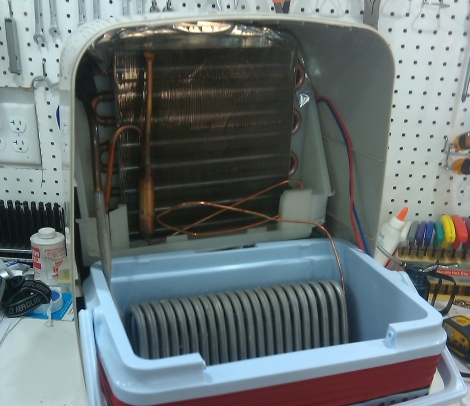
His first two attempts involved keeping the cooling solution inside of the kegerator, but he found that either the pumps added too much heat to the solution, or that the kegerator was running at nearly a 100% duty cycle. Scrapping any sort of kegerator-based cooling, he decided to build a separate cooling unit with a dehumidifier he had sitting around. After fitting the unit into a cooler and filling it with solution, he found it to cool so well it turned the propylene glycol solution to slush!

Check out his site for more details on his cooling setup – if you are in the business of homebrew, you will be glad you did.

Automated Home Beer Brewery — Best Laundry Room Add-on Ever

All-grain home brewing takes time… a lot of time. We’re not going to pretend like a good batch of beer isn’t thanks mostly to the artist that is the brewmaster, but at the same time it’s pretty amazing to see a compact system like the one above that can boil a batch of wort without much help from you.

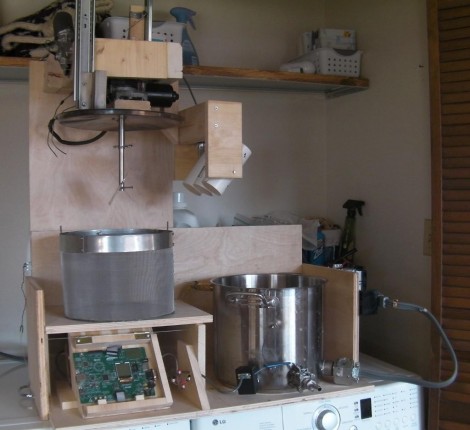
[Zizzle] built this machine as his entry in the Renesas contest. You can see the development board there just to the left of the brew kettle. It’s network connected with a web interface that allows you to take recipes from Brewtarget and import them directly to the system. All you need to do is make sure that you load up the grain basket and boil addition modules to match your recipe. The bot takes it from there, filling the kettle, preheating that water, lowering the grains and maintaining temperature for the mash, and completing the boil with additions from the servo-controlled PVC pipe pods. Experienced brewers will notice a few steps missing, like the sparge, and a quick way to cool the finished wort. But this does take a huge part of the drudgery out of our hands. If only it had a clean-in-place system… then we’d really be happy! Don’t miss the video after the break and take a moment to check out the build-log posts.

Continue reading “Automated Home Beer Brewery — Best Laundry Room Add-on Ever”