Using 555 Timers To Add “free Play” Functionality To Classic Arcade Machines

freeplay-arcade-board

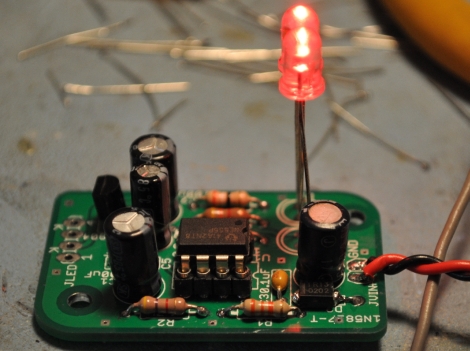
[John Zitterkopf] is in the middle of restoring a vintage Sega Star Trek Captain’s Chair arcade game for the upcoming 2012 Texas Pinball festival, though one prerequisite for the show is that the game supports some sort of free play mode. At this point he doesn’t have the option of tracking down a freeplay ROM for the device, so he had to come up with a solution of his own.

He did not want to alter the machine’s operation in any significant manner, and this meant preserving the functionality of the coin chutes. To do this, he put together a small circuit that uses a pair of cascaded 555 timers to provide the machine with the proper signaling to simulate coin insertion, while still accepting coins. You might initially think that this could be easily accomplished by shorting a pair of contacts in the coin chutes, but as [John] explains, the process is a tad more complex than that.

If you have some old arcade games kicking around and are looking for a non-invasive way to make them free to play, be sure to check out his site for schematics and a complete BoM.

Minimalist RGB LED Cube Has A Very Short BoM

charlieplexed-led-cube

[Asher Glick] wrote in to share a project he has been working on with his friend [Kevin Baker], a 4x4x4 RGB LED cube. The pair are students at Rensselaer Polytechnic Institute and also members of the newly-formed Embedded Hardware Club on campus. As their first collaborative project, they decided to take on the ubiquitous LED cube, trimming down the component count to nothing more than 64 LEDs, a protoboard, some wire, and a single Arduino.

Many cubes we have seen use shift registers or decade counters to account for all the I/O required to drive so many LEDs. Their version of the cube has none of these extra components, solely relying on 16 of the Arduino’s I/O pins for control instead. You might notice something a bit different about the structure of their cube as well. Rather than using a grid of LEDs like we see in most Charlieplexed cubes, they constructed theirs using 16 LED “spires”, tucking the additional wiring underneath the board.

The result looks great, as you can see in the videos below. The cube looks pretty easy to build, and with a cost around $60 it is a reasonably cheap project as well.

Nice job, we look forward to seeing all sorts of fun projects from the Embedded Hardware Club in the future!

Continue reading “Minimalist RGB LED Cube Has A Very Short BoM”

Ancient Mouse Teardown And Repair

For a young geek in the 80s, the it computer was the IBM PCjr. On paper, it was a truly remarkable leap in technology. With a wireless keyboard, light pen, and optical mouse it was an impressive, if maligned, piece of hardware. There was a small problem with the optical mouse, though; it required a special mousepad. [Michael], a PCjr aficionado, decided to make his own optical mousepad. It works, and was a lot easier to build than finding a used one for sale.

The PCjr mouse used two photodectors – a red LED and photodector for the horizontal axis, and an IR LED setup for the vertical. Light is shot through two holes in the bottom of the mouse and reflects back onto the photodetectors. [Michael] emulated the old mousepad with a sheet of aluminum foil and a transparency with a printed grid pattern. Surely not as elegant as an original, but it does the job nonetheless.

This clever-for-its-day optical mouse setup wasn’t limited to the lowly PCjr. A number of old Sun workstations had a similar setup that used small dots on the mousepad. There were several generations of mousepads that were generally incomparable with each other (because one type of mousepad wasn’t proprietary enough for Sun), but we would assume a similar build would work for these forgotten mice.

Thanks to [josh] for sending this one in.

Remove Function Lock Key With A 4016 And A 555

Many companies today try to simplify life by over complicating the keyboard. Microsoft has been doing it since 2001. If you love your ergonomic keyboard, but hate that “function lock” key, there are plenty of options out there for you to try.

The least complicated way is to either modify some XML or just set macros up in the MS software, but who wants to do that every time they re-install Windows? Reader [Elco] didn’t so he added a simple little 555 circuit inside the keyboard, that automatically re-enables the Flock after three seconds if he happens to hit it during fast and furious typing.

Now no matter what system the keyboard is plugged into he does not have to worry that if he hits F7 whether the system is going to spell check his document, or reply to an email, or that F2 is actually going to rename something and not undo his work silently.

A Bicycle Built For… Siamese Twins?

This project really puts an end to arguing over who has to ride in the back of the tandem bicycle. We challenge you not to smile while viewing the maiden voyage that [Carlos] and his daughter take on this side-by-side bicycle. The video can be found after the break.

It certainly makes a bit more sense than an over-under tandem, and the fabrication process is really quite manageable. This requires alterations to the seat, handle bars, and pedals, but the majority of the bike (frame, gearing, fork, wheels) is unaltered.

The cranks have been replaced by a custom welded cam mechanism that reminds us of how the pedals on a paddle boat work. Both riders must pedal at the same time and rate. To give each a place to sit the seat post was converted into a T bar to host saddles to the right and left of the frame. Finally, the handle bars are the most complicated of all. Extra framing was welded onto both sides for the front tube to provide a place to mount two pair of handle bars. One of them is fixed in place, the other can be turned, using a lever mechanism to steer the front fork.

It looks a bit awkward to get started, but once both riders are up it seems quite stable.

Continue reading “A Bicycle Built For… Siamese Twins?”