Puncher Tracks Your Freelancing Hours, Time Spent In TSA Patdowns

freelance-puncher

[Raphael Abrams] does a lot of freelance work, but he has trouble accurately keeping track of the hours he has put in for his clients. After trying various applications and methods of logging his time, he finally decided to build a device that worked just the way he liked.

He calls his device the “Freelance Puncher”, though it already has been nicknamed the detonator, as it looks like something you would find in the hands of a [James Bond] villain. The device uses a PIC16LF1827 to track the time, saving his logged hours to the built-in EEPROM when powered off. A pair of 7-segment displays are used to display the accumulated hours upon power-on, and a set of seven SMT LEDs separated into two banks keep track of quarter and hundreds of hours worked.

[Raphael] has made his code and schematics available on Github, so you can easily replicate his work if you are looking for a better way to track your time. We think it looks great, though it could be the sort of thing that traveling freelancers might want to keep in their checked luggage, unless they want to spend some quality time with the TSA! Be sure to stick around to see a short video where [Raphael] shows off and explains how his Freelance Puncher works.

Continue reading “Puncher Tracks Your Freelancing Hours, Time Spent In TSA Patdowns”

Monitoring Software Builds With A Traffic Light

[JD] at isotope11 was looking for a way to get instant feedback whenever a developer broke a piece of software they were working on. After finding a 48 inch tall traffic light, he knew what he had to do. Now, the entire development team knows the status of their code from a traffic light hanging in the corner.

isotope11 runs a continuous integration server to do the quality assurance on their software projects. It’s a lot more flexible than the ‘compile and pray’ setup we’re used to, but then again C isn’t very well suited to test-driven development. When one of [JD]’s developers breaks a piece of code, the CI server will send a warning to an Arduino where all the electronic magic happens.

To light the traffic light, [JD] used a few relays to drive the 120 volt bulbs in the traffic light. The traffic light is very easy to read – red means something is broken, green means everything is alright, and yellow means a test suite is being run.

Check out the video of [JD]’s TDD visualization after the break.

Continue reading “Monitoring Software Builds With A Traffic Light”

Hackaday Links: February 12, 2012

This is why digital picture frames were invented

[Petros] sent in this video of his visualization of Van Gogh’s Starry Night. He did this with openFrameworks and also made a version that reacts to sound. Is anyone else reminded of that one scene in Vincent and the Doctor?

A boat’s a boat, but a mystery box can be anything

[Rick] wanted to build a lock pick training station for the Eugene Maker Space, but he needed a way to make it interesting. What could be better than a mystery box? When you pick the deadbolt, open the box up and you’ll get a prize. Just make sure you put something of yours in the box for the next person.

3D printer prints its own case

Because the 3d printer community isn’t segmented enough, [Sublime] decided to design a new one. Here’s where it gets cool: the Tantillus can print its own case, and can ‘daisy chain’ to another Tantillus so only one set of electronics are needed. Interesting ideas afoot.

A diamond says I love you, but a duct tape rose says I’ll fix that for you

Valentine’s Day is coming up, so if you haven’t already made dinner reservations, you’re probably up the creek. How about making a duct tape rose for that special person in your life. Bonus: a dozen costs $3, and they won’t die in a week.

Using keypads over serial or SPI

[Leniwiec] sent in a tutorial on connecting keypads to a microcontroller with a serial or SPI interface. If you want to build a calculator, this is your chance. We’d use this for an Apollo Guidance Computer, though.

Dye Mac Dye!

Fabric dye is one of those products where it keeps popping up for unintended uses, we have seen it coloring printed circuit boards, and now a Macintosh computer? [The Brain]’s project to add a little color to his Macbook has been done before, but he chooses to do it in a different way, which comes down to a little bit of sandpaper.

You could go ahead and dye the Macbook plastics as is, but that thick layer of glossy plastic is going to take much more time to penetrate and its going to resist taking the color, so it might end up splotchy. The simple solution to this is to just sand off the gloss, that way the color has much less of a barrier to dye the plastic. Once the protective gloss shell is sanded away and cleaned throughly, Rit brand fabric dye is added to a pan of water and set on the stove to boil.

While most of the case plastics are thick and tough enough to withstand some heat, care does need to be taken when dealing with thin soft parts like the display bezel. After about 45 min the parts are dyed and popping with super bright orange color in record time.

Get Tons Of MIDI Knobs And Buttons With The Chomp

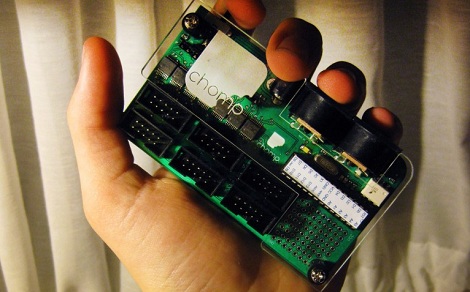
Although MIDI was originally designed for 1 MHz computers with 64 kB of RAM, it’s still an industry standard almost 30 years after its introduction. Even for electronic artists armed with a microcontroller, MIDI is old hat if you want to connect a few buttons up to a music workstation. What if you wanted to connect dozens of buttons and knobs to a bunch of MIDI hardware, though? Enter Chomp, the Configurable Hardware Open-source MIDI Platform.

[Max Justicz], an awesome pseudonym if we’ve ever heard one, built a MIDI controller that allows for 48 inputs for buttons, knobs, and any other electrical connection imaginable. The board is powered by an Arduino-fied ATMega328 and connects to your sensors through 2×5 ribbon cables.

If you’ve ever thought about building a monome MIDI controller, [Max Justicz] has started a Kickstarter campaign to put a few hundred Chomps out into the wild. It seems like a great way to build some controllers or simply to send stuff to MaxMSP. Either way, the Chomp is sure to be useful.

Create PCBs In Just Minutes With This Awesome Spray Etching Machine

pcb-sprayer

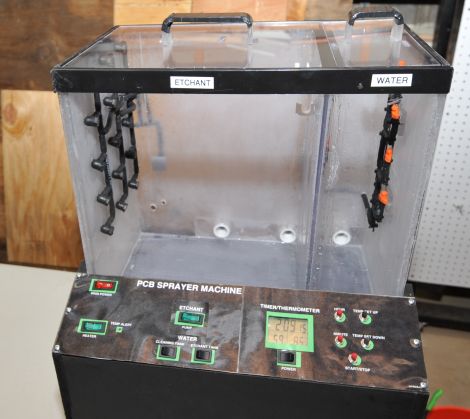
If you have ever produced your own PCBs at home, you know that it can be somewhat of a time consuming process. Spending 20 or so minutes manually agitating a board is a drag, and while aquarium bubbler setups improve the process, they are far from ideal. [Christian Reed] knew that if he really wanted to streamline his PCB production he had to emulate the big boys and build a PCB sprayer of his own.

His spray etcher is contained in a custom acrylic case built mostly of scraps from previous projects. It contains two compartments – one for spraying etchant on the PCBs, and another for rinsing the finished work. The system is impressive to say the least, featuring a maze of tubes and piping which allow him to etch boards and manage his chemicals with ease.

[Christian] says that although the parts list might seem daunting at first, it really is pretty easy to assemble the device. Seeing as he can etch and wash a board in about two minutes flat, we think that any amount of effort would be worth the results.

[Christian] points out that he was unable to find a guide for building this type of PCB sprayer anywhere online, so he documented the process in painstaking detail in order to make it as easy as possible to replicate his work. Be sure to check out the video below to see his etch tank in action – we’re pretty sure it will have you itching to build one this weekend.

Continue reading “Create PCBs In Just Minutes With This Awesome Spray Etching Machine”

CNC Light Painting

Light painting is a technique where a shape is drawn with a light source while a camera is taking a very long exposure shot of it. To do this well by hand would take a lot of skill, so I naturally decided to make my “light art” with a CNC router.

Using this technique, the LED light is treated just like an engraving bit would be under normal circumstances. The difference is that the Y axis is swapped with the Z axis allowing for easy movement in the plane that you see displayed in the picture above. This allows the old Y axis to switch the light on and off in the same way that an engraving bit is lifted to stop engraving and lowered to start (explained here). Instead of a bit though, it’s a switch.

Be sure to check out the video of the router in action (with the lights on) after the break: Continue reading “CNC Light Painting”