Hackaday Links: May 11, 2012

Three days of work in 5 minutes

[Celso] bought himself a Ultimaker kit and put together a time-lapse video of him putting it together. There’s a lot of work that goes into these machines, but being able to print a nearly perfect cube on the first run is nearly magical.

How about a CNC mill, too?

The folks over at Inventables have put together a tiny CNC mill kit designed from the fruitful mind of [Edward Ford]. The Shapeoko mill is designed around the Makerslide linear bearing system, so you’re getting a lot of precision very easily. Here’s some more info on the Shapeoko

Update the firmware on your RasPi

[Hexxeh] has been playing around with the Linux images for his Raspberry Pi, so he needs to reinstall the firmware on an image quite a lot. He wrote a tool to automate this task, but it should be useful for RasPi users that want to keep kernel and firmware up to date. You can get the rpi-updater at [Hexxeh]’s GitHub.

Your robotic barista is still always on the phone

Zipwhip is a company that provides a bridge from your phone to your computer so text messages can be displayed on your desktop. To show off their tech, they created a text enabled espresso machine. Everything on this robotic barista is automatic: the cups are grabbed from a warming tray with a servo arm, coffee is automatically brewed, and the last three digits of your cell phone number are printed on the foam to identify each cuppa. Check out the video; action starts at 1:30.

Awesome reading material

If you’re looking for something to read on that fancy tablet computer of yours, here’s every issue of New Scientist from 1956 to 1985. The early 60s issues say fusion power plants are about 50 years away, so we should be just fine in a couple of years.

USB Connectivity That Is So Very Very Small

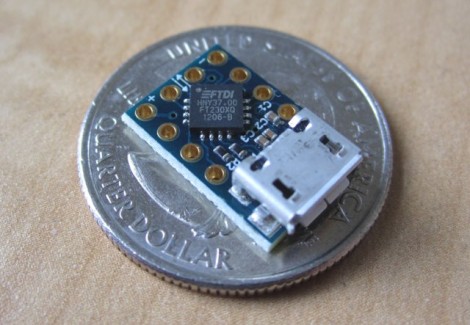
Using FTDI chips as a USB to Serial solution is nothing new, but this MicroFTX board takes the footprint to a new low. If you’re space limited this should have no problem fitting into your project. But if you plan to use it for prototyping we predict it’ll be lost in the parts bin forever as soon as you take your eyes off of it.

The USB Mini-B connector is becoming quite popular with hobby electronics these days. But here [Jim Paris] chose to use its little brother, the USB micro connector. Want to put this together by hand? How are you with 0402 footprints and QFN chips? In fact, there’s a ground pad on the bottom of that IC which means you really need to use a reflow oven to do the job right.

Aside from the diy-unfriendly fabrication size, we do like the design. There are four output pins (voltage, ground, TX, and RX) with a set of four solder jumpers to configure them. It can be powered from the USB port or an external connection, with the option for 5V or 3.3V output.

[Thanks John]

Tesla Gun Will Probably Kill Something, Sometime

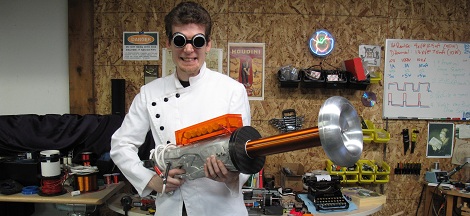
After reading The Five Fists of Science, a retelling of ‘war of the currents’ between [Tesla] and [Edison], [Rob] knew he needed a Tesla gun, the sidearm of the story’s protagonist. Since nothing as stupidly awesome and dangerous as a portable Tesla coil has ever been made, [Rob] needed to make his own.

[Rob] started his build as any good weird weapon build begins: taking apart a Nerf gun. A new Aluminum sand cast body replaced the wimpy plastic body of the Nerf gun and after a few days on a mill, [Rob] had an aluminum Nerf gun perfect for holding the guts of a Tesla coil. The high voltage switch is made of porcelain, and the power supply is an 18 V cordless drill battery and a flyback transformer potted with silicone in a PVC pipe end cap.

[Rob] really has a remarkable build on his hands here, and certainly something no one else has ever tried before. While he hasn’t fired his gun yet, we’re sure we’ll hear about it on the nightly news when he does.

The WiiKart, A Wireless Go Kart

Whoops… Looks like we covered this already. My mistake.

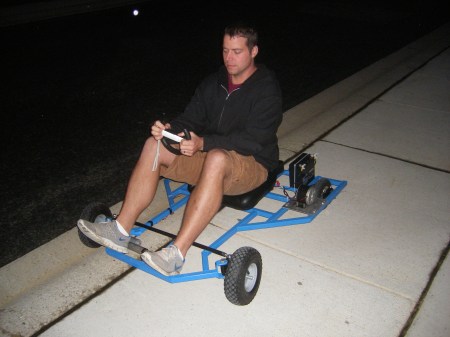
In case the name didn’t tip you off, this fun little kart was inspired by MarioKart. The goal was to build a functional go kart that could be controlled via the Nintendo Wiimote. They did a pretty good job and kept it fairly simple too. They designed a frame that vaguely mimics the shape of the carts in the game. The steering is handled by a 4″ stroke linear actuator. This was initially hooked directly to the tie-rod, but they found it to be too slow. Their solution was to put a lever in between the two with a 1to 3 ratio. This made everything much snappier.

Though they were capable of implementing PWM on the motors in their hardware, they opted to stick with full on, full off because of the push-button nature of the controller. The connection and communication are handled with an Arduino and they don’t mention what bluetooth module they use.

You can see in the video below it is fairly responsive and has more than enough power to lug a passenger over some varied terrain.

Continue reading “The WiiKart, A Wireless Go Kart”

Digital Magic 8 Ball

[sjm4306] had a small Magic 8-Ball key chain as a kid. The fluid in this key chain eventually dried up, and if [sjm] is anything like us the 20-sided die is now lost to the sands of time or at the very least hidden in a box in the basement. After remembering the old Magic 8-Ball one day, [sjm] decided to build a digital version of everyone’s favorite bewitched billiard ball.

The digital magic 8-ball uses a PIC16f886; more than enough to hold the twenty possible replies from a real magic 8-ball. The display is a tin 3 cm OLED which surprisingly emulates the ‘icosahedron with raised letters floating in purple liquid’ aesthetic very well.

Right now, this is just a breadboard prototype – there isn’t an accelerometer or tilt switch in the build yet, so shaking the project does absolutely nothing. [sjm] may add that functionality later by turning his project into a watch, key chain, or installing it in a real Magic 8-Ball case.

[Matt’s] Bubble Display Updated

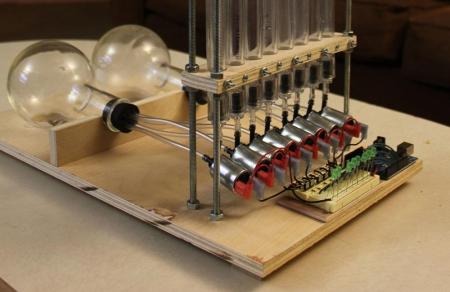
[Matt] emailed in to show us how he has improved his bubble display since the last time we saw it. If you recall from last time, he was having issues with the air pressure dropping when multiple bubbles were released, resulting in smaller bubbles. This time around, he has added an aesthetically pleasing air reservoir to help ensure that his bubbles don’t vary too much. There really wasn’t a reason to use two containers for the reservoir, aside from the fact it is what he had on hand. He has also torn part the part of the display that houses the oil, replacing it with individual tubes for each vertical segment. This makes it easier to regulate the speed of the bubbles, as he found they travel at a constant rate if they are in contact with the edges of the tube.

One downfall of using the vinyl tubes is the fact that it comes in a giant roll. This leaves the tube wanting to curl. To get around this, he stretched it on a wooden dowel and heated it with a heat gun till it relaxed. Using clear PVC or acrylic tubing would be an alternative but would be more expensive.

Continue reading “[Matt’s] Bubble Display Updated”

Generating Electricity With Swing Sets

[Guelherme Pena Costa] came up with an idea to light up a swing set using the motion of the people swinging on it to generate electricity. The goal was to get people to enjoy the playground at night and we think, this might actually be a pretty good way to achieve that. People love blink lights, especially if they are interactive.

To Light the LEd ropes, [Guelherme] has attached a gear motor to the frame of the swing set and an arm to the chain. When the swinger swings, it spins the motor generating between 6 and 10 volts at 230-400 mA. As you can see in the video below, that works fine to illuminate the LEDs, though we think a charging circuit to allow the lights to stay lit for longer would also be cool.