LEGO ROV Without A Tether

[Brane] built an underwater ROV from LEGO mindstorm parts. Look closely at this image and you should notice something missing. The tether that normally carries power and control lines from an ROV to the surface is missing. This is a wireless solution that lets him control the device using an Xbox controller.

The video after the break shows about five minutes of test drive footage. [Brane] has a big aquarium in which he can test the thing. Since he put it together as his senior engineering project at University it’s likely that this is a testing facility at the school. Here’s the little we know about the hardware: It’s using NXT Mindstorm parts to control the motors, with a sealed chamber for a battery. Connectivity is provided by an XBee module with an NXT adapter board called the NXTBee. A laptop with its own XBee module makes up the other end of communications. Right now [Brane] uses an Xbox controller connected to the laptop, but a standalone device would be easy to build by hacking the XBee and controller together directly.

Continue reading “LEGO ROV Without A Tether”

Building A Giant Game Of Life Spinner

We see a lot of projects related to Conway’s Game of Life, but this one is Hasbro’s Game of Life. The board game company recently commissioned a giant game spinner as part of a museum exhibit. Here’s the build log that shows how it was pulled off.

The first thing to note is that [Jzzsxm] does this for a living. His company was hired to build several exhibits related to board games for a children’s museum in Springfield, MA. But don’t let that stop you from offering to help at your own local museum. We know some hackers love doing that kind of work.

The scale of the project is what makes the build really interesting. It starts with a design which can be cut out with a CNC router. First the spinner frame and numbers are cut out of MDF to verify the code. From there the design is cut in two pieces out of HI-MACS, a durable solid-surface material. Pegs for spinning the dial are milled from more HI-MACS stock. The clicker mechanism uses a steel rod as a pivot point. On the underside of the table it has opposing springs to hold it in place no matter which way the thing is spun. [Jzzsxm] mentions that it sees a lot of abuse from the young patrons, but seems to be holding up just great!

[via Reddit]

Turning A Keyboard Into A Computer With A Raspberry Pi

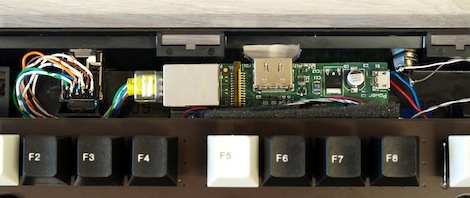
Only 80s kids will get this: remember when computers had built-in keyboards, like the Apple II line, or the Commodore 64? That’s a form factor duplicated by case modders many times over the years, but [preamp]’s project is the first time its been done using a Raspi (German, Google translation).

For his build, [preamp] used what he considers the best keyboard in the world, the Cherry G80-3000. Except for the HDMI port, just about every plug was moved to the back side of the keyboard with the help of an Ethernet jack, a USB hub, and RCA jack. Audio is missing, but for an extremely portable system [preamp]’s RaspCherry Pi is at the top of its class.

We were wondering when someone would shove a Raspi into a keyboard, and we couldn’t be happier that [preamp] chose a Cherry keyboard for his build; they’re wonderful input devices second only to the 8 pound behemeoth used to write this post.

Making Chiptunes With 32 Bytes Of RAM

Ah, chiptunes. One of the few remaining human endeavours where less RAM, less storage space, and fewer capabilities are actually considered an improvement. [dop3joe] over at the Stuttgart hackerspace Shackspace sent in a tiny chiptune playing circuit using the most bare-bones hardware we’ve ever seen.

The Noiseplug, as [dop3joe] calls it, is based on a very, very small 6 pin ATtiny9. With 1 kB of Flash memory and only 32 bytes of RAM [dop3joe] was able to create a small device inside an RCA jack that plays chiptunes whenever it is powered by a battery.

If you’d like to make your own noise plug, [dop3j0e] put all the code up in his Git. There are two relevant pieces of software for this build: a Windows app to create the chiptunes, and the ATtiny9 firmware itself. Of course to program the tiny, you’ll have to deal with the Atmel TPI, so here’s the application note (PDF).

Oh, [dop3joe] won third place at the Evoke demoscene party last weekend with the Noiseplug. Awesome.

Servo Controlled Wine Glass Plays The Music Of The Angels

[youtube=http://www.youtube.com/watch?v=tUNuTgNU-3c&w=470]

There’s a lot of cool stuff brewing on the Hackaday forums. [igor_b] posted a project he’s been working on that uses a servo, motor, wine glass, and a balloon to create a one-glass armonica.

A glass harmonica is a series of nested bowls turned on a spindle that is played by running your finger along the rims of the glasses. They’re very unique sounding instruments and something [igor] decided to emulate using only one glass.

Because the note produced from a wine glass varies with the volume of liquid, [igor]’s first thought was to use a pump to change the level of the water. He discarded this idea when he realized he could displace water by tying a balloon to a servo.

The rest of the build is a simple 555-based motor driver, a phone app written with GoOSC, and a Teensy dev board. To change the pitch of his instrument, [igor]’s phone sends a command via WiFi to his computer, which in turn controls the Teensy, servo, and ultimately the level of water in the glass.

It’s a very cool build, but there is a small change in timbre as the water balloon displaces more liquid in the glass. [igor] tried a few other objects – a peach and a plum – but using a balloon filled with water produced the clearest tone.

Now to make a few more of these and connect them to a MIDI keyboard…

Toorcamp: Banana Piano

Banana Piano

[Michael] built his own clone of the popular MaKey MaKey Kickstarter project. His implementation uses an ATMega328 and the V-USB stack to connect as a USB Human Interface Device. He was showing it off at Toorcamp wired up to a banana piano, which captured the interest of kids and adults alike.

The digital inputs are pulled to ground with a large (10 Mohm) resistance. The user holds a supply voltage in one hand and completes the circuit by touching a conductive object like a banana, which is connected to a digital input of the ATMega328. Since the internal resistance across your body is typically around 1 Mohm, this pulls the input high and corresponds to a key being pressed on a normal keyboard.

We featured banana pianos before, and it’s a great demo of the interfaces that can be built with this project. This implementation is very simple, and works well if your internal resistance is low enough. [Michael] taught a workshop at Toorcamp to show people how to build their own. He has found that the ‘magic’ of playing music with bananas is a great way to get children interested in electronics.

Light Painting With The Raspi

The art of taking long exposure photographs with blinking RGB LEDs has improved greatly over the years, mostly due to the extremely easy to use Arduino and hundreds of tutorials on the web. If there’s one problem with light painting with a ‘duino, it’s that large, full color images take up a ton of storage space, much more than the flash memory on an Arduino can provide. Wanting fancier and more colorful light painted images, [Phil] over at Adafruit used a Raspberry Pi to make some very awesome light painted images.

Like any Adafruit tutorial that uses LEDs, the build begins with a digital RGB LED strip wired to the GPIO pins on the Raspi. After loading up the Adafruit educational Raspi Linux distro for hardware SPI support, the only thing left to do was writing a Python script to display images in the air.

[Phil] says vertical, hand-held LED bars are old hat, so he took a hula hoop and a few bits of PVC pipe, attached the LED strip, and put it on his bike. The results are really impressive – we’re loving the flames in the title pic – and considering the Raspi is a full-fledged computer, light paintings larger than what [Phil] made are very possible.