Bits And Pieces Robotic Arm

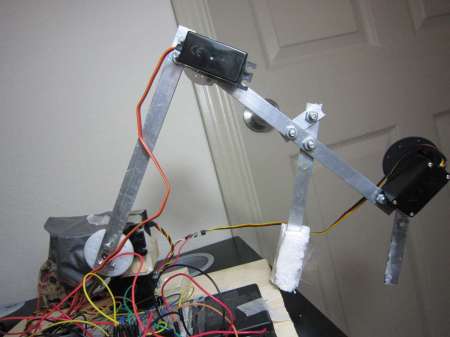
[V0R73X], who is 17  has been working on a project, to build A robotic arm. This project started out as a challenge put forward from one of his school teachers to build a robotic arm for $200.  [VoR73X] accepted, and the challenge began.

He came up with a robotic arm that can be controlled from his mobile phone and other bluetooth enabled devices. He also designed it so that he can control it from the infrared remote control of an old tv set. [VoR73X] decided to kept the design simple, to make it easy for others to build.  [VoR73X] has shared the code and a step by step process of how to build in the hopes that others would also like to take up the challenge.  Watch the video after the break for further details on his project.

via[Instructables]

Continue reading “Bits And Pieces Robotic Arm”

Getting Around The Raspi’s USB Host Current Limit

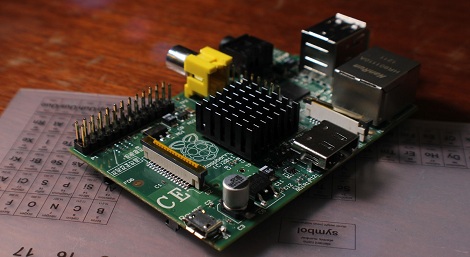
For being such a revolutionary device, there are still a few problems with the Raspberry Pi. For one, the USB host ports are only able to source 140 mA per port, while the USB ports on your desktop, laptop, and even tablet are able to send a full 500 mA per port.

The official ‘fix’ for this problem is to use a powered USB port for any device that requires more than 140 mA,  something that didn’t sit well with [Manis]. He came up with an easy fix , though, that only requires a few bits of wire and a soldering iron.

The USB ports on the Raspi are current limited to 140 mA by a pair of polyfuses. [Manis] bridged these fuses, effectively taking them out of the circuit with a short length of wire. This allowed him to use a USB hard drive (powered by USB, of course) with the Raspi.

There’s one small problem with sending that much current through the Raspi’s USB port. Sometimes, when the high-power USB device is powered on, the voltage will sag, resetting the SoC and rebooting the system. [Manis] did his homework and discovered USB 2.0-spec ports should use a 120 μF, low-ESR capacitor to prevent this. The Raspi comes stock with a 47 μF cap used for this purpose. Replacing this cap (C32) might be a good idea if you’re planning on using high-power devices with your Raspi.

Sexy Six Axis Robotic Arm Is A Work Of Art

We don’t know if it’s a mid-life crisis or just the result of way too many solder fumes, but [sparten11] on Instructables is building one of the coolest robotic arm we’ve ever seen, and we thank him for that.

The build began with a set of brushed DC motors running capable of running on 60 volts at up to 8 amps. These motors were attached rotary encoders that, with the gearing [sparten11] is using, provide 400,000 steps per revolution.Combined with a heavy duty motor controller, [sparten]’s arm has more than enough power and control for just about any industrial process.

Of course muscles are useless without a skeleton or brain, so [sparten] milled the structural and mechanical members of his arm in his home machine shop. It’s an impressive bit of kit; the base of his robot tested the capacity of his lathe, and the waterjet-cut arms form a graceful skeleton of an absurdly powerful robotic arm. The electronics for the build consist of a Pico PC running Windows XP with servo control board etched from a copper clad board.

The build isn’t quite done yet, but judging from the videos after the break, [sparten] will have a fabulous robotic arm shuffling around his workshop in short order.

Continue reading “Sexy Six Axis Robotic Arm Is A Work Of Art”

Galago, The Latest In A Series Of Awesome ARM Boards

Long time Hackaday reader [Kuy] sent in a project he’s been working on for the last year and a half. It’s called Galago, and it wraps up all the features we’d like to see in the current crop of ARM microcontroller dev boards into one neat package.

The Galago features an AMR Cortex-M3 microcontroller running at72 MHz. Included on its pinout are 25 digital IO pins, 6 analog input pins, 10 PWM pins, and an I2C and SPI port.

The Galago isn’t simply an exercise in hardware development, though. [Kuy] spent a great deal of time writing proper libraries for his board, allowing you to get started with the Galago very quickly without having to rely on crippled tools.

A proper library isn’t Galago’s only significant developer feature: [Kuy] went as far as to create a browser-based IDE (no Internet connection required, thankfully) that has the ability to upload code directly to the board via a USB cable. Add in a hardware debugger, and the Galago might just be the perfect ARM board for tinkerers weaning themselves off the Arduino.

[Kuy] has released the Galago on a Kickstarter, with a single board costing $25. It’s a cool device, and something we’d really like to come to market.

Put A Solder Mask On Those Homebrew PCBs

While making your own PCBs at home is one of the best marks of a competent builder, if you want to give your project a more professional vibe, you’re going to need to do better than bare copper traces on a piece of fiberglass. To help out his fellow makers, [Chris] sent in his Instructable on creating a solder mask for homemade circuit boards using a minimal amount of tools and materials easily sourced from the Internet.

[Chris]’ soldermasks are made from UV curing paints he found on eBay. Of course the traditional green paint is available, along with paints very similar to the Sparkfun red or Arduino blue soldermasks.

After brushing the soldermask paint onto his home-etched circuit board, [Chris] printed out the solder mask onto a piece of transparency film using a laser printer. This mask is vitally important if you ever plan to solder your board; by covering the pads you wish to solder, the paint won’t cure and can later be removed.

[Chris] cured his soldermask by leaving it in the sun for a half hour. After the paint was dry, he removed the excess paint covering the pads with a little bit of turpentine and some elbow grease.

While [Chris]’ paint had somewhat of an ugly matte finish, the soldermask does its job, protecting the PCB traces while leaving the pads uncovered and ready to solder.

Remote Control Does Everything

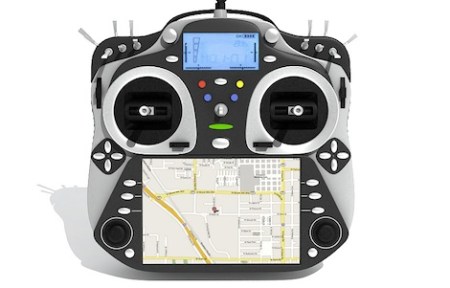
After a year of development, the OSRC is ready to hit a manufacturing plant. This transmitter (and receiver) for remote control cars, airplanes, quadcopters, and semi-autonomous drones features modular everything and allows you to transmit video from the cockpit and display it on a screen in the palm of your hands.

This isn’t the first time we’ve posted something on the OSRC, but since then [Demetris], the team lead has released a ton of information on the capabilities of the OSRC main unit, the clip-on FPV display, and the receiver and transmitter modules made to operate with the OSRC.

Unfortunately, [Demetris] spent a good deal of money developing the OSRC and is now doing a pseudo-kickstarter, ostensibly to gauge interest and allay a bank’s fears when applying for a small business loan. If all goes as planned, the OSRC base unit should cost somewhere around €300, a significant sum, but really not that bad considering the OSRC simply does more than other high-end RC transmitters.

We’re hoping enough people will step up and promise to buy the OSRC after it goes into manufacturing, otherwise we’ll be waiting a few more years before the big names in the RC transmitter game manage to come out with a similar product.