Building A Tiny Arcade Cabinet From A Game Boy Advance

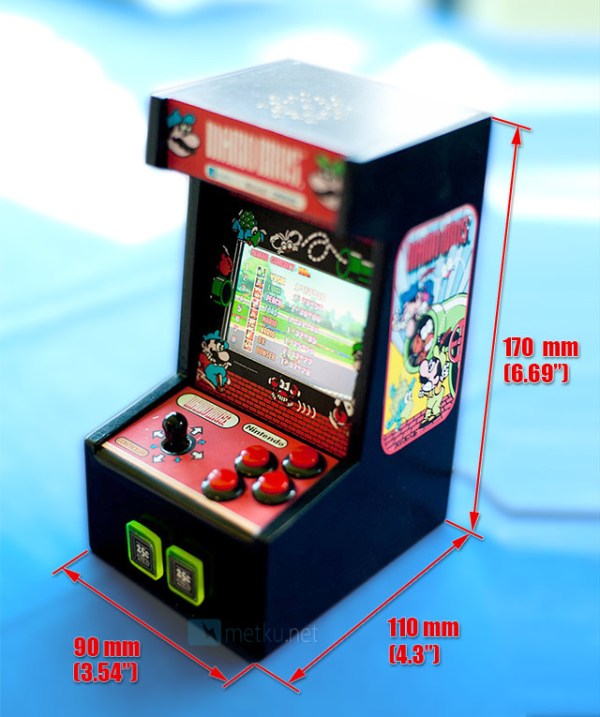
[Jani ‘Japala’ Pönkkö] found a way to make his old Game Boy Advance exciting again. He poured a ton of time and craftsmanship into building a miniature arcade cabinet. He did such a good job it’s easy to think this is a commercial product. But when you open the back of the case to switch games one look at what’s crammed inside let’s you know this is custom work.

What’s most surprising to us is that he didn’t draw out a full set of plans before beginning. He simply measured the circuit board and LCD screen from the Game Boy and went with his gut for everything else. The case itself is crafted from baltic birch plywood, which was primed and painted before applying the decals. There is also a screen bezel made of acrylic with its own decal like you’d find on coin-op machines. These were made using printable sticker paper. The electronic part of the build involves no more than extending contacts from the circuit board to buttons mounted on the case. But he did also replace the stock speaker for one that produces better audio.

An Interview With The Creator Of Slic3r

[youtube=https://www.youtube.com/watch?v=vA6jmg_zcQo&w=580]

When in Rome, most people visit great works of art, see masterpieces of architecture, or simply try to convince random tourists that a modern recreation of naval battles in the Colosseum would be really cool and somebody should really get on that. [Andrew] had a different idea, though. He thought meeting up with Slic3r developer [Alessandro Ranellucci] would be just as educational and entertaining as visiting a basilica and thoughtfully decided to film his interview for all to see.

Whenever a file of a 3D object is sent to a 3D printer, the object must first be converted into GCode – the language of lines, circles, and computer aided design that all 3D printers speak. To convert 3D objects to GCode, every piece of 3D printer software from Pronterface, ReplicatorG, and Repetier must first ‘slice’ the file up so the object can be printed one layer at a time.

As the lead dev for Slic3r, [Alessandro], a.k.a. [Sound] goes over the current happenings of his STL to GCode converter – he’s even getting a little support from the very cool people at LulzBot – and the future of Slic3r. There’s still a lot of work to be done optimizing the current software, improving the user interface, and getting rid of all those nasty edge-case bugs.

For as much as we at Hackaday focus on the hardware half of 3D printers, it must be said the current state of the art in desktop manufacturing wouldn’t be where it is without [Alessandro] and other software devs. There’s still a lot of room for improvement – try printing a single wall thickness cylinder without a seam, for example – but without software projects like Slic3r, 3D printing wouldn’t be where it is today.

Breadboard Friendly FPGAs

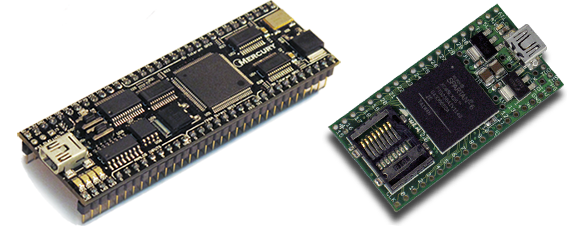
Regular Hackaday readers will be familiar with all the cool things you can do with FPGAs; emulating old video game consoles, cracking encryption protocols, and DIY logic analyzers become relatively simple projects with even a modest FPGA dev board on your workbench. Many FPGA boards aren’t geared towards prototyping, though, and breadboard friendly devices are hard to come by. Here’s a pair of breadboardable FPGAs we’ve found while searching for some related hardware over the past few days

First up is the Mercury FPGA Module. Packaged in a DIP-64 format, the Mercury features a Spartan-3A FPGA with the equivalent of 200k logic gates. Elsewhere on the board is 512kB of RAM and 128kB of Flash storage. There are enough GPIO pins for nearly any project, but sadly only a 10-bit ADC – the same resolution you’d find in an AVR or PIC ‘micro.

Of course the Mercury isn’t the only breadboard-friendly FPGA dev board out there. There’s also the slightly more capable XuLA2 board powered by a Spartan-6 with 32 MB of RAM, 1MB of Flash. Unlike the Mercury, the XuLA2 can also fit in one of those ‘half-sized’ solderless breadboards.

Yes, it’s a different form factor than the commonly recommended Papilio One or the DE0. If you can suggest any other ‘beginners’ (i.e. doesn’t cost an arm and a leg) FPGA boards, leave a note in the comments and we’ll summarize them in another post.

Beautiful Table Made From A Bowling Alley

table

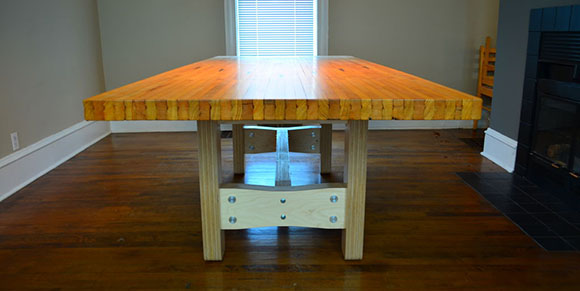
For a workbench, desk, or even a dining room table, there’s nothing quite like a massive piece of laminated maple put to use as the surface of a table. Whether in the form of butcher block, a shop class table, or in [Dillon]’s case, a reclaimed bowling lane, laminated maple provides one of the best possible table surfaces.

A while back, [Dillon] found someone on Craigslist willing to part with an eight foot section of a bowling alley for about $300. After trucking this two and a half inch thick, 250 pound monstrosity home, work began on converting it to a dining room table.

Bowling alleys are constructed by workers laying down maple strips and nailing them together one row at a time. This provides a stable surface when mounted on a concrete platform, but is completely insufficient for a table. To keep his bowling alley table from sagging, [Dillon] routed out three slots for aluminum bars going across the width of the lane. These bars were then screwed into each individual maple strip in the lane, resulting in a very sturdy surface.

The strengthened lane was then resurfaced with the help of a huge industrial belt sander and finished with a satin polyurethane. The legs of the table are made out of CNC’d 18mm Baltic birch plywood held together with metal fasteners.

The end result is a beautiful table ready to last 100 years. Considering [Dillon] spent less than $1000 on this table – and the price of eight feet of 2.5″ butcher block – we’re going to call this a win for [Dillon], his kids, and grandkids.

Level Converters To Make All Your Hardware (5.5V And Under) Play With Each Other

txb0108-level-converters-ks0108-stellaris-launchpad

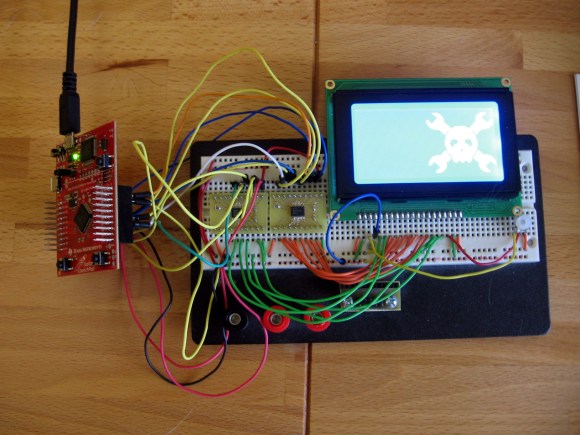
I finally set aside some time for one of my own projects. I have been playing around with ARM microcontrollers a lot lately and wanted to try out my GLCD display that uses the KS0108 protocol. It’s 5V but I had heard that some of these displays will work with 3.3V TTL. But the datasheet tells me otherwise. I tried using a pull-up resistor to 5V and configuring the Stellaris Launchpad pins to open drain, but the low voltage wasn’t getting below the 0.3V threshold needed by my display. My only choice was to use some type of level conversion. I actually ended up driving the KS0108 using a pair of TXB0108 level converters.

I figured this had to have been done before so I check over at Sparkfun. Their offerings are either one-way or have a direction pin that you must drive yourself. I figured there had to be a bi-directional solution and a search over at Mouser led me to the TXB0108. It is exactly what I was looking for and as you can see I etched my own circuit boards to make the TSSOP chips breadboard compatible. I’ve documented the process you can find the code and board files at my post linked above.

Update: one of the Reddit comments mentions this chip is available on a breakout board from Adafruit if you’re interested.

Standalone Air Quality Monitor Based Around Raspberry Pi

rpi-air-quality-monitor

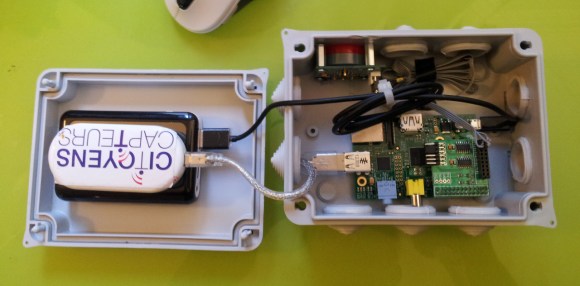
You can have a lot of fun tinkering with the Raspberry Pi. But in addition to the low-cost hobby potential it is actually a great choice for serious data harvesting. This air quality monitor is a great example of that. The standalone package can be taped, screwed, bolted, or bungeed at the target location with a minimum of effort and will immediately start generating sample data.

The enclosure is a weather proof electrical box. The RPi board is easy to spot mounted to the base of the case. On the lid there is an 8 Ah battery meant to top off an iPhone. It works perfectly as it provides a USB port and enough current to operate the Pi. On top of that battery is a 3G modem used to access the data remotely — although it can log to the SD card for collection at a later time if you’d rather not mess with a cell network.

Look closely at the GPIO header and you’ll notice that an ADC add-on board has been plugged in. This is used to take the readings from the gas sensor which is monitoring for air pollutants in Paris.