Building A Steam Punk Style Time And Weather Display

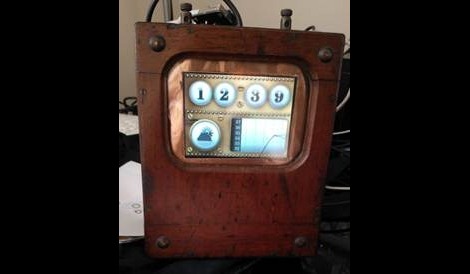
This is [Pierre Cauchois’] digital weather display. Since weather displays are ubiquitous in this day of smart phones in every pocket he went out of his way to give it a unique look. He started with a wooden voltmeter case, swapping the ancient display for a modern LCD screen.

He used Gadgeteer components for the retrofit. The images for the LCD are stored on an SD card and displayed on demand. Since the digital bezel will be the same no matter what the time or environmental conditions [Pierre] used the power of the .NET framework that drives the system. He made up an image using magenta for all of the dial openings. This way a sprite can be used just for the changing numbers, weather icon, and graphing area.

Looking at all that went into coding the project we think the Gadgeteer components are perfect for those that are well-versed in upper-level languages and don’t really want to deal with low-level microcontroller issues.

[Thanks George]

Redesigning The RC Tank

[youtube=http://www.youtube.com/watch?v=–YZHMqHzPw]

[Vincent] started building this tank (translation) with a regular hobby model: the Heng Long Tiger 1. However, after considering some goals for the project, he decided to nearly gut the tank and redesign it, basing it on the Arduino and a standard Motor Shield. The possibilities with this setup are nearly endless. In its current form, the ArduTiger detects obstacles in front of it by way of three servo-mounted infrared rangefinders. The tank’s trajectory can be adjusted automatically based on feedback from the servo positions. Two additional short-range rangefinders detect if there is ground for the tank to roll over, keeping it safe from cliffs and black holes.  [Vincent] plans on updating this beast by adding a Raspberry Pi for live video and advanced control… and maybe even adding a Geiger counter!

DIY GLOBARS For Nighttime Bike Visibility

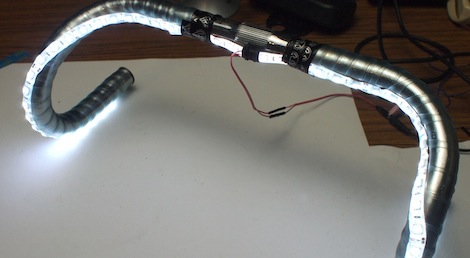
Inspired by a non-existant yet still cool illuminated bicycle handlebar project, [Becky] over at Adafruit came up with her own version of light up  handlebars. Not only is her project actually real, they’re also a pretty cool build that brings a little lightcycle ambiance to twilight bicycling.

[Becky]’s light up handlebars are inspired by the GLOBARS concept design that made the blog rounds earlier this year. Instead of custom machined aluminum tubing, [Becky] used an Adafruit LED strip neatly assembled with heat shrink tubing and waterproof tape, along with an 8 AA-cell battery holder in a fabric and velcro pouch suspended from the top tube on her bike.

After wrapping the LEDs around the handlebars, [Becky] wrapped them in clear handlebar tape she sourced from Amazon. From the video after the break, the 2 meter LED strip on [Becky]’s handlebars verge on lightcycle territory, but sourcing a 6 AA-cell battery holder over an 8-cell will bring the brightness down to a reasonable but still safe level.

You can check out [Becky]’s build video after the break.

Continue reading “DIY GLOBARS For Nighttime Bike Visibility”

Picking Handcuffs With Laser Cut Keys

At this year’s HOPE conference, German competitive lockpicker and security researcher [Ray] gave a talk about escaping high security handcuffs that are probably being used by your local police and other LEOs. He’s doing this with 3D printed and laser cut keys because, you know, security through obscurity never works.

Two years ago, [Ray] gave a talk at HOPE on 3D printing Dutch handcuff keys (you can listen to his conference as an .MP3 here). This time around, [Ray] copied the keys of Bonowi and Chubb handcuffs, very popular brands for American police. After obtaining a key from each of the two brands, [Ray] broke out the calipers and micrometer and designed his own versions that can be printed on a RepRap or Makerbot, or just laser cut from a piece of plastic; the perfect material for sneaking one through a metal detector.

The .DXF and .STL files for the handcuff keys will be available on Thingiverse shortly. We’d suggest watching this Thingiverse account (nevermind), as they have the files for [Ray]’s earlier Dutch handcuff key.

Robot Trash Can Catches Anything You Throw Near It

This guy is about to toss the blue ball half way between the book shelf and the waste basket. By the time it gets there the waste basket will have moved into position to catch the ball perfectly. It’ll do the same for just about anything you throw.

We’re unable to read the captions but it looks like this may have been made as part of a commercial which is shown in the first few seconds of the video after the break. From there we see the development of a locomotive mechanism which will fit into the bottom of the bin. It start as a single swivel wheel, but gets more complicated quite quickly. Once the low-profile three-wheeler is milled and assembled it’s time to start writing the code to translate input from a Kinect 3D camera and extrapolate the position for catching the trash. The final result seems to do this perfectly.

Continue reading “Robot Trash Can Catches Anything You Throw Near It”

Giving An ATX Bench Supply The Case It Deserves

Your bench supply doesn’t need to look sad just because you’re using an ATX power supply instead of a commercial product. Follow [Ian Lee’s] example and you could have beautiful wooden enclosures for the tools in your own shop.

The woodworking skills used here aren’t all that advanced, but you need to have a knack for it so we suggest running some test pieces before you start the actual build. [Ian] ran a dado for the front and back panel in each piece of the wood sides. At each corner the inside of the the pieces were mitered at 45 degrees. To put it all together he laid the pieces end to end on a the work bench, then applied painters tape to the outside of the joints. This holds the joints together so that he can flip the collection over, apply glue, and then start hinging the sides into place. It’s almost like rolling up a box.

As with other ATX supply projects we’ve seen [Ian] designed this so that the PSU can be swapped out later if necessary. Instead of wiring his own cable harness he used an ATX breakout board. To get the interface layout he wanted he mounted the banana jacks separately and just ran jumper cables back to that board.

Self Balancing Robot Uses Cascading PID Algorithms

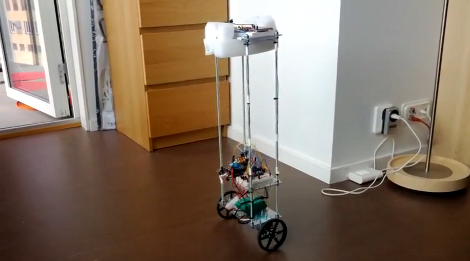
At this point we’re beginning to think that building a self-balancing robot is one of the rights of passage alongside blinking some LEDs and writing Hello World on an LCD screen. We’re not saying it’s easy to pull off a build like this one. But the project makes you learn a lot about a wide range of topics, and really pushes your skills to the next level. This latest offering comes from [Sebastian Nilsson]. He used three different microcontrollers to get the two-wheeler to stand on its own.

He used our favorite quick-fabrication materials of threaded rod and acrylic. The body is much taller than what we’re used to seeing and to help guard against the inevitable fall he used some foam packing material to protect the top level. Three different Arduino boards are working together. One monitors the speed and direction of each wheel. Another monitors the IMU board for position and motion feedback, and the final board combines data from the others and takes care of the balancing. Two PID algorithms provide predictive correction, first by analyzing the wheel motion, then feeding that data into the second which uses the IMU feedback. It balances very well, and can even be jostled without falling. See for yourself in the clip after the break.

Continue reading “Self Balancing Robot Uses Cascading PID Algorithms”