Robot Stroller Lets Baby Steer Without Mowing Down Other Toddlers

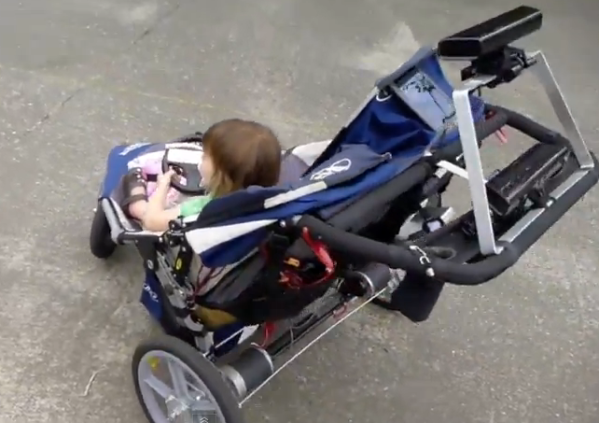
We’ve seen strollers and car seats that have a steering wheel for the baby to play with (like in the opening of The Simpsons). But what we hadn’t seen is a stroller that allows baby to actually steer. You might think that a putting a motorized vehicle in the hands of someone so young is an accident waiting to happen. But [Xandon Frogget] thought of that and used familiar hardware to add some safety features.

The stroller seen above is a tricycle setup, making it quite easy to add motors to the two rear wheels. These are controlled by a tablet which you can see nestled on the canopy of the stroller (look for the light reflected on the glass). This interfaces with two Kinect sensors, one pointing forward and the other pointing back. They continually scan the environment, looking for obstacles in the stroller’s path. You can see [Xandon’s] little girl holding a Wii Wheel, which connects with the tablet to facilitate steering. A test run at the playground is embedded after the break.

Continue reading “Robot Stroller Lets Baby Steer Without Mowing Down Other Toddlers”

Developing A Thermostat For A Heat Pump That Only Has A Timer

The heat pump which cools [Chris LeBlanc’s] home lacks the sort of control he was looking for. It’s just got a timer, which switches it off automatically. He wanted to the ability to schedule the cooling cycle like you would with a thermostat-driven arrangement. He ended up build his own controller to automate the cooling process.

The heat pump came with an IR remote control which provides the access point for the project. [Chris] set out to emulate the remote protocol which saved him the trouble of having to crack open the unit and wire in a controller. He went with the IR Toy from Dangerous Prototypes as this device is able to record and transmit IR signals — it’s basically a universal remote for your USB port. His Raspberry Pi, seen to the left, controls the system. It’s connected to the red IR Toy board via a USB hub which is used to interface a WiFi dongle as well. The system works alongside Google Calendar to allow [Chris] to schedule his home’s cooling just by adding an appointment. A Python script queries the calendar, then selects and sends the appropriate IR command. He shows off the build in the clip after the break.

Continue reading “Developing A Thermostat For A Heat Pump That Only Has A Timer”

Building A Thermal Imaging Sensor From Scratch

[youtube=http://www.youtube.com/watch?v=pIb1scnD67o&w=470]

[Rob] lives in a 100-year-old house, and with these antique lath and plaster walls and old window frames comes a terrible amount of drafts. The usual way to combat this energy inefficiency is with a thermal imaging camera, a device that overlays the temperature of an object with a video image. These cameras are hideously expensive so [Rob] did what any of us would do and built his own.

The build centers around a Melexis MLX90620 far infrared thermopile that can be had for about $80. Basically, this sensor is a very, very low resolution camera (16×4 pixels) that senses heat instead of light. By sticking this sensor on a breadboard with an Arduino Mini and WiFly network adapter, [Rob] is able to pull the data down from the IR sensor to his iPhone and overlay it on the feed from the camera.

The result, as seen in the video above, is a low-resolution but still very useful thermal imaging camera, perfect for looking for cold drafts in an old house or tracking down [Arnie] just like a Predator.

Tip ‘o the hat to [Ronald] for sending this one in.

Giving An Apartment Keyless Entry

The key for [rybitski]’s apartment is a copy of a copy of a copy, and the landlord lost the original key years ago. The lock itself still works, but opening it with [rybiski]’s key is a chore. He wanted to make it easier to get into his apartment, and with Arduinos and such he figured he could make a keyless entry device for his front door.

After figuring out how to open his deadbolt with an Arduino and a rather powerful servo, [rybiski] looked into wireless control options. He found a keyless entry remote, complete with receiver, that integrated perfectly to just about any microcontroller project.

After mounting the Arduino, receiver, and servo on a piece of plastic, he attached his contraption to the deadbolt. In the video after the break, you can see his key fob remote locking and unlocking the deadbolt, all without jamming an ill-fitting key into the lock.

Continue reading “Giving An Apartment Keyless Entry”

Turning The Hexbug Spider Into A Line-following Robot

[youtube=http://www.youtube.com/watch?v=quDHhuEsxEg&w=470]

You may be familiar with the Hexbug Spider, a small electronic robot toy sold at Target and Walmart for $20. While they’re able to be commanded to move forward, backward, and spin around on a dime, there aren’t any external sensors to make it really exciting. [Eric] sought to remedy this and came up with a line-following board replacement for the Hexbug Spider.

The stock Spider has a small circuit board that allows for the control of two motors with a remote. [Eric] removed this control board and replaced it with his own, powered by a TI MSP430 microcontroller. On this board, [Eric] included a pair of IR LEDs, able to detect the path of a white line drawn on the ground. With just a little bit of code, [Eric] made his $20 Hexbug Spider into a very cool looking robot.

[Eric] figured out how to improve his robot toy, but the power of the MSP430 microcontroller he used doesn’t limit him to only following lines. By using an MSP430 Launchpad, anyone can upload new code to the improved Spider, and even add new sensors to this creepy walking robotic toy.

$4 Volt Meter From A Dollar Store Pedometer

[Paulo]’s got a few solar panels on his shed, and while he does have a fairly nice setup with a battery charge controller, he found himself looking around for a panel voltmeter. Of course you can buy a panel voltmeter for under $20, but [Paulo] wanted something that fit his 4-4-4 plan; his voltmeter should cost under $4, draw less than 4mA, and last for 4 years. The jury is still out on the 4 year qualifier, but he did manage to meet his other goals by repurposing a dollar store pedometer as a voltmeter.

The pedometer in question is a very simple device. After inspecting the PCB, [Paulo] found it operates by looking at a trigger pin and incrementing the number on the display each time the circuit closed. [Paul] designed a very small PIC12F-powered circuit that reads the voltage of his batteries and triggers the pedometer’s LCD for every 10th of a volt. To display 12.6 Volts, [Paulo]’s code triggers the LCD 126 times, for example.

After wiring up the reset button so the display will go back down to zero for each new reading, [Paulo] encased his new volt meter in a plastic box. It’s not exactly a fast way of measuring voltage, but seeing as how that won’t change very fast, it’s the perfect solution for [Paulo]’s solar charger setup.

Steam-powered Pickup Winder

[Valve Child] has been building a few three-string cigar box guitars. Of course he’ll need a few pickups, but three-string guitar pickups aren’t exactly easy to come by. To solve this problem, he’s built a guitar pickup winder powered by a steam engine.

The pickup winder is powered by a Wilesco D20 model steam engine, connected to the actual winding mechanism via a rubber belt. To the right of the bobbin bracket is a mechanism built out of Meccano – Erector sets for us americans – that provides a mechanical counter for the number of wire turns and a wire traverse to keep each layer of wire somewhat even across the width of the bobbin.

Previously, we’ve seen [Valve Child]’s really sweet sounding lap steel build from a log using a hand-wound pickup and a preamp tube as the bridge. It’s questionable if the guitar signal came from this lap steel via the pickup or the microphonic tube, but now [Valve Child] has a really, really good method of improving his pickup production abilities.

Video after the break.

Continue reading “Steam-powered Pickup Winder”