Finally, Turning Plastic Pellets Into 3D Printer Filament

Here’s the situation: a kilogram of 3D printer filament costs about $50. A kilogram of plastic pellets costs less than a tenth of that. Does anyone have a solution to this problem?

For years now, the general consensus was making your own 3D printer filament at home was nigh impossible, dealing with temperatures, pressures, and tolerances that home-built machines simply can’t handle. [Bradley] sent in a filament extruder he made because he was disturbed at this current mindset that desktop filament factories have huge technical issues that have yet to be overcome.

[Bradley]’s extruder is based on the Lyman Filament Extruder, a machine that has successfully demonstrated taking plastic pellets, forming them into a filament, and having this filament used in the production of 3D printed parts. [Bradley]’s improvements include a variable-speed motor, a larger hot end, and an automatic timing system to produce set quantities of printer filament.

Of course, since Inventables threw $40,000 at the problem of creating filament at home there were bound to be more than a few successful designs making their way out into the public. When we last covered the developments of home filament manufacturing, the Filabot seemed to be in the lead. Now with [Bradley] (and  [Lyman])’s machines turning out usable filament, it’s only a matter of time before the 40 grand prize is snatched.

Halloween Light Show Gets An Upgrade

This is [Dave]’s second year of putting on a Halloween light show (cache), and his latest production has received some upgrades over last year’s Christmas show. He’s switched from Christmas style bulb lights to high brightness LEDs, and upgraded to 48 channels of control.

The controllers are from Light-O-Rama, and each provides 16 output channels. They communicate over RS-485; the same type of network used for controlling professional theater lights with the DMX512 protocol. The whole thing is powered by a 20 A DC supply from some Chinese retailer.

[Dave]’s show features light up pumpkins, tombstones, and faces mounted on his house. The lights are coordinated to a list of songs that he plays over an FM transmitter, allowing for cars to tune into the music that’s synced up with the lights.

If  you happen to be in Estacada, OR, you might want to head over to [Dave]’s and check out the show in person. Otherwise, there’s two videos of the light show after the break.

Continue reading “Halloween Light Show Gets An Upgrade”

Giving The Arduino Deques, Vectors And Streams With The Standard Template Library

The Arduino IDE is extremely similar to C++, but judging from the sketches you can find on the Internet, you’d never know it. Simpler Arduino projects can make do with just toggling IO pins, reading values, and sending serial data between two points. More complex builds fall into the category of real software development, and this is where the standard Arduino IDE falls miserably short.

[Andy] saw this lack of proper libraries for more complicated pieces of software as a terrible situation and decided to do something about it. He ported the SGI Standard Template Library to bring all those fun algorithms and data structures to any AVR chip, including the Arduino.

Going over what’s included in [Andy]’s port reads just like a syllabus for an object-oriented programming class. Stacks, queues, and lists make the cut, as do strings and vectors. Also included is just about everything in the   and headers along with a few Arduino-oriented additions like a hardware serial and liquid crystal streams.

With all these objects floating around, [Andy] says it will make an impact on Flash and SRAM usage in an AVR. Still, with all the hullabaloo over faster and larger ARM micros, it’s nice to see the classic 8-bit microcontroller becoming a bit more refined.

Hacked Kobo Becomes A Weather Display

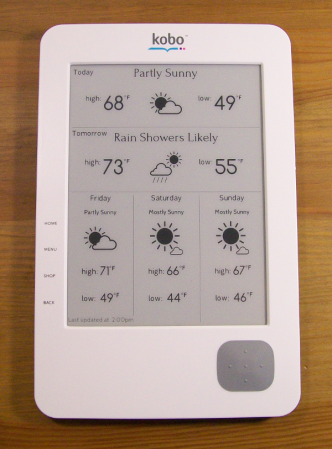
The Kobo e-reader has been hacked for a while now. It’s pretty easy to enable telnet access by modifying some files. Once [Kevin] was able to telnet into the device and draw to the display, he created the Kobo Wifi Weather Forecast. This hack was inspired by the Kindle weather display that we discussed in the past, but this version runs entirely on the Kobo.

The weather report software is written in Python using the pygame library. After loading the software package onto a Kobo, a few commands are run over telnet to set up Python and run the display. Since Python and pygame run on the Kobo, it allows for direct access to the e-ink display.

There’s a lot of possibilities for a internet connected e-ink device running custom graphics code. It’s asking to be turned into any kind of display you can imagine. What ideas do you have for a custom e-ink display? Let us know in the comments.

Debugging The Stellaris With OpenOCD

It looks as though Texas Instruments are really reaching out to the hacker community with their new ARM-powered Stellaris dev board. On the Stellarisiti forums, a member asked about the debugging options for the Stellaris board. The Stellaris already features an In-Circuit Debug Interface (ICDI), but unfortunately it’s a little hard to get working in Linux-ey environments.

One of the devs for the Open On-Chip Debugger was already talking with TI to get the ICDI spec released for the Stellaris board. TI released the info, and after quite a bit of work, everything is open for all to see.

Right now, OpenOCD support for the Stellaris is still incomplete, but there is an project up on the Gits that allows for multi-platform development for TI’s new board.

Needless to say, getting everything up and running is still a chore. That’s not really a concern, though; the Stellaris has only been around for a few months and it takes devs time to put all the required tools into nice, neat packages. We’re just glad TI is being so forthcoming with the relevant documentation, lest development becomes a million times harder.

4096 LEDs Means The Biggest LED Cube Ever

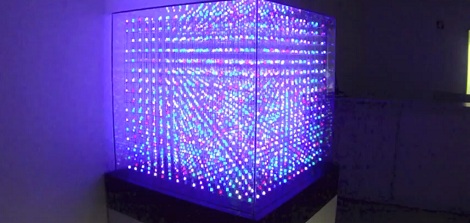
Adaptive Computing, a cloud management and high performance computing outfit in Utah, needed something really cool to bring to their trade shows. Something that makes order out of chaos, and demonstrates their attention to detail in the midst of miles of wiring. They decided building the largest non-commercial LED cube would be a good project, and thus the 16x16x16 All Spark Cube was born.

The All Spark Cube was constructed using 10 mm RGB LEDs wired together with three-foot lengths of 16 ga pre-tinned copper wire. In this video, [Kevin] shows off the process of constructing a single row; first the LEDs are placed in a jig, the leads are bent down, and a bus wire is soldered to 16 individual anodes per row.

The hardware for the build uses 16 Arduino Megas with a custom-made shield powering a 16×16 LED grid. The custom shields provide the 24V for the LEDs, 5V for the ‘duino, The Arduino boards communicate to each other through an RS485 connection, and the entire cube is connected to a computer through an RS232 serial connection.

The software is, admittedly, still a little janky. [Spencer] and [Thomas], the Adaptive Computing volunteers that are working on the control system, are still having a few problems getting logos and animations to display. They have managed to create a control app to draw individual pixels, as seen after the break.

Not bad for nearly a mile of wire and a summer’s worth of work, huh?

Continue reading “4096 LEDs Means The Biggest LED Cube Ever”

RPi Video With Pygame

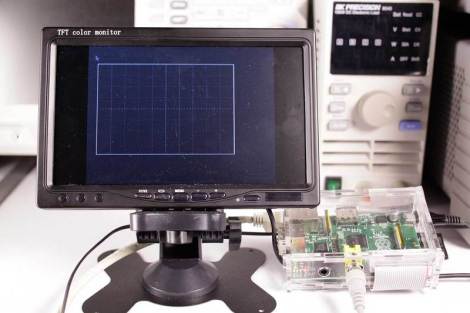
Adafruit has a new tutorial on creating video with an RPi and pygame. The goal is to create custom user interfaces on low cost hardware, powered by the easy to use pygame library. The tutorial walks through getting your RPi set up to run pygame, creating a basic pygame script that controls the framebuffer, and drawing an oscilloscope display on the screen.

This tutorial uses Adafruit’s WebIDE as a development environment. This is an excellent solution for working on video display, since you can develop the code on a networked computer and view the shell while running your graphical application. This is very useful for debugging, since you can just print information to your WebIDE console.

There’s a lot of potential for this setup. It would be ideal for creating any kiosk application. Maybe an announcement display, interactive kiosk, or even a programmable logic controller type user interface? What else could you build with a RPi attached to a LCD touchscreen?

Check out a video of Adafruit’s display in action after the break.

Continue reading “RPi Video With Pygame”