Hobby Electronics Team Up With Augmented Reality

augemented-reality-hobby-electronics

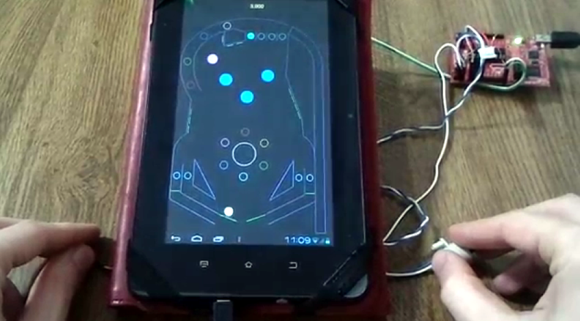
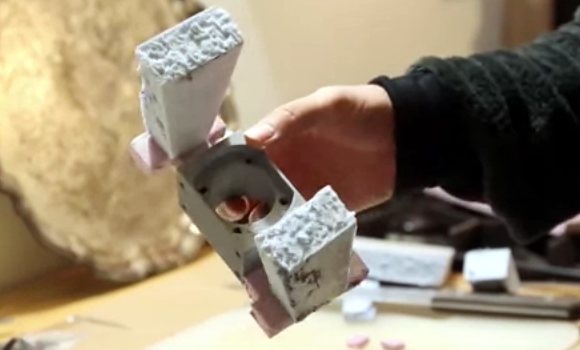
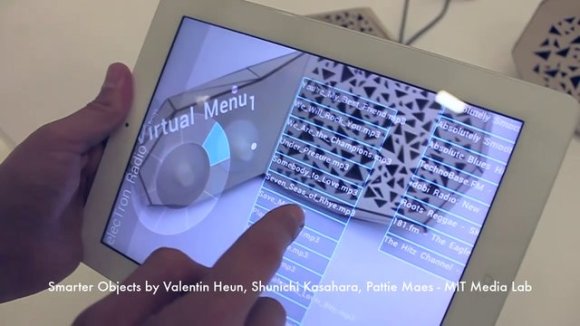
Here’s an interesting take on using augmented reality alongside hobby electronics. The project, which comes from a group of researchers at the MIT Media Laboratory, starts off by making simple electronic devices like a radio with two knobs using network connected hardware. In other words, build something using an Arduino and include a way to get it on a network. With the radio example on knob is for tuning, the other adjusts the volume. But pick up an iPad and aim its camera at the device — which is what the image above is showing — and those knobs will get a lot more functionality. This opens up a whole set of virtual controls that can be assigned to different segments of the knob controllers.

This is certainly a better use of augmented reality than using it in advertisements which is where it usually shows up. We also think that the proliferation of personal electronics that include high-quality camera modules makes wide adoption a lot more plausible than some of the projector-based augmented reality we’ve seen. Check out a full demo in the video after the break and if that leaves you hungry for details you can get your hands on the whitepaper (PDF).

Continue reading “Hobby Electronics Team Up With Augmented Reality”

External Pinball Controls For An Android Tablet

android-pinball-controls

This hack, which adds external flipper controls to Android pinball, is a great way to cut your teeth at Android hardware hacking.

[Ruben] decided to go with the TI Launchpad for this project. The MSP430 dev board offers serial communications via a USB connection, but it’s not quite as easy as just finding the right cable. His tablet does support USB On the Go (OTG), but the board identifies itself as an ACM device which needs to be handled differently. In order to get the tablet talking to the Launchpad he compiled a CDC_ACM module for the Linux underpinnings that make up every Android OS. In this case the module is tailored for the Allwinner A10 chip inside his model of tablet, but it shouldn’t be too hard to adapt his guide for other processors.

Of course you could go a different route and use Bluetooth for connectivity. We’ve seen several gaming peripherals that use this technique with Android devices.

Continue reading “External Pinball Controls For An Android Tablet”

Auto Dimmer Hacked Into Keyboard Backlight

keyboard-backlight-auto-adjustment

As the title says, [José Faria] added the ability to adjust his keyboard backlight based on ambient light levels. But that’s just one of the things he did during his hacking extravaganza with this Razer BlackWidow Ultimate.

When he first received the peripheral he didn’t like the blue LEDs used as backlights. So he removed all of them and put in white ones. He doesn’t talk too much about that but we’d image it was a ton of work. The new color was pleasing, but then the ability to adjust their brightness started to irritate him. There are four predefined levels and that’s all you get. Even the GUI which has a slider for adjustment couldn’t go outside of those levels.

His solution was to augment the controller with his own. He patched in an AVR chip to the transistor which controls the low side of the LED circuits. While at it he also noticed that the keyboard case was actually translucent. This let him hide a photosensor inside which automatically adjusts the light levels. But he did it in a way that still allows him to use the original functionality with the flip of a switch. See for yourself after the break.

Continue reading “Auto Dimmer Hacked Into Keyboard Backlight”

LEGO Jukebox Choses From Different CDs

lego-jukebox

Music used to be delivered on round plastic sheets called Compact Discs. [Ralph] still has some of them lying around which he used in his latest project. It’s a CD changer built out of LEGO pieces. It reminds us of the mid-century jukeboxes that changed out 45s on a record player.

You can’t tell from this image, but the entire disc changer build is shaped to sit atop a computer case. The system is built in two parts. There is a transport arm which moves left and right along the rack of CDs. It uses that black and white strip as an encoder to track its movement. It can reach in, grab a disc, and take it all the way down to the right where it drops it off in a staging area. The second part of the build now takes over, grabbing the disc from the staging holder and rotating it down into the CD tray of the PC. All of this is demonstrated after the jump.

If you’re like us you prefer digital delivery for your music. We haven’t crossed that watershed with video games yet and that’s why we still love this Xbox 360 disc changer hack.

Continue reading “LEGO Jukebox Choses From Different CDs”

Laser Cutter Helps Make Dual Sided PCBs

laser-cutter-dual-sided-pcb

[Rich Olson] wrote in to share his technique for making dual-sided printed circuit boards using a laser cutter. Unfortunately this still depends on etching copper clad boards with chemicals. But his process makes it really easy to produce well-defined and precisely aligned etch resist on both sides of the board all at once.

This can be really tough to do with the toner transfer method. The most common way would be to use a light box to align the two printouts of resist, taping them together before putting the copper clad in between and sending the whole thing though a laminator. [Rich] uses a scrap of acrylic to ensure alignment. He tapes it to the bed of his Epilog laser cutter and cuts the board outline out (that’s the void you see in the image). He removes the scrap and uses it as a stencil for cutting out the copper clad. After prepping the board he coats both sides and sends it through the laser cutter to burn away the paint where he wants to remove copper. Don’t miss his video embedded after the break.

The acrylic outline trick is similar to the laser cutter fence we heard about several weeks back.

Continue reading “Laser Cutter Helps Make Dual Sided PCBs”

Low Water Indicator For Coffee Maker Couldn’t Be Simpler

low-water-indicator-for-coffee-maker

The coffee maker which [Donald Papp] uses every morning has a water reservoir on the back that can last for several days. This means he forgets to check it and from time to time will return to find that nothing has brewed. He decided to add a low-water indicator to the machine. His approach is about as simple as it gets and we admire that accomplishment.

If it were our project we’d probably try to complicate it in one way or another. The use of a microcontroller and ultrasonic rangefinder (like this tank level indicator from a February links post) would be overkill. No, [Donald] boiled down the electronics to a homemade switch, a blinking LED, and a battery. The switch is a flexible piece of metal attached to a plastic cap using some monofilament. The cap goes in the reservoir and floats until the water gets too low, it then pulls on that metal, completing a circuit between the battery and the LED. That’s it, problem solved.

Now he just needs to plumb the coffee maker into a water line and he’ll really be set.

Update: Lost PLA Metal Casting — The Movie

lost-pla-metal-casting-movie

Turning 3D printed plastic parts into metal objects is not a new concept. But we don’t see a lot of it and enjoyed watching the documentary version of [3DTOPO’s] lost PLA metal casting process so much we figured you’d want to see it too.

The thirty-five minute video walks through every part of the process which we originally learned about in September of last year. The process was developed as a way to fabricate parts that will be used in high-stress applications. For instance, the part seen above is a mounting bracket for the ball screws that moves the Z axis on a huge CNC build he’s been working on. A plastic part will break under the strain so he needed to make it out of aluminum alloy.

To start, the piece is modeled and printed in plastic to check the fit. Once it’s just right he scales it to 103% and prints it again to account for the shrinking of the metal as it cools. The next step is pictured above, adding paths using rigid foam insulation that allow for the metal pour and for air to escape. This is packed into a plaster and sand mold which dries before being cooked in a furnace to vaporize the foam and PLA. This leaves a perfect mold for the metal pour.

After the break you can see a 5-minute overview version of the project.

Continue reading “Update: Lost PLA Metal Casting — The Movie”