Well That’s Finally Over With

HaD

When the owner of the site wanted to sell Hackaday you guys wanted a Kickstarter to crowdfund the purchase and keep it in the community. I obliged and started a crowdfunding campaign. All things must pass, and I got an email from the owner, [Jason]:

Looks like a nice showing but we won’t hit even 100k
I guess we tried…. I have two solid offers from really cool folks. Will keep you posted.

Yes, that’s right, we’re finally done with the crowdfunding campaign. The end time for the campaign is now set for Monday at noon – you can’t actually delete Indiegogo campaigns – and I’m very, very doubtful it will be funded by then.

I have two words for those who supported Hackaday and this crowdfunding campaign: thank you. It’s astonishing we raised what we did without the infrastructure, licensed business, and non-profit status that would make Hackaday really cool. You guys believe in the future of Hackaday, and I’m very thankful for that.

As for the people who vomited vitriol against me in the comments of the crowdfunding announcement, I also have two words for you.

Even though the dream of a Hackaday owned by the community is dead now, I’m extremely confident we’ll find a better home for Hackaday that will allow us to keep moving forward and allow us to do some really cool things we’ve been thinking about for a while. I’ve spoken with a few of the possible future owners, and let me assure you they’re cool people. No, we won’t be doing grants for builds, but I assure you Hackaday will come out of this better than how it went in.

TL;DR: We didn’t quite get to the best of all possible universes, but things are going to be better than how they were before. Everything’s cool, don’t freak out. We’ll tell you stuff when we know more.

Arduino Cellphone

OLYMPUS DIGITAL CAMERA

The fact that you can build a cellphone around an Arduino is pretty neat. But we’re drawn to this project more as a testament to the advancement of hobby electronics. An [Average Joe] can build this thing with a minimum or background knowledge and without breaking the bank. Wow.

Of course this isn’t the first DIY cellphone we’ve come across. One of our favorites is this one which resides on a home etched PCB. There was even another Arduino offering with similar components back in September. But the one seen above really pulls it all together into a package that is usable for everyday life. The components include and Arduino Uno, GPRS shield from Seeed Studios, a TFT touch screen, Lithium battery and charging circuit, and a few other bobbles. All of it is mounted inside of a 3D printed case.

A simple phone calls for a simple UI and that’s included as well. The main menu has two buttons, one for placing a call, the other for sending a text. From there you get the virtual keypad seen above for typing out the phone number or composing a message.

[Thanks Victorzie]

Reverse Engineer A PSU To Change Its Output Voltage

reverse-engineering-psu

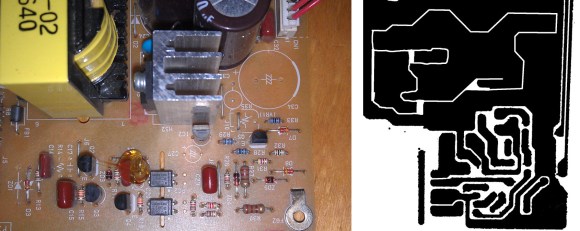
[Semicolo] has a bunch of old PSUs on hand which he pulled out of some Lexmark dot matrix printers. In their stock form they put out 40V, which is close to the 35V max he needs to run the stepper motors on a 3D printer he’s been building. So he reverse engineered the PSU to change its output.

On the left you can see the top of the PCB. [Semicolo] flipped it over and snapped a picture of the traces on the bottom of the board. With a bit of work in The Gimp (FOSS image editing software) he was able to convert the traces to black and white. Overlaying the picture of the top with a 50% transparency of the traces made it rather easy see the connections and generate a schematic for the hardware. That’s a really cool trick!

Figuring out how it’s supposed to work is a big step in achieving his goal. The next step was to see if he could bend the circuit to his will. He had previously run across ATX PSU hacks which changed the reference voltage in order to alter the output. He grabbed a datasheet for the HA17431 variable shunt regulator. It lays out how to tune the output based on values of a few external components. He dropped in one resistor and the output measured 31V, well within his target range.

LED Module Used To Display Load, Traffic, And Status Data For Your PC

cpu-monitoring-block

You’re going to like [Ivan’s] write-up for this LED computer status monitor. Of course he didn’t just show-and-tell the final product — if he had you’d be reading this in a Links post. But he also didn’t just detail how he put the thing together. Nope, he shared pictures and details of every iteration that got him here.

It started off with a tachometer. Yeah, that analog display you put on the dashboard of your car which reads out RPM. He wanted to make it into a USB device which would read out his CPU load. But that’s an awful lot of work when it can only display one thing at a time. So he decided to add an 8×8 LED module which would display the load for each individual core of his CPU. It looks great next to the illuminated tachometer. From there he added resolution by transitioning to an RGB module, which ended up sucking him into a coding project to extend the data pushed to his embedded hardware. In the end his ReCoMonB (Real Computer Monitoring Block) displays CPU load, RAM usage, several aspects of HDD activity, as well as the network up and down traffic.

We think he’s probably squeezed all that he can from this little display. Time to upgrade to a TFT LCD.

Continue reading “LED Module Used To Display Load, Traffic, And Status Data For Your PC”

Water Cooled Raspberry Pi

If your Raspberry Pi is running a bit hot you can add a few hunks of salvaged heat sink, or you can go all out and machine your own water cooling system.

Remember when everyone had a giant desktop computer which was a perfect receptacle for cool lighting effects and somewhat ridiculous cooling systems? Relive that experience with [Phame’s] multi-page forum post that serves as the build log. With the exception of the tiny pump itself, this one’s a fully custom job.

The image on the left shows the machined parts being tried on for side. There is a slug which contacts the ICs on the RPi board, conducting the heat to the chambers inside through which the liquid will flow. The upright rectangular enclosure serves as the reservoir which dissipates the collected heat as the water flows through it. The image on the right shows the finished project. It uses the power pins on the GPIO header to drive the pump.

[Thanks PL via Bit-Tech]

Energy Harvesting To Build A Carbon Monoxide Detector With No Battery

no-battery-carbon-monoxide-detector

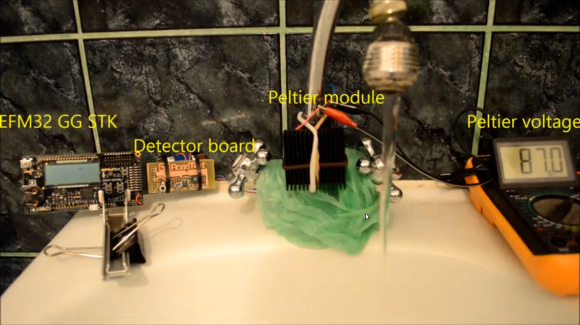
There are a few devices that work tirelessly to protect our lives. We’re talking about smoke detectors and carbon monoxide detectors. Increasingly these either need to be hardwired into the home, or have a sealed battery which is good for ten years (in the case of smoke detectors). [Gelmi] recently had to change the battery in his Carbon Monoxide detector — which happens very rarely — and he it got him to thinking. If the batteries need to be changed so rarely, how hard would it be to harvest energy to power the device?

Our first thought was that he’d use inductance like those spy birds which perch on power lines. But instead he went for the heat lost from using the hot water spigot. Above you can see his test rig which attached a Peltier device to the faucet in his bathroom. Whenever you turn on the hot water the faucet also heats up. The differential between faucet temperature and ambient room temperature generates a small amount of power. This is a suitable source, but only if he could also cut the amount of power needed by the detector. This adventure takes him down the rabbit hole, learning about how the sensors work and designing for reliability at the lowest consumption level possible.

The faucet application might seem peculiar. But if you use a natural gas water heater you want a carbon monoxide detector near it. Attach the Peltier to the outflow and every time any hot water tap in the house is opened your system will get a bit of a recharge.

Continue reading “Energy Harvesting To Build A Carbon Monoxide Detector With No Battery”