Hackaday Links: Sunday, August 4th, 2013

hackaday-links-chain

[Craig Turner] shows that simplicity can be surprisingly interesting. He connected up different colors of blinking LEDs in a grid. There’s no controller, but the startup voltage differences between colors make for some neat patterns with zero effort.

Remember the 3D printed gun? How about a 3D printed rifle! [Thanks Anonymous via Reason]

While we’re on the topic of 3D printing, here’s a design to straighten out your filament.

It takes four really big propellers to get an ostrich off the ground. This quadcopter’s a bit too feathery for us, but we still couldn’t stop laughing.

This Kinect sign language translator looks pretty amazing. It puts the Kinect on a motorized gimbal so that it can better follow the signer. We just had a bit of trouble with translation since the sound and text are both in Hebrew. This probably should have been a standalone feature otherwise.

Work smarter, not harder with this internal combustion wheelbarrow. [via Adafruit]

LED Strip Cape Drives Kilometers Worth Of LEDs

led-strip-cape

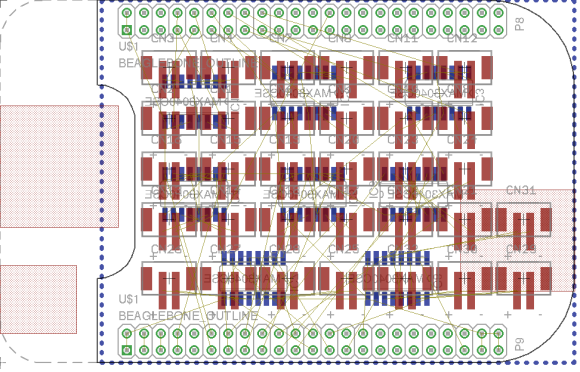
[Hudson] is looking to drive a lot of LEDs. A driver that effectively addresses kilometers worth of LED strips isn’t an easy thing to come by. So he’s in the process of designing his own BeagleBone Cape to do the work. Above you can see the board layout he’s working with. Notice the set of repeating red footprints in the center? Those are pads for 32 RS485 connectors!

Of course this is all in preparation for Burning Man where the mantra seems to be: he who has the most LEDs wins. Well, unless you’re the sort that likes to work with flames. But we digress. The scaling problem that [Hudson] is dealing with hinges around his desire not to include ridiculous numbers microcontrollers and the need to beef up the 3.3V logic levels of the BeagleBone to travel further on the data bus of the strips. By leveraging the RS485 protocol — which is designed to carry data over long distances — he can get away with a single processing unit by adding an RS485 translator at each remote strip connector. He plans to use the BeagleBone’s Programmable Realtime Units feature to address the eight drivers on the cape. But first he has to solve what looks like a doozy of a trace routing problem

Measuring Tiny Current With High Resolution

measuring-microamps-at-3MHz

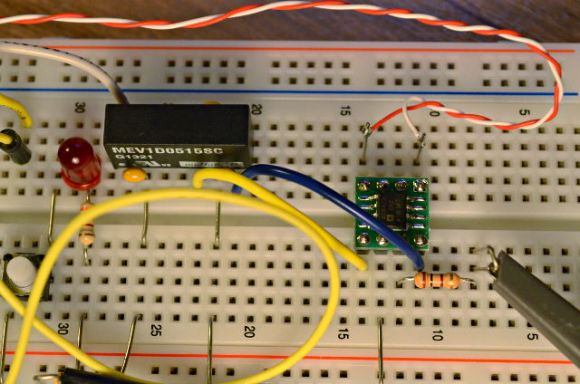
[Paul] knew that he could get an oscilloscope that would measure the microamp signals with the kind of resolution he was after, but it would cost him a bundle. But he has some idea of how that high-end equipment does things, and so he just built this circuit to feed precision data to his own bench equipment.

He’s trying to visualize what’s going on with the current draw of a microcontroller at various points in its operation. He figures 5 mA at 2.5 mV is in the ballpark of what he’s probing. Measurements this small have problems with noise. The solution is the chip on the green breakout board. It’s not exactly priced to move, costing about $20 in single quantity. But when paired with a quality power supply it gets the job done. The AD8428 is an ultra-low-noise amplifier which has way more than the accuracy he needs and outputs a bandwidth of 3.5 MHz. Now the cost seems worth it.

The oscilloscope screenshot in [Paul’s] post is really impressive. Using two 1 Ohm resistors in parallel on the microcontroller’s power line he’s able to monitor the chip in slow startup mode. It begins at 120 microamps and the graph captures the point at which the oscillator starts running and when the system clock is connected to it.

Drilling PCBs With Cameras And Math

PCB

After making your first PCB, you’re immediately faced with your next challenge – drilling the holes. It’s a doable task with a small drill press, but a lot of makers already have a small CNC mill or router, but how to make that work the first time? [Alessio] has you covered with a technique that uses a CNC-mounted webcam and some linear algebra for perfect through-holes the first time and every time.

A few months ago we saw [Alessio]’s work with transform matrices and PCB drills. The reasoning behind this technique is if a PCB isn’t exactly aligned to a CNC mill’s axes, or if the scaling for a toner transfer board is a bit off, automating the drilling process will only end in pain, with holes going through traces and a whole host of other nasty things. The application of linear algebra gets around this problem – taking a measurement off of two or three known locations, it’s easy to program a CNC machine to drill exactly where it’s supposed to.

[Alessio]’s new project takes the same mathematical techniques and applies them to a very sleek application that uses a drill-mounted webcam. After taping his homebrew PCB down to the mill, [Alessio] simply marks off a few known points, imports the drill file, and lets a computer calculate where to drill the holes. The results are remarkable – with a soldermask and silkscreen equipment, these handmade boards can be just as good as professionally manufactured boards,

There are Windows and OS X binaries for [Alessio]’s tool available on his page, with a video demo available below.

Continue reading “Drilling PCBs With Cameras And Math”

DIY Prescription Swimming Goggles

diy-prescription-swimming-googles

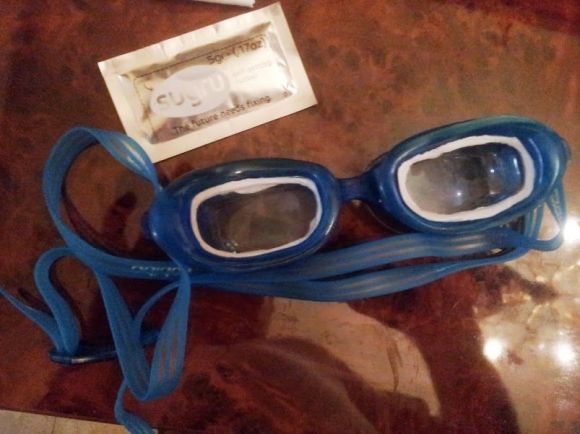
We can’t see much without our glasses (which is why our habit of shaving in the shower often ends badly). Our glasses cost a bundle, but we wear them every waking moment so it’s worth it. But only recently did we break down and spring for prescription sunglasses. However, when it comes to sports we don’t pony up the dough for dedicated specs. Here’s a hack that will change that. If you’ve still got your last set of glasses on hand hack up the lenses for swimming goggles or other applications.

In this case [Dashlb’s] lenses were already small enough to fit in the goggles. He simply added a bead of Sugru around the edges to hold the lenses in place. But if you do need to cut them to size aligning the lenses with your eyes is important, so we suggest the following: have a buddy stand in front of you and mark the center of your pupil on the glasses, as well as the goggles. If you need to cut down the lenses (which are probably a type of polycarbonate) just make sure the marks match up before doing any cutting.

We might give this a try with some wrap-around sunglasses to make an inexpensive pair of prescription cycling shades.