Making A 9GHz Doppler Radar

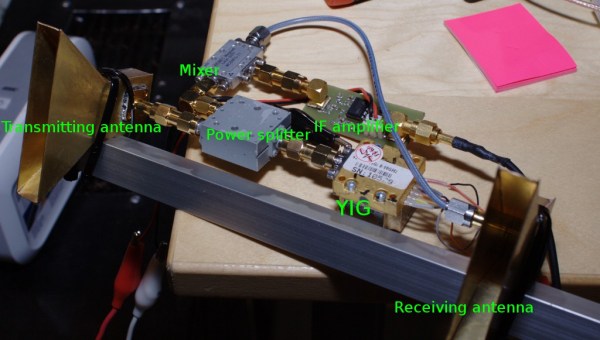
[Kalle] is currently building an FMCW radar, but as he doesn’t have all the parts finished he decided to build a 9GHZ doppler radar in the mean time. The H-plane horn antennas were made from brass sheet and soldered together. [Kalle] checked the matching between the emitter and the antenna by inserting a directional coupler between the two and measuring the intensity of the reflected signal (approximated return loss). At 9Ghz, the Doppler shift for a 1 meter per second speed is about 30Hz so he connected the radar’s output signal to his soundcard.

A quick explanation of the Doppler effect that a radar uses: if you send an RF signal at a given frequency to a moving target, the reflected signal’s frequency will be shifted. It is commonly heard when a vehicle sounding a siren or horn approaches, passes, and recedes from an observer. The received frequency is higher (compared to the emitted frequency) during the approach, it is identical at the instant of passing by, and it is lower during the recession. Hackaday featured plenty of projects using this effect: a small doppler motion sensor, gesture control using doppler shift, hacking an old radar gun

Step Into The Box

thebox

Take three industrial robots, two 4’ x 8’ canvases, and several powerful video projectors. Depending on who is doing the robot programming you may end up with a lot of broken glass and splinters, or you may end up with The Box.  The latest video released by the creators project, The Box features industrial robots and projection mapping. We recently featured Disarm from the same channel.

The Box is one of those cases of taking multiple existing technologies and putting them together with breathtaking results. We can’t help but think of the possibilities of systems such as CastAR while watching the video. The robots move two large canvases while projectors display a series of 3D images on them. A third robot moves the camera.

In the behind the scenes video, the creators revealed that the robots are programmed using a Maya plugin. The plugin allowed them to synchronize the robot’s movements along with the animation. The entire video is a complex choreographed dance – even the position of the actor was pre-programmed into Maya.

Continue reading “Step Into The Box”

VU Meter Prom Dress

vu meter prom dress

[Kyle] has just put the finishing touches on this VU Meter Prom dress, and it looks great!

The dress makes use of 70 feet of aquamarine EL wire, a 2600mAh li-on battery, a repurposed DB9 cable, an Arduino knock off, an Adafruit microphone pre-amp, and features eight addressable triac channels through an EL Escudo Dos by Sparkfun. Each loop of EL wire was sewn into the dress using clear thread. The separate segments were then daisy chained together near the zipper in the back using ribbon cables. To top it all off, [Kyle] has a cheap thermoforming setup utilizing a toaster oven which he used to make an acrylic case for the electronics.

The dress is for his lucky friend [Diane] and we think it will make for quite a memorable prom! To see this awesome VU Meter in action, stick around after the break for the video.

Continue reading “VU Meter Prom Dress”

Raspberry Pi Media Center On An Apple TV

You may tend to think of the AppleTV as a sort of walled garden, and you would mostly be right. Apple keeps tight control over what runs on their devices. That said, [David] decided to look closer at how the various ‘applications’ work. It turns out, the applications are nothing more than glorified web plugins. Using XML and Javascript, the apps simply define library function calls, giving them a consistent interface. So using fairly simply methods, the options really open up. Unfortunately, the method for adding new sites isn’t enabled by default.

Using a jailbroken AppleTV, [David] was able to do a fair bit of detective work and found a way to enable the ‘Add Site’ option, which allowed him to use his Raspberry Pi as a media server. The good news: you don’t need to jailbreak if you’re running 5.2 or 5.3… you should be able to recreate his success fairly easily. The bad news: things seem to have changed in 6.0. [David] isn’t sure if this was Apple intentionally closing a hole, or just not dotting all of their i’s.

[David] put all of his research up on Github, including the rough code. If you haven’t updated your AppleTV yet, and you have a Raspberry Pi to use as a media server, give it a try and let us know how it goes in the comments.

Fail Of The Week: EPROM Reading And Erasing

It may be a failure but it sure does look cool. [Scott Lawrence] had a fair number of EPROM chips on hand and decided to get rid of the traditional eraser and programmer in order to play around with the concepts using his own hardware. He was met with disappointment at several steps in the process. No worries though, each of these upsets sent him back to the drawing board and he learned way more than he ever would have if it had actually worked. It’s fair to say this failure was highly successful.

Continue reading “Fail Of The Week: EPROM Reading And Erasing”

The Intel-powered Arduino

Dev boards based on microcontrollers and ARM System on Chips are everywhere, but finding a small pocketable computer based on an Intel processor has been difficult to find. [Massimo] of Arduino just unveiled a new Intel architecture Arduino-compatible board at the Rome Maker Faire. It’s called the Galileo, and it has everything you’d expect from a juiced-up Arduino running x86.

The main chip is an Intel Quark SoC running at 400MHz with 256 MB of DRAM. On board is a Mini-PCIe slot, 100Mb Ethernet port, Micro SD slot, RS-232, and USB host and client ports. Here’s the datasheet for the Galileo with all the applicable information.

The Galileo can be programmed with the standard Arduino IDE, but from the getting started guide, it looks like this board is running Yocto, a stripped down Linux for embedded environments.

Realistically, what we have here is a board with about the same processing power as a Raspberry Pi, but with Arduino compatibility, and a Mini PCIe port for some really fun stuff. It will be interesting to see what can be made with this board, but if you have any ideas on what to do with a Galileo before it’s released in two months, drop a note in the comments.

Making A Bathymetric Book By Hand And Searching For An Easier Way

We first saw this Bathymetric Book at our local hackerspace, Sector67, quite some time ago. [Caroline Rose] gave a seven minute presentation on the project as part of the monthly meeting which is open to the public. You can get a pretty good feel for the book that includes a to-scale depth representation of Crater Lake in the introductory post which she recently published. Each page makes up one topographical ring of the lake. Put them all together and you’ve got a really amazing way to explore the watery depths of the deepest lake in the United States.

The book you see above is hand made. She downloaded the depth data from the US Geological Survey, then put it through some processing in order to print one elevation level on each page. That’s when the work really began. She cut out every page by hand! The four-plus hour task was grueling. And just for a bit of added punishment she even made a second book. But at Tuesday night’s follow-up presentation she said never again.

[Caroline] developed a much faster and still accurate technique for producing the bound-book depth maps. She is using a laser cutter and a different binding technique. By using folded packets of paper, rather than individual pages, she is able to cut out three double-sheets at once — including holes for the binding thread and the outline of the finished pages themselves. This cuts the process down to about four minutes of laser cutter time.

For now you’ll have to settle for a time-lapse video of the hand-cutting process (embedded below). But we hope to post an update when she makes more information about the laser-cut version available.

Continue reading “Making A Bathymetric Book By Hand And Searching For An Easier Way”