Laptop Trackpads And MIDI Controllers

pads

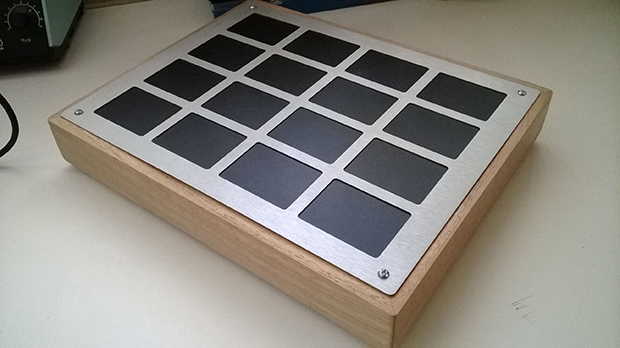
A bunch of pads connected to a MIDI out port is as old an idea as the Akai MPC. creating a homebrew version is great, but [Scott] took his version one step further. He used old laptop trackpads to control note on and note off commands when the each pad is tapped, and also added MIDI CC values for the touch pressure and the x and y-axis position.

The trackpads were identical models, each having their own PS/2 output. A few ribbon cable to 8-pin header adapters were manufactured, and the entire ensemble encased in a wonderful maple and aluminum enclosure.

The electronics are based on an Arduino Mega with 16 clock and data points for each touchpad eating up 32 of the 54 available pins on the ‘duino. The PS/2 protocol is well documented, but running 16 separate PS/2 id most certainly not. [Scott] ended up writing his own asynchronous PS/2 communications library to get the latency of his midi device down to about 50ms.

It’s an amazing bit of kit and comparatively inexpensive, given that [Scott] now has a 16-channel Kaoss pad. Video of the device hooked up to a MicroKorg below.

Continue reading “Laptop Trackpads And MIDI Controllers”

Class Up Your Haunted House With A Disney Mansion Prop

raspiDisneyPortrait

Die-hard Disney fan [Brandon Etto] must have one of the coolest houses in the block around this time of year, especially now that he’s built his own Master Gracey changing portrait. If you’re unfamiliar with the Disney Haunted Mansion attraction, there are a few different versions at theme parks around the world; the Orlando one features a portrait above the fireplace that miraculously ages into skeletal form.

[Brandon’s] recreation uses a Raspi loaded with a Video Looper SD image that cycles through a clip of the aging man image. He fabricated a box to hold a 19″ LCD monitor and mounted an inexpensive IKEA frame to the front. The magic is hidden with window film applied to turn the frame’s glass into a two-way mirror: a technique [Brandon] borrowed from this Halloween Instructable.

For a step-by-step tutorial, you’ll want to head over to [Brandon’s] writeup on MAKE, but stick around for a quick video demonstration after the break and check out another Haunted Mansion hack: the Singing Heads.

Continue reading “Class Up Your Haunted House With A Disney Mansion Prop”

A Jeep-Mounted FLIR Camera

jeep

[Eddie Zarick] is at it again, modding his Jeep Wrangler into something that makes us all properly jealous. This time, he managed to acquire and mount the FLIR camera from an old Cadillac. It truly is an FLIR thermal imaging camera, and not just a near-infrared hack. Cadillac used this technology with a HUD, but [Eddie] decided to connect it to his in-dash screen. He also didn’t settle for simply facing it forward, but mounted it to a Golight searchlight base. He mounted the joysticks under the screen, giving him directional control.

[Eddie] spent about $500 on the project, which seems like a lot, but not when you consider the cost of a new FLIR camera. We would love to know where he found such a great deal! Maybe he hit up a local salvage yard? If you know of a good source for parts like this, let us know in the comments!

Previously we covered [Eddie’s] pressurized water tap, weatherproof keypad entry, and other assorted hacks. We look forward to seeing what he adds to his Jeep next.

Continue reading “A Jeep-Mounted FLIR Camera”

An Impressively Large LED Matrix

One of the more impressive projects a home-bound tinkerer can pull off is some sort of display. Not only does the final project result in a lot of blinky, glowey things, but driving hundreds of LEDs is an achievement in itself. [Fabien] decided he wanted to build his own LED display and ended up with something great (French, Google translation).

Instead of going off the deep end and making his own boards for this giant LED display, [Fabien] found a very cheap 16×32 LED display board on DealExtreme. Once these kits were pieced together, [Fabian] mounted them in a wooden frame and started connecting the displays together.

The original plan was to drive these with an Arduino, but with so many pixels he quickly ran out of RAM. Replacing the Arduino with a larger ATMega1284p, [Fabian] found the RAM he needed and started work on some interesting visualizations.

Of course, Conway’s Game of Life made a showing in the final build, but [Fabian] also managed to whip up a spectrograph using FFT. It’s a very nicely put together display that makes us want to buy a few of these displays ourselves.

Hackerspacing In Europe: RevSpace In Den Haag

IMG_1075 (Custom)

Welcome to RevSpace!

This was the Netherland’s largest hackerspace — Until Hack42 acquired a military base in Arnhem… More on that later though. RevSpace is a 24/7 hackerspace located in the basement of a large industrial building turned workshop/studio. They have lots of space, but could even use more as they continue to grow! The photo above is from the Tuesday night BBQ – a weekly event that has happened every Tuesday for almost 2 years straight! It’s the social night and it draws many people out to share in good food, good company, and good times.

Special thanks to [Mark] for picking us up from the train station! He’s the fellow in the bottom right of the photo, and also happens to be one of the board members of RevSpace!

Continue reading “Hackerspacing In Europe: RevSpace In Den Haag”

Trinket Contest Update #2

trinket-contest-update-2

Whoa nelly, the Trinket entries are really starting to rolling in fast now! The last update featured only five, but below you’ll find an even dozen, and there are more coming in as we write!

The contest asks you slap the Hackaday logo onto something for a chance at winning one of 20 Trinket dev boards donated by Adafruit for this contest.

Continue reading “Trinket Contest Update #2”

A Twitter Connected Mechanical Calculator

The TwitALU

Two students at the University of Bristol wanted to create a computer to demonstrate how ALUs work. The result is the TwitALU, a Twitter connected mechanical calculator.

The device uses a custom 7400 series ALU based on the famous MOS 6502 processor. Instead of doing the calculations on a silicon die, the ALU drives mechanical relays. This produces a nice clicky-clacky sound as the calculation is computed.

To start a calculation, you tweet @twittithmetic with your input. A Raspberry Pi is used to load the instructions into the ALU. Once the computation is done, it’s tweeted back to you and displayed on the Nixie tube display. It’s not efficient, or fast, but it does the job of demonstrating the inner workings of the device while doing simple math.

The device’s schematics are all available on the website, and are helpful for understanding how a simple ALU works. After the break, check out a quick clip of the TwitALU in action.

Continue reading “A Twitter Connected Mechanical Calculator”