Game Of Light

gameoflight

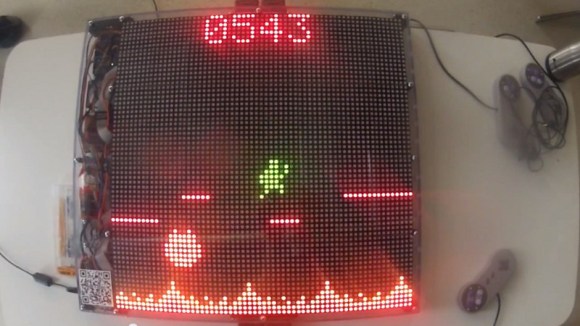
Hyperrealistic graphics may be the standard for gaming, but Game of Light (Warning: Loud video volume) is a welcomed detour into vivid, low-res delight. Built for a course at the University of Oslo by [Abdimaalik], [Martin], [Andre], [Eivind], and [Stian], Game of Light has a handful game options, some of which allow up to four players. The build uses eight DE-DP14211 LED dot matrix boards, each with 32×16 bi-color LEDs and a built-in HT1632C display controller to handle the multiplexing. They are mounted together to form the 64×64 resolution display.

The box was custom-made out of what we suspect is acrylic, and uses some 3D printed pieces to offset the top from the bottom and to hold components in place. SNES controllers send data to the Arduino, which also runs the games and feeds the display controllers. Buried in the mix are two fans to keep the components cool. Everything is open source, so race to Github for source code and the games.

For another LED matrix project with a lot of gaming potential, check out [Brad’s] PS2 mouse interface that lets him interactively draw in real-time.

Continue reading “Game Of Light”

123D Circuits: Autodesk’s Free Design Tool

Arduino fanatics rejoice: Autodesk and Circuits.io have jointly released a new electronics design tool with some unique features: 123D Circuits. Anyone familiar with Autodesk knows they have a bit of a habit of taking over the world, but you can relax knowing this is a (pretty much) free product that’s filed under their Free 3D tools—though we’re not quite sure what is “3D” about a circuits layout program.

123D is web-based software, and using it requires account creation on the circuits.io website. Anything you design sits on the cloud: you can collaborate with others and even embed your circuit (with functioning simulation) straight into a webpage. Unfortunately, your work is public and therefore accessible by anyone unless you fork over $12 or $25 monthly: the former only gives you 5 private circuits. Dollar signs pop up again when you hit “finish circuit;” they offer to sell you PCBs in multiples of three.

Some features of the free account, however, may tempt the Arduino veteran away from a go-to program like Fritzing. Plopping in a virtual Arduino lets you edit its code on the fly in another window, which you can then simulate. If you’re new to circuit design or want some guidance for using 123D Circuits, they have provided an extensive list of applicable Instructables. Check out their promotional video below.

Continue reading “123D Circuits: Autodesk’s Free Design Tool”

Completely Analog Electronic Music Box

For the Ottawa Mini-Maker Faire this year, [Steven Dufresne] created an electronic take on the classic mechanical music box.

A typical music box uses a sequence of bumps on a rotating drum to pluck the tuned teeth (called lamellae) of a metal comb. Steven ditched the drum and comb and replaced them with a strip of paper and a single 555 timer.  The timer is configured as an astable oscillator with a fixed capacitor and charging resistor.  The discharge resistor is selected via a series of 13 shaped wires that drag along the strip of paper.  When a wire drags over a hole, it is connected to a copper pad below that is soldered to a specific resistor.  This completes the circuit and generates a tone specific to the resistor selected.

While the electrical aspects of the project are fairly simple (not even requiring a circuit board), the mechanical parts are much more sophisticated.  Steven had problems getting the dragging wires to make good contact and keeping the paper roll pulled tight.  He outlines all of these challenges and how he solved them in his very thorough video summary (embedded after the break).  With all of his incremental improvements to the design, the finished music box stood up to a whole 14 hours of abuse at the Faire.

Continue reading “Completely Analog Electronic Music Box”

Rubicon Gives The Makerbot Digitizer A Run For Its Money

rubicon

Look out MakerBot, there’s a new 3D scanner on the block and it’s about 10% of the cost of the Digitizer. Enter the Rubicon 3D Scanner which just hit Indiegogo, a device much closer to being worth its price $199.

Just like the pricey Makerbot Digitizer it’s a very simple design made up of a webcam, two laser lines, and a stepper motor controlled turn table. Still very easy to make yourself, but at $199, it’s not a bad price for an all-in-one kit, especially compared to the Digitizer. The newcomer claims a much faster scan time (3 minutes versus 12), and the same stepper rotation (800 steps or 0.45 degrees per step). There are no details about making the design open source, but after some digging in the RepRap forums we found some discussion on that topic from designer [Robert].

It scans objects up to 160mm in diameter and 250mm tall, however it has the ability to scan marginally larger objects if the camera is moved farther back. The funding for the Indiegogo campaign will go towards a custom arduino-esq PCB with a motor driver built in – personally we would be interested in just getting the PCB and 3D printing the rest of the scanner ourselves!

More information is found in the video after the break. Continue reading “Rubicon Gives The Makerbot Digitizer A Run For Its Money”

PCB Agitator From A Broken CD-ROM Drive

pcb-agitator

Etching PCBs goes a lot better if you agitate the solution in order to carry away the dissolved copper and get fresh etchant to the area. With that in mind [Rohit Gupta] designed a mechanism in Sketch Up before realizing he was going about it the hard way. He ended up basing his agitator on a broken CD-ROM drive instead of starting from scratch.

He uses the CD sled from the drive, ditching the lens and its support structure. To get direct access to the motor that drives the tray he uses an L293D H-bridge chip. This is controlled by an MSP430G2231 microcontroller. The driver board seen in the upper right includes a voltage regulator, three status LEDs, and one user input switch. Once triggered, the sled will move back and forth, contacting an old mouse microswitch which acts as the limiting switch. We find it entertaining that [Rohit] prototyped the circuit on a breadboard, then used that success to etch the final circuit board (shown in the video below).

If you’ve been following the hacker creed and never getting rid of any junk you’ll have no problem finding a donor drive to make one of your own. But just in case you can’t get a hold of this hardware a similar agitator can be built using a hobby servo.

Continue reading “PCB Agitator From A Broken CD-ROM Drive”

Retrotechtacular: The Apollo Guidance Computer

There is so much amazing technology that came out of the space race. For this week’s Retrotechtacular we’re looking at the guidance computer used in the Apollo program undertaken by NASA in the 1960’s.

One of the main components of this system is the Inertial Measurement Unit or IMU. That’s a familiar term for hackers who build quadcopters or other devices for which spacial awareness is paramount. In this case the IMU provided critical information about the motion and orientation of the capsule during it’s trip from the Earth to the Moon and back. But it wasn’t just high tech electronics along for the flight. To determine actual position a sextant was used for triangulating position. Yes, this is the same type of measuring device used for centuries. The method of using the sextant is displayed above. The spacecraft was turned until the sextant pointed at a landmark on Earth. The instrument was the adjusted to line up a star as a landmark, then the computer calculated position based on time and the angles of the two points being sighted. There’s a lot more shown in this thirty-minute film including in-depth assembly and testing of the computer components.

Before we point you to a few related articles we’d like to mention that our stash of really cool Retrotechtacular tips is running low. So if you know of some old footage that’s awesome to watch please send us a tip about it.

Now if you can’t get enough about NASA electronics you should check out the LVDC board which [Fran] got her hands on. Also, it’s worth checking out the unbelievable soldering techniques specified in the NASA manual. There’s a pretty good discussion about that going on in the Reddit thread.

Continue reading “Retrotechtacular: The Apollo Guidance Computer”