Printer bed leveling with a solenoid probe

Bed Leveling With A Solenoid Actuator

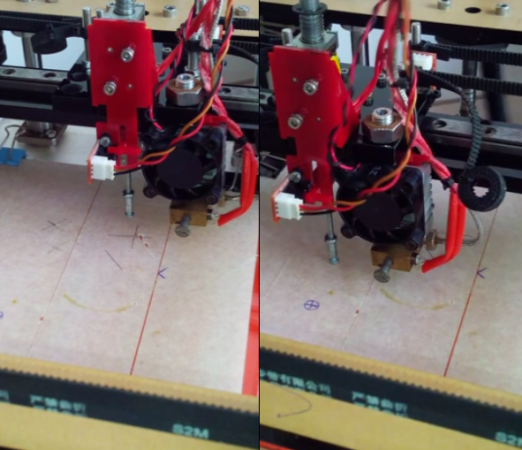
Ah, the woes of printer bed leveling. Unless you have a fancy 3D printer, bed leveling is a tedious task. [Rupin] got tired of messing around with his printer, so he decided to make his very own bed leveling sensor.

The goal was to create a Z-axis probe that works as both an auto-leveling sensor and as an end stop. He originally was trying to design something using a servo motor probe, but ended up chucking the idea since the motor was noisy and calibration was difficult.

He’s since switched over to use a solenoid actuator with an optoisolator to determine the position. The actuator extends an M3 screw which will touch the bed — as the position is adjusted, it is possible to adjust the bed using software for a perfectly level bed, every time.

Continue reading “Bed Leveling With A Solenoid Actuator”

Light Controlled Musical Instrument

Illumaphone Uses Light To Make Music

Move aside Theremin,  we have another crazy instrument that relies on its musicians to frantically wave their arms around to produce a beat. This is the Illumaphone.

[Bonnie Eisenman] recently took a course on Electronic Music, and for her final project she was allowed to basically do whatever she wanted — so she chose to create a custom musical instrument. It’s fairly simple on the hardware side, making use of coffee cups, an Arduino Uno, six photo-resistors, some alligator clips and a whole bunch of cardboard — but don’t let the lackluster parts list fool you, it actually works quite well for what it is!

Each coffee cup is a different note, and the amount of light that gets into the cup determines its volume and vibrato. It even auto-calibrates to the ambient light levels when it is first setup! The light level data is interpreted by the Arduino which then sends it to a laptop standing by, which uses a software called ChucK to synthesize the notes for output.

Continue reading “Illumaphone Uses Light To Make Music”

Vodka dispenser

Arduino Drink Dispenser Turns Quarters Into Liquid Courage

Ever feel the need to have your very own alcohol vending machine at home? Well if you do, [Ben] and [Dan] have just the Arduino based machine for you!

It was actually part of a school assignment for product design at Brunel University – the whole thing was designed and built in just over a week. The machine accepts and counts coins giving you a total readout on the LCD screen. When the correct amount is inserted you can select your shot and the machine will pour you a stiff one.

The thing we like about this vending machine — we’re not sure if it actually qualifies as a barbot — is that it doesn’t have any fancy pumps. In fact, it just uses two inexpensive solenoid valves and gravity to dispense the drink, much like a typical bar bottle dispenser.

Continue reading “Arduino Drink Dispenser Turns Quarters Into Liquid Courage”

Feed That Shoulder Boom Box With A Wrist Tune Transmitter

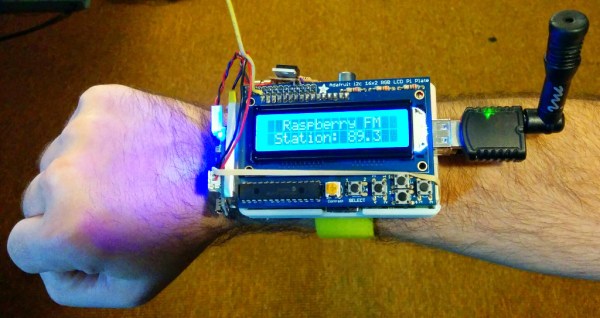
Next time you’re strutting down the block with that hi-fi on you shoulder, don’t subject yourself to the limitations of a radio station’s tight playlist or the short run time of a cassette tape. Pack your tunes on your wrist and beam them directly with this wearable FM transmitter. No wires… it’s like the future is now!

The Raspberry Pi has proven itself to be a dependable FM transmitter. This project follows in those footsteps but moves the goal line a few leaps further. The build has a full user interface which will make it easy to adapt to just about any application you can imagine. And the added twist is shown in the latter third of the video after the break. [Navic209] has included a microphone in the design which allows the wearer to transmit voice to an appropriately tuned radio. It gives the device a very Dick Tracey-esque feel.

Continue reading “Feed That Shoulder Boom Box With A Wrist Tune Transmitter”

RomoCart, Indoor Robot Racing

Your Living Room Becomes Next Mario Kart Course

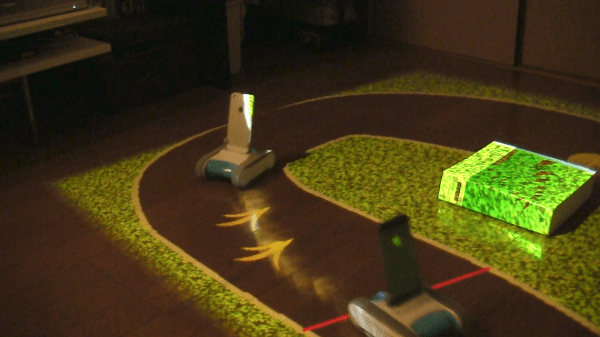
[Ken] likes his living room and he is on a continual mission to make it more interesting. Recently, he has made a giant leap forward with a racing game project he calls RomoCart. Think of it as a partially-physical game of Mario Kart. You are able to race others around a track while still having the ability to fire projectiles or drop defensive measures in efforts to win the race!

First, lets talk about the hardware required. The racers are standard Romo educational robots. Wireless game controllers provide the means for the drivers to control the Romos. Hanging from the ceiling is an Xtion motion sensing camera and a video projector, both pointed down at the floor.

To get started, the system scans the floor and determines a race course based on the room layout and any physical objects in the vicinity. A course is then generated to avoid the obstacles and is projected onto the floor. At this point it would still be a pretty neat project but [Ken] went way further. The ceiling-mounted camera tracks the motion of the Romos driving around the track and the video projector displays a smoke trail behind each racer. Randomly displayed on the track are items to help you win the race, including an acceleration item that makes your Romo go twice as fast for a short time.

Have a tailgater? No problem, just pick up some bananas and drop them on the track. If a following competitor drives into one, they spin out. If you want to get super rude, pick up some missiles and fire them at the racers ahead of you. A direct hit will stop them right in their tracks.

[Ken] is no stranger to HaD, he’s had a few of his projects covered here before. Check out his Tempescope, Moving Window and his Autonomous Lighting System.

Check out a video of the racing in action after the break. It is amazing!

Continue reading “Your Living Room Becomes Next Mario Kart Course”

DIY Camera Stabilizer

DIY Camera Stabilizer Takes The Shakes Out Of Filming

We’ve all prematurely stopped watching some Youtube video because of shaky camera work that makes the video unwatchable. There is a solution available for this problem, it’s a device called a camera stabilizer and it is designed to compensate for jerky camera movement. There are several types available for purchase but they can get fairly expensive. Even the cheaper ones at a few hundred dollars are not economical for hobbyists. [John] set out to make his own camera stabilizer using some unorthodox parts.

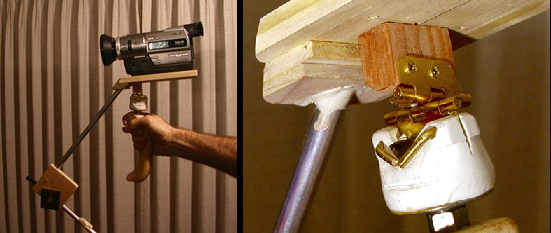
[John’s] chose a gimble style design that effectively lowers the camera’s center of gravity down close to the camera persons hand. The handle of the device must also be mounted in a manor to prevent angular and rotation movement of the supporting hand from transferring to the camera.

The handle is from a cement trowel, on top of which is a ball bearing mounted to a threaded rod. A PVC fitting was heated to soften it and the bushing pressed in. This bearing is responsible for allowing the rotational freedom between the handle and the camera. To decouple any angular movements, two hinges were attached to the PVC fitting. The hinges are perpendicular to each other, one allows forward-back tilting while the other allows left-right tilting. The upper hinge is attached to a piece of poplar wood that also serves as a base for the camera.

At this point, if you were to try to hold this contraption with the camera installed, it would immediately tip over due to gravity. To prevent this, the center of gravity of the moving parts (including the camera) must be lowered. [John] did this by using some aluminum tubing to support wood weights that reside lower than the pivot points created by the hinges.

If you like the DIYer-style stabilizers, check this other wooded one out. Want something more polished looking? How about this pistol grip stabilizer?

supercapacitor ups

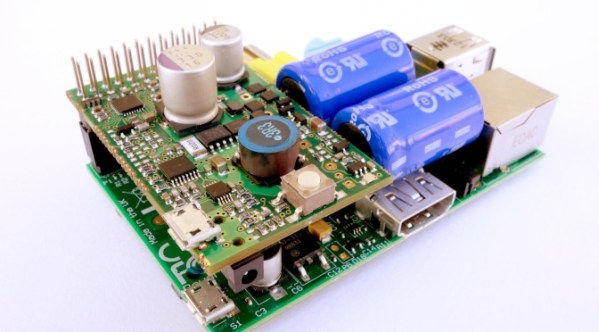
Supercapacitors For The Raspberry Pi

As versatile as the Raspberry Pi is, it has a weakness when it needs to be able to shut down properly during a power outage, especially when handling data-sensitive or industrial applications. To solve this problem, [Pavol Sedlacek] has created a supercapacitor-based UPS specifically for the Raspberry Pi that gives it enough time to properly halt its processes and shut down if it detects a power failure.

The device is called the Juice4Halt. It uses a DC-DC converter to provide power to the Pi from the normal power supply and to charge the supercapacitors during normal operation. It is bidirectional, so in the event of a power failure it works in reverse to take power from the capacitors and feed it back to the Pi. A second DC-DC converter handles power from an external power supply.

A side effect of using supercapacitors as a UPS is that they can also help the Pi survive brownouts. The project site has an incredible amount of detail about the functionality of the device, including circuit diagrams and the source code. We’ve seen other supercapacitor-based UPS units before but this particular one is much more robust and would be truly at home in any industrial or other sensitive setting.