The PiBoy

piboy

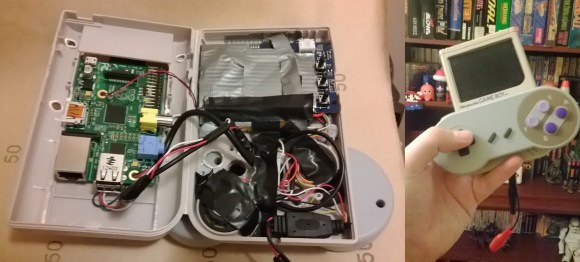
What do you do with a broken Gameboy, a 3″ LCD, a pile of wires, a USB SNES controller, a 32gb SD card, and a Raspberry Pi? You make a pocket emulator, of course!

[Anton] decided he wanted to build an emulator awhile ago. He had a few specific goals in mind: it had to be hand-held, portable, child safe, and usable without a keyboard. He started by stripping the broken Gameboy down to its external shell, then removing all of the internal plastic mounting features with a hot soldering iron. Next was the challenge of fitting everything into the case and powering it. Because his 3″ LCD runs off 12V, [Anton] needed a way to get 5V to the Pi. Lucky for him, it turned out that his LCD’s controller board had a 5V test point/expansion pin-out!

From there it was just a matter of reusing the original Gameboy’s speaker, closing up the case, and loading the emulator! As always, there’s a demo video after the break.

Continue reading “The PiBoy”

Touring Null Space Labs, Another LA Hackerspace

Null Space Labs prides itself on being the only hackerspace that’s not saving the world. Instead, they focus on more important matters such as repairing an industrial pick and place machine, hoisting laser cutters through third story windows, and generally being extremely awesome. Since some of the Hackaday crew is in LA, we decided to check in on the folks at Null Space, and they graciously granted us a tour.

It’s not an overstatement that Null Space is better stocked than any university EE lab. They have at least four million electronic components, and they honestly have no idea how many different types of components they have. As for tools, a 22 GHz spectrum analyzer and 2 GHz scope are tucked away behind a direct to garment printer. A gigantic laser printer, pro 3D printer, PCB milling and through-hole plating stations, and pick and place machine are just a few more of the fun toys available to Null Space members.

In the video below, [M] walks us through the main electronics work area, filled to the brim with tools and storage cabinets. After that, [arko] shows off the PCB mill and the back room with reels of parts strewn asunder.

Continue reading “Touring Null Space Labs, Another LA Hackerspace”

A Quick And Simple Filament Joiner For Multi-Color Prints

Filament splicer

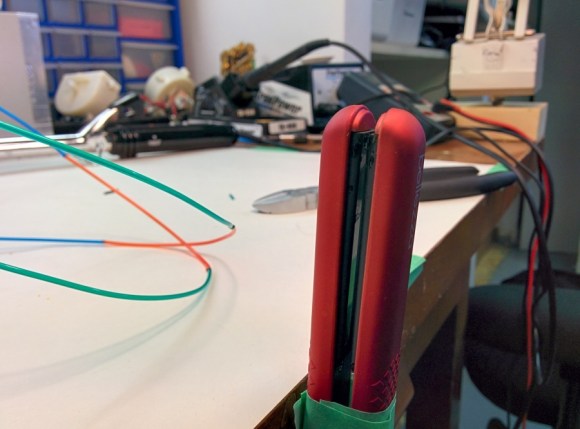
[Malcolm] was having a grand time with his new 3D printer. He was getting tired of monochromatic prints, though. Not having a machine with multiple extruders, he went looking for a way to join pieces of filament. There were a few designs on Thingiverse, but they required milled parts that he didn’t have the tools to recreate. Rather than invest in a mill, [Malcolm] decided to build his own filament joiner. He started by raiding his wife’s hair care tools. His first test was a curling iron. It had the heat, but lacked a good surface to join the filament. [Malcolm’s] next test was a ceramic hair straightener, which he found to be the perfect tool.

The splicing process is simple. Start with a hot iron, then lay two pieces of filament on top of the short end of the iron. They soften quickly and melt together. [Malcolm’s] real trick is to slightly pull the joint once the two pieces have joined. Pulling causes the filament to stretch, slightly reducing the diameter of the joint. A thinner joint helps prevent extruder jams as the joint passes through. This method works great for PLA. We’d love to see if it works for ABS as well.

Click past the break for an example piece and for [Malcom’s] instructional video.

Continue reading “A Quick And Simple Filament Joiner For Multi-Color Prints”

Developed On Hackaday: The Designs

We know that many of our readers have been impatiently waiting to discover what the Hackaday community-developed offline password keeper project will look like. Today we present you several designs that our mechanical contributors came up with and we will ask you to give your opinion about them. Obviously these are just preliminary cases that may evolve along the way, but we will only produce the electronics for the designs you prefer.

All the designs are embedded after the break, with a multiple-choices poll to express your interest. You may also want to join the Mooltipass Google Group in case you’d want to talk about the designs in more depth or meet their creators. On the firmware side, I just finished soldering many mooltipass prototypes that will be shipped in the coming days to our firmware developers. As you may have noticed, this project is gaining speed!

Continue reading “Developed On Hackaday: The Designs”

Touring Crashspace, The LA Hackerspace

Starsong

In case you’re not up to speed with the most recent happenings at Hackaday, we’re partying in LA tomorrow. This means visiting all the local hackerspaces and begging for a tour. First up is Crash Space, an awesome hackerspace that uses Starsong, the soldering iron alicorn shown above as a mascot.

Inside Crash Space are the usual Hackerspace compliment of tables, projectors, whiteboards, and more recycled computers than you can shake several IDE cables at. When we rolled up to Crash Space, they were just finishing up their weekly 3D printing workshop, replete with a Mendel Max, The Printer Which Shall Not Be Named, and a pair of printers from Deezmaker, a company started by one of Crash Space’s members.

For anyone wanting to roll their sleeves up and get dirty, all the action starts in the back of the building. There, they have a laser cutter, an ancient lathe and mill, drill press, and even a project that will become a vacuum former.

The folks at Crash Space were kind enough to show off their workshop for a video, viewable below along with a few pics of the space buzzing with activity.

Continue reading “Touring Crashspace, The LA Hackerspace”

Happy Birthday, Son. Here’s Your Very Own Claw Machine

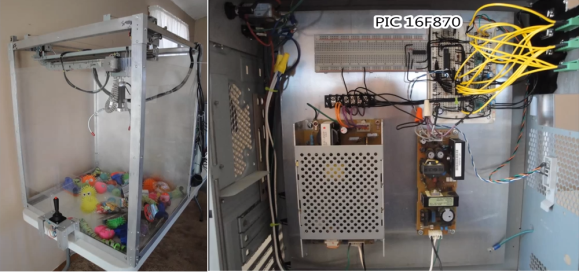
mrclawIf [Will Baden] is in the running for Father of the Year, he’s a shoe-in. His son requested a robot-themed birthday party, so [Will] did what any superhero father would do and built him a toy claw machine.

[Will] harvested many of the parts from copy machines: both the 5V and 24V power supplies, the limit switches, 2/3 of the motors, and the 24V solenoid coil in the claw. The carriage is from a commercial printer. He made many of the mounts, including the ones holding the 3 stepper motors from Pololu.

A PIC16F870 is running the show. [Will] programmed it in assembly using Timer2 for stepper pulsing and RB0 interrupt to drop the claw when the button is pushed. He also added a WDT to get out of code trouble if needed. The claw’s solenoid is driven by a ULN2001A Darlington array. [Will] put a kickback diode on the coil so the pulses don’t go farther than they need to. He formed the fingers of the claw by bending pieces of brake line.

Not your kind of claw? Check out these incredible Wolverine claws!

Continue reading “Happy Birthday, Son. Here’s Your Very Own Claw Machine”