A Simple LED Flashlight Composed Of A Relay And A Magnet

In our tips line we sometimes receive hacks that are amazing just because of their ingenuity. This relay-powered flashlight is definitely one of them. It has been named RattleGen by its creator [Berto], who apparently often makes simple hacks used in his everyday life (have a look at his YouTube channel).

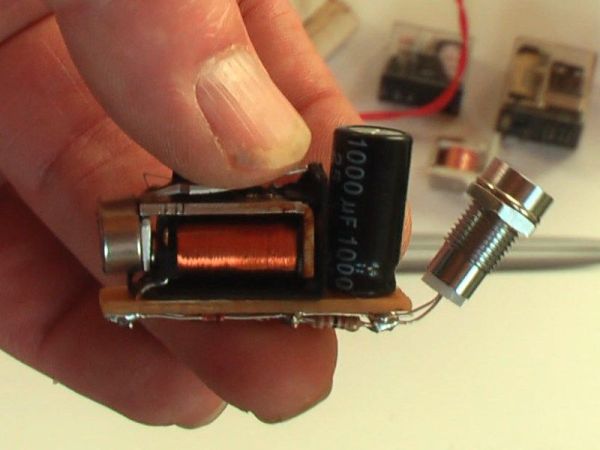
To understand this hack, you first need to know (in case you didn’t already) that a magnet moving near a conductor (here a coil) induces a voltage at its terminals. This is called electromagnetic induction. In the picture you see above, you may distinguish a disassembled relay with a magnet located on the lever’s end. As a ferromagnetic metal is already placed inside the coil, the lever is by default ‘stuck’ in this position. By continuously pressing the latter on its other end, important voltage spikes are created at the coils terminals. [Berto] therefore used a bridge rectifier to transform the AC into DC, and a 1000uF capacitor to smooth the power sent to his super bright LED. A video of the system in action is embedded after the break.

Continue reading “A Simple LED Flashlight Composed Of A Relay And A Magnet”

The Face-Tracking Confectionery Cannon!

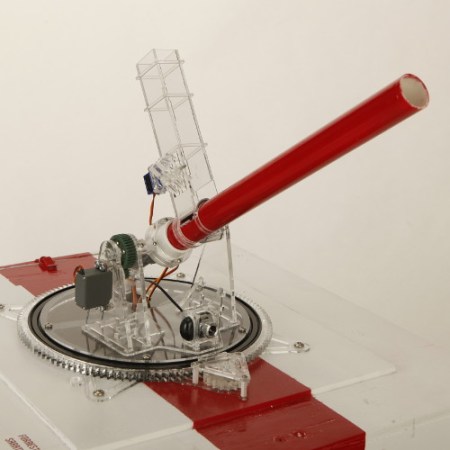
A team of mechanical and electrical engineering students at Olin College came up with a very fun semester project — a pneumatic powered marshmallow cannon that can track faces, and aim for the mouth!

The device — dubbed the Confectionery Canon — is an impressive mechanical build which required many of Olin College’s manufacturing resources such as the laser cutter, the mill, and the lathe. The majority of the device was made out of acrylic, which was chosen for easy laser cutting, and affordability. Specific aluminum pieces provide strength and were made using mostly scrap found in the shop.

Four servos, a webcam, a solenoid and an Arduino Uno make up the electrical system, which uses Python and OpenCV to track faces (GitHub). A PVC tank is used as the pneumatic reservoir, charged with a safety release valve at 30PSI. To fire the cannon, a sprinkler valve is controlled by a beefy solenoid. It currently only has a magazine capacity of 4 large marshmallows, but the team is planning on upgrading soon.

They have put together a great website with tons of information on the project, and following the break is a fun promo video they made for the project — they even got the VP of  the college to try it!

Continue reading “The Face-Tracking Confectionery Cannon!”

Saving $20,000 USD With A Single LED

carrier

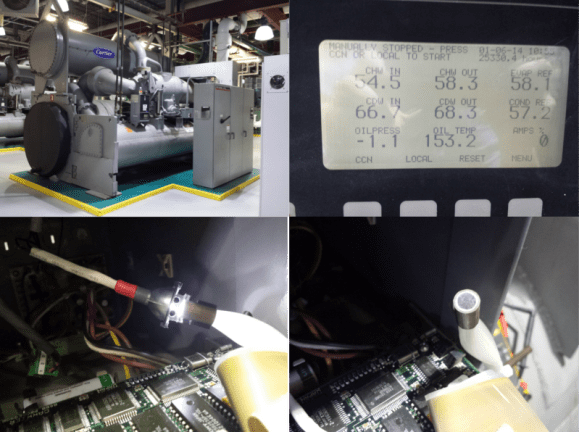
[N8Mcnasty] is a HVAC tech who works on some big machines. One of his charges is a Carrier 19EX Chiller, rated at 1350 tons of cooling. 1 ton of cooling = 12,000 BTU. This particular chiller contained an odd LCD screen. It used a fiber optic bundle and a halogen light for backlight illumination. The system worked fine for over a decade. Now though, the halogen bulb has begun melting the glue on the fiber bundle, causing a dim display. The display in question shows some very important operating parameters, such as oil temperature, current draw, and process temperatures. Since they couldn’t easily see the display, the machine’s operators weren’t running the machine, placing stress on the other chillers in the building’s physical plant. [N8Mcnasty] tried repairing the bundle, however the glue kept melting.

A replacement display was no longer available, meaning that the entire chiller control system would have to be upgraded to a newer system. The new control system uses different sensors than the old one. This is where things start getting expensive. Replacing the sensors would also require draining the 15-20 gallons of oil, 4500 lbs of R134a refrigerant, and bringing the whole system down for almost two weeks, a $20,000 job. Rather than go this route, [N8Mcnasty] found an alternative. LED’s have come a long way since 1996, when the chiller was built. He simply replaced the halogen bulb with an LED and appropriate resistor. [N8Mcnasty] was even able to reuse the halogen bulb bracket. A bit of heat shrink tube later, and the fix looks like it was a factory option. He’s documented his fix here on reddit.

Automated Decanting Machine Pairs Wine With Pi

[Logi.cals], a German software company focused on process, automation, and facilities planning has devised an automated wine decanting machine to demonstrate its logi.CAD 3 PLC programming tool. Sommeliers use these simple machines to handle heavy, expensive bottles of wine. [Logi.cals] added sensors and a stepper motor to a very nice looking specimen and automated the decanting process with a Raspberry Pi.

The outstanding feature of this design is the built-in redundancy. A pair of micro switches detect the presence of both a bottle and a glass. Failing these, a load cell is there to weigh the bottle, reporting naturally whether one is present. The load cell also plays a part in monitoring the liquid level in the bottle, as do capacitive sensors that register the wine flow. The design also includes strain gauges that measure the weight in the glass as well as the liquid level. To bring it full circle, they also verify that a glass is present.

[Logi.cals] used two expansion boards, the Quick2Wire interface with an I²C analogue board and the PiFace. The I²C analogue board takes information from the strain gauges over its ADC, and the Quick2Wire communicates with the load cell’s measurement amplifier over the serial connection. The PiFace handles the remaining sensors and the stepper motor, and provides high voltage protection for the Pi.

If you’re fresh out of heavy, expensive bottles of wine but have some cheap ones lying around, you could use a Pi to make them dance.

Continue reading “Automated Decanting Machine Pairs Wine With Pi”

Hackaday Links: January 12, 2014

hackaday-links-chain

[Kyle] teaches photography and after being dismayed at the shuttering of film and darkroom programs at schools the world over decided to create a resource for film photography. There’s a lot of cool stuff on here like mixing up a batch of Rodinal developer with Tylenol, lye, and sodium sulphite, and assessing flea market film cameras. There are more tutorials coming that will include setting up a dark room, developing prints, and playing around with large format cameras.

[hifatpeople] built a binary calculator out of LEGO® bricks or toys. It started off as a series of logic gates built out of LEGO® bricks or toys in the LEGO® Digital Designer. These logic gates were combined into half adders, the half adders combined into full adders, and the full adders combined into a huge plastic calculator. Unfortunately, buying the LEGO® bricks or toys necessary to turn this digital design into a physical model would cost about $1000 using the LEGO® Pick-A-Brick service. Does anyone have a ton of LEGO® Technic® bricks or toys sitting around? We’d love to see this built.

Think you need a PID controller and fancy electronics to do reflow soldering in a toaster oven? Not so, it seems. [Sivan] is just using a meter with a thermocouple, a kitchen timer, and a little bit of patience to reflow solder very easily.

The folks at DreamSourceLabs realized a lot of electronic test equipment – from oscilloscopes and logic analyzers to protocol and RF analyzers were all included a sampling circuit. They designed the DSLogic that puts a sampler and USB plug on one board, with a whole bunch of different tools connected to a pin header. It’s a pretty cool idea for a modular approach to test equipment.

Adafruit just released an iDevice game. It’s a resistor color code game and much more educational than Candy Crush. With a $0.99 coupon for the Adafruit store, it’s effectively free if you’re buying anything at Adafruit anytime soon. Check out the video and the awesome adorable component “muppets”.

Developed On Hackaday: We Have Pixels!

It has been a while since we kept you informed about the current state of the Mooltipass project. Well, several days ago we finally received the PCBs we got produced at Seeedstudio. Keep in mind that this first version (shown in the picture above) is only meant to check that the chosen components can suit our needs while our mechanical contributors work on their designs. Moreover, we may add empty footprints for our readers that may want to hack the device.

After a few hours of soldering and a few days of coding, we finally got a basic firmware running. The OLED screen is easily readable and has an amazing contrast (the picture doesn’t do it justice). So far we checked all basic functionalities of the on-board components and it’ll still take a few days/weeks to be certain that we can settle with them. We are therefore starting to ship a few platforms to the firmware developers that want to work on the core functions of the Mooltipass. So if you’re an experienced C developer and have some spare time, you may get onboard by contacting me at mathieu[at]hackaday[dot]com or by joining the Mooltipass Google Group.

In a few days we will publish the designs that our mechanical guys came up with and we’ll ask you to let us know which ones are your favorites. Depending on how things will go, we may produce PCBs for several of them to select our final design based on user experience and ease of use. We look forward to hearing your feedback in the comments section below!

SquareWear 2.0 A Wearable Opensource Arduino

squarewear2_annotation-1024x577

Are you guys tired of redesigned Arduinos yet? Usually we are, but [Ray] just released the SquareWear 2.0, and we have to admit, it’s a pretty slick design.

It’s an update to SquareWear 1.1 which we covered a year ago. That version made use of a 18F14K50 microcontroller, measured a tiny 1.6″ x 1.6″ and could easily be sewn into wearable circuits. But after receiving lots of requests to design a new Arduino based board, [Ray] obliged and made v2.0.

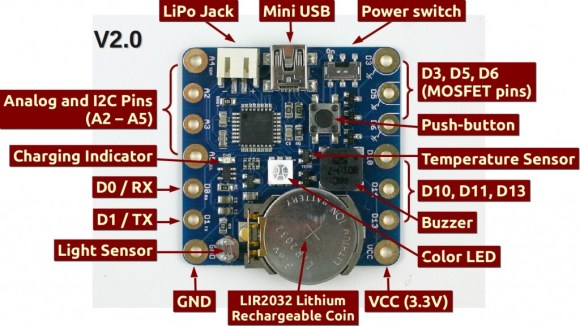
The new SquareWear is slightly bigger, measuring in at 1.7″ x 1.7″, but it packs a much bigger and more functional punch — just check out the image schematic above! The only catch is it doesn’t actually have a USB-to-serial chip on-board, which is why [Ray] was able to get the board so small and inexpensive. Instead it simulates USB in the software using the V-USB library. That method is much slower but still functional. To perform serial communication through the USB port it uses the onboard USBasp bootloader.

The board also features large through-holes to accommodate sew-able pin pads, making it super easy to integrate this into fabric!

For a complete explanation of the SquareWear 2.0, check out the video after the break.

Continue reading “SquareWear 2.0 A Wearable Opensource Arduino”