Retrotechtacular: Salvaging A Capsized Ocean Liner

salavaging-a-capsized-ocean-liner

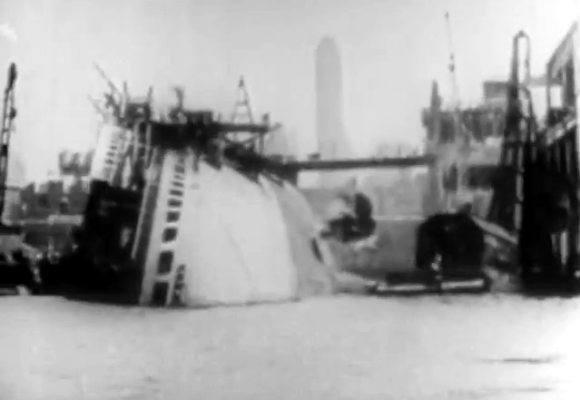
The scale of this salvage operation is nothing short of daunting. The SS Normandie was an ocean liner put into service in 1935 and capable of carrying 1,972 people across the Atlantic Ocean. The ship is still the fastest turbo-electric-propelled passenger vessel ever built, so it’s no surprise that it was seized by the US Navy during World War II for conversion to a troop carrier called the USS Lafayette. But in 1942, during retrofit operations, the vessel caught fire and capsized. The topic of today’s Retrotectacular is the remarkable salvage operation that righted the ship. Unfortunately, it was subsequently scrapped as bringing it into service was going to be too costly. Lucky for us the US Navy documented the salvage operation which makes for a fascinating 35-minutes of footage.

Continue reading “Retrotechtacular: Salvaging A Capsized Ocean Liner”

A Deep Dive Into NES Tetris

Tetris AI

Back in 1989, Nintendo released Tetris for the NES. This detailed article first explains the mechanics of how Tetris works, then builds an AI to play the game.

To understand the mechanics of the game, the ROM source was explored. Since the NES was based of the MOS 6502 microprocessor, this involves looking at the 6502 assembly. The article details how the blocks (called Tetriminos) are created and how they move across the screen. The linear feedback shift register used for random number generation is examined. Even details of the legal screen and demo mode are explained.

After the tour through how Tetris works, an algorithm for the AI is presented. This AI is implemented in Lua inside of the FCEUX NES/Famicom emulator. It works by evaluating all of the possible places to put each new Tetrimino, and choosing the best based on a number of criteria. The weighting for each criterion was determined by using a particle swarm optimization.

The source for both the Lua version and a Java version of the code is available with the article. Everything you need to run the AI is available for free, except the Tetris ROM. If you’re interested in how 8 bit games were built, this dissection is a great read.

[via Reddit]

3D Printed Netduino Remote Controlled Car

netduinocar

[Matt] lives in South Africa, where homes have smallish crawlspaces (some only 30cm high!) that he can’t quite squeeze himself into. Even if he could, he probably wouldn’t: they’re apparently vacation homes for the local rats. He did, however, want to explore these spaces to get a better idea what’s going on inside, so he built a Windows Phone-controlled car with a Netduino and 3D-printed parts.

Such a specialized application requires unique parts, so [Matt] designed and 3D-printed the wheels and frame from scratch. You’ve probably noticed that the wheels aren’t your typical cylinders. The terrain [Matt] faces is sand, so the spiked shape provides better grip. The body’s design required extra attention because it holds the motors, the Netduino, the motor driver, and the battery.

A Bluetooth module connects to the Netduino and allows [Matt] to drive the car with his Windows Phone, and an inexpensive 5V LED board provides some light for those dark corners. How does it see once inside the crawlspace? It looks like [Matt’s] getting to that part. His plan is to simply mount a second phone running Skype and watch the stream. Stick around after the break to see [Matt] use the car to both confuse and excite his dog.

Continue reading “3D Printed Netduino Remote Controlled Car”

Veronica Gets A ROM Monitor

monitor

[Quinn] has been on Veronica, her 6502-based computer for quite a while now, but until very recently it’s been more of an embedded project rather than a fully functional computer. Writing software for Veronica on Veronica has been the goal from the start, and finally [Quinn] can write code from a ROM monitor.

In its most basic state, a ROM monitor is an extremely simple piece of software. It resides on the ROM of a computer and is the first thing the computer loads on booting, allowing the user to inspect, read, and write to memory locations, writing code in hex, and running it straight from the monitor.

To write the ROM monitor (and a few other programs), [Quinn] is using the awesome cc65 6502 C compiler. This comes with a whole bunch of macros that make it easy to read keyboard input, shove bits into her AVR GPU, and writing to memory. The monitor program is loaded onto her ROM chip which is automatically read every time the reset button is pressed.

In the video below, you can see [Quinn] writing a few bits to address $2000 that tell the CPU to output ASCII characters to the display. It’s not much, but it’s the first time [Quinn] has written code for Veronica on Veronica, and should prove to be the beginning of a very interesting system.

Continue reading “Veronica Gets A ROM Monitor”

Yet Another DIY Camera Slider

Professional camera gear is expensive, which is probably why there is such a huge DIY field for camera equipment. Here’s another great DIY camera slider that you can build for cheap.

Similar to other rigs we’ve seen, the heart of this design makes use of skateboard wheels — they’re cheap, have good bearings, and are easy to mount. He’s created a dolly for them using a T-strap bracket, which is used for wood framing — the wheels mount directly to it without any modification.

What we think is unique about this build are the rails [Shootr] decided to use. They’re U-Post fence posts — strong, rigid, and probably one of the cheapest forms of processed metal you can buy. To hold them together, he’s using a threaded rod with two pieces of 1/2″ square steel tubing, bracing the fence posts. This wedges the dolly in between them with just enough slack to slide smoothly back and forth.

The other method of making a camera slider like this is using tubular rails, which also allows you to add a curve in your camera track. And if you’re looking for a precise, 2-axis camera dolly… you should check out this one!

Low-Power SMD Fireflies

lowpowerledfireflies

[Tyson’s] family went with creating rather than buying Christmas presents last month, which gave him the opportunity to build some electronic fireflies for gifts. He drew inspiration from a similar firefly project we featured last year, but expanded on the original model by designing dedicated PCBs and housings for each of his firefly pieces.

Although he’d settled on using ATTiny85’s for this project, [Tyson] was fresh out of through-hole versions. He decided to skip the prototyping phase and go right for fabrication, cranking up the laser-jet printer for some toner-transfer, which successfully produced 4 functioning boards (and 3 failures). The fireflies were [Tyson’s] first attempt at SMD soldering, and we’d have to say it’s a job well done; he reflowed each board with a cheap-o heatgun from Harbor Freight.

After some hiccups with fuse programming, [Tyson] got the code uploaded and the fireflies illuminated.  Swing by his site for the nuts and bolts on construction, then snag the project files here. (Direct .zip download)

Measuring 185 µΩ In Circuit

meter

To measure resistance, you usually have to take the resistor to be tested out of the circuit, and sometimes that’s impossible. If you’re using a multimeter, measuring very small resistances is difficult to say the least. Combine both these problems – measuring microOhms in-circuit – and you have a problem that’s perfectly suited for the Mooshimeter.

Announced just a few weeks ago, the Mooshimeter is a two-channel multimeter that communicates with your cell phone over Bluetooth. It’s perfect for measuring current and voltage simultaneously, all while being tucked away in some place that’s either dangerous, inaccessible, or mobile.

The Mooshimeter team put together a great example of what can be done with their meter by measuring the resistance of a car battery grounding strap while behind the steering wheel. To do this, they put alligator clips across the grounding cable and clamped on a current meter.

Inside the car, they whipped out their cell phone and looked at the Mooshimeter’s output for the voltage and current measurement. The Mooshi app has an IV curve (with linear regression in the works), so simply dividing the current and voltage gives them the resistance of the battery’s grounding cable.

It’s a very cool and extremely simple demonstration of how cool the Mooshimeter actually is. Video of the demo below.

Continue reading “Measuring 185 µΩ In Circuit”