The Catweazle Mini: A Super Small ARM Based Embedded Platform

Catweazle

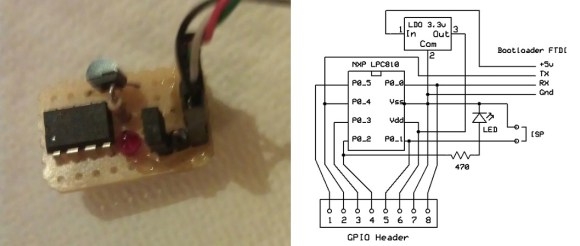
There has been a recent trend in miniaturizing embedded platforms. [Jan] wrote in to tell us about his very tiny ARM based embedded platform, the Catweazle Mini. Who knew that an ARM based system could be so simple and so small?!?

With the success of the Trinket and Femtoduino (miniature Arduino compatible boards) and many other KickStarter campaigns, it is only natural for there to be a mini platform based on the ARM architecture. Built around the NXP LPC810 ARM Cortex M0+ MCU at 30MHz (which only costs slightly more than $1, by the way), this small embedded platform packs some pretty impressive processing power. The board contains a simple linear regulator, and can be programmed via UART. [Jan’s] development environment of choice is the mbed compiler, which is free and requires no installation. If you need some help getting started Adafruit has a nice guide for the LPC810.

Do you need some more processing power for your next wearable project? Be sure to use the Catweazle Mini.

Smart Thermostats For An Old Club House

20140220_210220

[Michael] is a Scout Leader in the Netherlands, where they have a great clubhouse—a “Landhuis.” The only problem? It’s old, and it’s not an efficient place to heat!

The building currently has two furnaces to cope with its many nooks and crannies, with individual thermostats in each of the five rooms. If a thermostat was activated in one of the rooms, it would control a valve in the furnace responsible for that room. Depending on which valve the furnace is attached to, a furnace would start. As you can imagine, this is an extremely inefficient system if you are heating two different rooms (and using two different furnaces!) It’s all on or off with no in-between.

As true scouts, they try to adhere to the simple principle of “why buy it when you can build it?” Commercial systems are expensive, and besides, they needed a project to work on! They’ve designed a smart(er) system using an Arduino Mega 2560 with five DS18B20 temperature sensors set up in each room, and even threw together a nice enclosure for it! They’ve included the source code on GitHub (in Dutch), so if you’re interested in setting up something similar you can check it out.

[Michael] will be around in the comments section, so if you have any feedback or questions, let him know!

PCB Antenna Reference Designs

Have you ever built a wireless project and weren’t sure how to make one of those awesome (and cheap!) PCB antennas? “What low-cost solutions does our Antenna Board #referencedesign contain?” said Texas Instruments (TI) recently via Twitter.  This older reference design contains some comprehensive designs for sub-1 GHz and 2.4 GHz antennas.

While TI’s documentation can be difficult to navigate, there are many hidden gems, and this is one of them. While TI created these designs for use with their wireless products, they will work on any device which utilizes the same wireless base frequency. For example, you could use any of the 2.4 GHz antennas with any Bluetooth, WiFi (2.4 GHz), or Bluetooth Low Energy chips. Simply open up their Antenna Selection Quick Guide document and navigate to the specific design for whichever antenna you would like to build.

For a more detailed overview of what goes into designing and testing a PCB antenna, check out this hack which we featured back in 2010. With the internet of things coming into its own, wireless projects will become more and more prolific, making PCB antennas more important than ever.

Raspberry Pi GPU Goes Open Source! $10,000 Bounty For Quake 3

raspberrypi_logo

One of the thorns in the side of the Raspberry Pi crowd has been the closed source GPU. Today that all changes. [Eben Upton] reports that Broadcom is opening the source to the VideoCore® IV 3D graphics subsystem. In Broadcom’s own words:

The VideoCore driver stack, which includes a complete standards-compliant compiler for the OpenGL® ES Shading Language, is provided under a 3-clause BSD license; the source release is accompanied by complete register-level documentation for the graphics engine

Full documentation is available on Broadcom’s support site. To celebrate this, The Raspberry Pi Foundation is offering $10,000 to the first person to run Quake III at a playable frame rate on Raspberry Pi with open source drivers. The competition is worldwide. Full rules available here.

This release doesn’t cover everything, as there are still parts of the Pi’s BCM2835 which are hiding behind the blob files. However, it is a very big step for open source. Congrats to the Raspberry Pi Team, and good luck to all the entrants.

Computers Playing Flappy Bird. Skynet Imminent. Humans Flapping Arms.

flappy-double

After viral popularity, developer rage quits, and crazy eBay auctions, the world at large is just about done with Flappy Bird. Here at Hackaday, we can’t let it go without showcasing two more hacks. The first is the one that we’ve all been waiting for: a robot that will play the damn game for us. Your eyes don’t deceive you in that title image. The Flappy Bird bot is up to 147 points and going strong. [Shi Xuekun] and [Liu Yang], two hackers from China, have taken full responsibility for this hack. They used OpenCV with a webcam on Ubuntu to determine the position of both the bird and the pipes. Once positions are known, the computer calculates the next move. When it’s time to flap, a signal is sent to an Arduino Mega 2560. The genius of this hack is the actuator. Most servos or motors would have been too slow for this application. [Shi] and [Liu] used the Arduino and a motor driver to activate a hard drive voice coil. The voice coil was fast enough to touch the screen at exactly the right time, but not so powerful as to smash their tablet.

If you would like to make flapping a bit more of a physical affair, [Jérémie] created Flappy Bird with Kinect. He wrote a quick Processing sketch which uses the Microsoft Kinect to look for humans flapping their arms. If flapping is detected, a command is sent to an Android tablet. [Jérémie] initially wanted to use Android Debug Bridge (ADB) to send the touch commands, but found it was too laggy for this sort of hardcore gaming. The workaround is to use a serial connected Arduino as a mouse. The Processing sketch sends a ‘#’ to the Arduino via serial. The Arduino then sends a mouse click to the computer, which is running  hidclient.  Hidclient finally sends Bluetooth mouse clicks to the tablet. Admittedly, this is a bit of a Rube Goldberg approach, but it does add an Arduino to a Flappy Bird hack, which we think is a perfect pairing.

Continue reading “Computers Playing Flappy Bird. Skynet Imminent. Humans Flapping Arms.”

Can’t Stand Your Noisy Fan? Here’s A Plan, Man

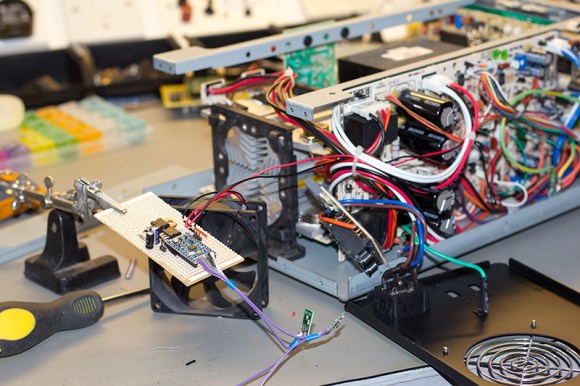
[Brian] adores his GW Instek GPC-1850D power supply, but it’s annoyingly loud and disruptive to his audio projects. The thing works great, so he decided to regulate the fan’s speed based on usage level to save his sanity.

Once [Brian] got under the hood, he found that it actually has four separate heatsinks: one for the bridge rectifiers and one for each power transistor on the three output channels. The heatsinks are electrically and thermally isolated from each other and change temperature based on the channel being used.

[Brian] and his associates had several Microchip MCP9803 temperature sensors kicking around the lab from previous projects, so they put one on each heatsink. The great thing about these is their address selection pins which let all four of them sit together on the I²C bus to Arduinoville. Each sensor is insulated and clamped to its heatsink with a piece of meccano and a dab of thermal paste.

[Brian] used an Arduino Mini and built the circuit on stripboard. The fan runs at 24V, so he’s sharing that with the Arduino through a 7805. He controls the speed of the fan with PWM from the Arduino fed through a MOSFET. The Arduino reads from each sensor and determines which one is hottest. [Brian] wanted the fan to run at all times, so he set a base speed of 20%. When the heatsinks reach 30°C/86°F, the fan speed is increased to 40%. After that, the speed increases at 5°C/9°F intervals until it reaches max speed at 65°C/149°F.

You can grab the code and schematic from [Brian]’s repo. If you want to study your heatsinks, build this heatsink tester first.

Homebrew Phase Laser Rangefinder

Just when you thought ARM micros couldn’t get any cooler, another project comes along to blow you away. [Ilia] created a phase laser rangefinder (.ru, Google translatitron) using nothing but a laser diode, a pair of magnifying glasses, a few components and an STM32F4 Discovery dev board.

The theory behind this build is using a laser’s phase to determine how far away an object is. By modulating the laser diode’s output at a few hundred Mhz, the reflection from the laser can be compared, giving a fairly reasonable estimate of how far away the target is. This method has a few drawbacks; once the reflection is more than 360 degrees out of phase, the distance ‘loops around’ to being right in front of the detector.

The laser diode used does not have any modulation, of course, but by using an STM32F4 ARM chip, [Ilia]was able to modulate the amplitude of the laser with the help of a driver board hacked out of a 74HC04 chip and a few resistors. Not ideal, but it works.

The receiver for the unit uses a photodiode feeding into the same microcontroller. With an impressive amount of DMA and PLL wizardry (the STM32F4 is really cool, you know), the phase of both the transmission and reflection can be compared, giving a distance measurement.

It’s all an impressive amount of work with a hacked together set of optics, a cheap dev board, and a few components just lying around. For any sort of application in a robot or sensor suite this project would fall apart. As a demonstration of the theory of phase laser rangefinding, though, its top notch.

You can check out a video of [Ilia]’s rangefinder below. Be sure to full screen it and check out the distance measurement on the LCD. It’s pretty impressive.

Thanks [Володимир] for the link.

Continue reading “Homebrew Phase Laser Rangefinder”