Open-Source Grinder Makes Compression Screws For Plastic Extruders Easy

In a world that’s literally awash in plastic waste, it seems a pity to have to buy fresh rolls of plastic filament to feed our 3D-printers, only to have them generate yet more plastic waste. Breaking that vicious cycle requires melding plastic recycling with additive manufacturing, and that takes some clever tooling with parts that aren’t easy to come by, like the compression screws that power plastics extruders.

This open-source compression screw grinder aims to make small-scale plastic recyclers easier to build. Coming from the lab of [Joshua Pearce] at the Michigan Technological University in collaboration with [Jacob Franz], the device is sort of a combination of a small lathe and a grinder. A piece of round steel stock is held by a chuck with the free end supported by bearings in a tailstock. On the bed of the machine is an X-Y carriage made of 3D-printed parts and pieces of electrical conduit. The carriage moves down the length of the bed as the stock rotates thanks to a pulley and a threaded rod, carrying a cordless angle grinder with a thick grinding wheel. A template attached to the front apron controls how deep the grinder cuts as it tracks along the rod; different templates allow the screw profile to be easily customized. The video below shows the machine in action and the complicated screw profiles it’s capable of producing.

We’ve seen lots of homebrew plastic extruders before, most of which use repurposed auger-type drill bits as compression screws. Those lack the variable geometry of a proper compression screw, so [Joshua] and [Jacob] making all the design documents for this machine available should be a boon to recycling experimenters.

Continue reading “Open-Source Grinder Makes Compression Screws For Plastic Extruders Easy”

A 3D-Printed Bowl Feeder For Tiny SMD Parts

[Andrzej Laczewski] has something big in mind for small parts, specifically SMD resistors and capacitors. He’s not talking much about that project, but from the prototype 3D-printed bowl feeder he built as part of it, we can guess that it’s going to be a pretty cool automation project.

Bowl feeders are common devices in industrial automation, used to take a big pile of parts like nuts and bolts and present them to a process one at a time, often with some sort of orientation step so that all the parts are the right way around. They accomplish this with a vibratory action through two axes, which [Andrzej] accomplishes with the 3D-printed ABS link arms supporting the bowl. The spring moment of the arms acts to twist the bowl slightly when it’s pulled down by a custom-wound electromagnet, such that the parts land in a slightly different place every time the bowl shifts. For the parts on the shallow ramp spiraling up the inside of the bowl, that means a single-file ride to the top. It’s interesting to see how changing the frequency of the signal sent to the coil impacts the feed; [Andrzej] used a function generator to find the sweet spot before settling on a dedicated circuit. Watch it in action below.

We’re really impressed with the engineering that went into this, even if we wonder what the vibration will do to the SMD components. Still, we can’t wait to see this in a finished project – perhaps it’ll be integrated like this Arduino-fied bowl feeder.

Continue reading “A 3D-Printed Bowl Feeder For Tiny SMD Parts”

Desktop Radio Telescope Images The WiFi Universe

It’s been a project filled with fits and starts, and it very nearly ended up as a “Fail of the Week” feature, but we’re happy to report that the [Thought Emporium]’s desktop WiFi radio telescope finally works. And it’s pretty darn cool.

If you’ve been following along with the build like we have, you’ll know that this stems from a previous, much larger radio telescope that [Justin] used to visualize the constellation of geosynchronous digital TV satellites. This time, he set his sights closer to home and built a system to visualize the 2.4-GHz WiFi band. A simple helical antenna rides on the stepper-driven azimuth-elevation scanner. A HackRF SDR and GNU Radio form the receiver, which just captures the received signal strength indicator (RSSI) value for each point as the antenna scans. The data is then massaged into colors representing the intensity of WiFi signals received and laid over an optical image of the scanned area. The first image clearly showed a couple of hotspots, including a previously unknown router. An outdoor scan revealed routers galore, although that took a little more wizardry to pull off.

The videos below recount the whole tale in detail; skip to part three for the payoff if you must, but at the cost of missing some valuable lessons and a few cool tips, like using flattened pieces of Schedule 40 pipe as a construction material. We hope to see more from the project soon, and wonder if this FPV racing drone tracker might offer some helpful hints for expansion.

Continue reading “Desktop Radio Telescope Images The WiFi Universe”

Helix Display Brings Snake Into Three Dimensions

Any time anyone finds a cool way to display in 3D — is there an uncool way? — we’re on board. Instructables user [Gelstronic]’s method involves an array of spinning props to play the game Snake in 3D.

The helix display consists of twelve props, precisely spaced and angled using 3D-printed parts, each with twelve individually addressable LEDs. Four control groups of 36 LEDs are controlled by the P8XBlade2 propeller microcontroller, and the resultant 17280 voxels per rotation are plenty to produce an identifiable image.

In order to power the LEDs, [Gelstronic] used wireless charging coils normally used for cell phones, transferring 10 W of power to the helix array.  A brushless motor keeps things spinning, while an Arduino controls speed and position via an encoder. All the links to the code used are found on the project page, but we have the video of the display in action is after the break.

Continue reading “Helix Display Brings Snake Into Three Dimensions”

MIDI Guitar Pedals

Ever since Jimi Hendrix brought guitar distortion to the forefront of rock and roll, pedals to control the distortion have been a standard piece of equipment for almost every guitarist. Now, there are individual analog pedals for each effect or even digital pedals that have banks of effects programmed in. Distortion is just one of many effects, and if you’ve built your own set of pedals for each of these, you might end up with something like [Brian]: a modular guitar pedal rack.

ae0fmjx
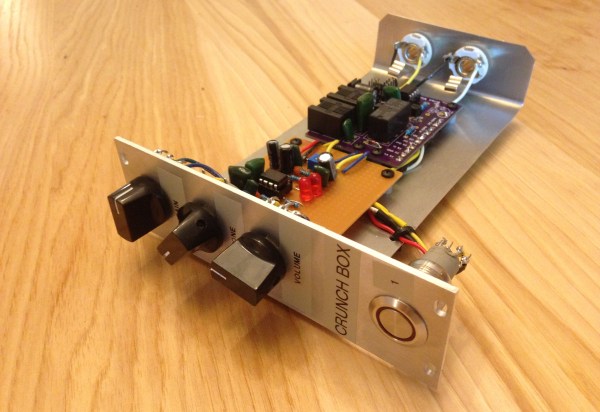
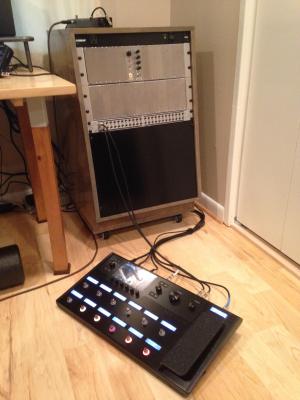
Taking inspiration from modular synthesizers, [Brian] built a rack out of wood to house the pedal modules. The rack uses 16U rack rails as a standard, with 3U Eurorack brackets. It looks like there’s space for 16 custom-built effects pedals to fit into the rack, and [Brian] can switch them out at will with a foot switch. Everything is tied together with MIDI and is programmed in Helix. The end result looks very polished, and helped [Brian] eliminate his rat’s nest of cables that was lying around before he built his effects rack.

MIDI is an extremely useful protocol for musicians and, despite being around since the ’80s, doesn’t show any signs of slowing down. If you want to get into it yourself, there are all kinds of ways that you can explore the studio space, even if you play an instrument that doesn’t typically use MIDI.

Helix Turning Tool Born From Necessity

helix turning tool

Sometimes while working on a project there comes a point where a specialized tool is needed. That necessary tool may or may not even exist. While [Fabien] was working on his DNA Lamp project he needed to bend a copper wire into a helical shape. Every one of us has wrapped a wire around a pencil and made a little springy thing at some point. While the diameter may have been constant, the turn spacing certainly was not. [Fabien] came up with a simple gizmo to solve that problem.

The tool utilizes an 8mm rod that will ensure the ID of the helix is indeed 8mm. We’ve already discussed that was the easy part. To make certain the turn spacing is not only consistent but also of the correct amount, a wooden frame is used. The frame has holes in it to allow the 8mm rod to pass through. Adjacent to those rod holes are much smaller holes just a bit larger than the copper wire that will become the helix. These holes are drilled at an angle to produce the correct turn spacing. [Fabien] figured out the correct angle by taking the desired turn spacing distance, helix diameter and wire diameter and plopping it in this formula:

Continue reading “Helix Turning Tool Born From Necessity”

Spark-Up Your Halloween Party With This Double Helix Jacob’s Ladder

Double Helix Jacobs Ladder

Dr. Frankenstein’s laboratory wouldn’t be complete without some electrical sparks. So for [Rick’s] final Halloween DIY hack this year he gives us just that, but with a twist. This time it’s a double helix Jacob’s ladder. The sparks are flying as they twist and turn their way up this unique design, powered by a standard neon sign transformer. If you can get your hands on a 15,000 V 30 mA transformer, you might have just enough time to build one for Halloween.

The build is quite simple. Other than the transformer, you will need a few feet of ¼ inch flexible copper tubing and a piece of ¾ inch PVC pipe. After twisting the copper tubing around the PVC pipe to form the double helix, [Rick] mounts the tubing to a block of wood and removes the PVC form. In his video, which you can watch after the break, [Rick] demonstrates a standard Jacob’s ladder, as well as his double helix design. The double helix version has a much nicer and slower traveling arc even stopping at times.

You don’t want to set this up anyplace someone might touch it as it can be quite deadly or cause burns. [Rick] mentions not to use wood to mount your ladder because the wood will burn as it did during his testing. And do not operate unattended. Otherwise, it adds some spark to your great Halloween fun.

Continue reading “Spark-Up Your Halloween Party With This Double Helix Jacob’s Ladder”