Pi-Powered Anti-Cat Trap Soaks Felines And Other Animals

[Joshua] has a problem with cats. They like pooping in his garden. He decided to take action with this awesome automated and humane cat trap.

Now just to clarify, he did attempt a few other alternatives before going all out in cat defense – the easiest solution would be to get a cat of his own, but alas, he’s not a cat person.

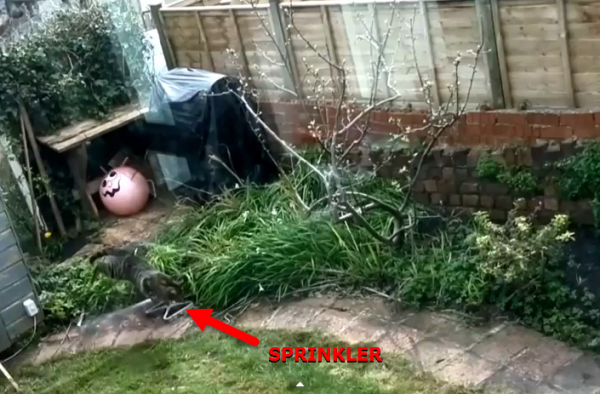
The system uses a Raspberry Pi in a waterproofed housing with a PiCam. He’s written some rudimentary code to make use of the PiCam Python Library which also allows him to record pre-cat-trapping footage, much for our enjoyment. When motion is sensed, the Pi trips a 24VAC solenoid water valve, which turns on the sprinkler and quickly soaks the intruder.

Stick around after the break for quite a few videos catching the furry little buggers in the act!

Continue reading “Pi-Powered Anti-Cat Trap Soaks Felines And Other Animals”

A Simple Commodore 64 Cart Dumper

c64

While [Rob] was digging around in his garage one day, he ran across an old Commodore 64 cartridge. With no ROM to be found online, he started wondering what was stored in this ancient device. Taking a peek at the bits stored in this cartridge would require dumping the entire thing to a modern computer, and armed with an Arduino, he created a simple cart dumper, capable of reading standard 8k cartridges without issue.

The expansion port for the C64 has a lot of pins corresponding to the control logic inside these old computers, but the only ones [Rob] were really interested in were the eight data lines and the sixteen address lines. With a little bit of code, [Rob] got an Arduino Mega to step through all the address pins and read the corresponding data at that location in memory. This data is then sent over USB to a C app that dumps everything in HEX and text.

While the ROM for just about every C64 game can be found online, [Rob] was unlucky enough to find one that wasn’t. It doesn’t really matter, though, as we don’t know if [Rob] has the 1541 disk drive that makes this cart useful. Still, it’s a good reminder of how useful an Arduino can be when used as an electronic swiss army knife.

Upgraded Nerf Gun Keeps Track Of Your Ammo

[Paul] and his buddy [Jonathan] recently had a zombie themed Larp event to go to, so in the spirit of making the experience more realistic, they decided to upgrade their Nerf N-Strike Stryfe gun.

They started by cracking open the gun and making note of the available space for a few bells and whistles. Luckily, thanks to traditional plastic injection molding practices — there’s lots of room!

Upgrades include a magazine sensor, a jam sensor, a trigger sensor and a voltmeter to make the gun a little bit smarter. A knockoff Arduino Pro Mini takes in all these inputs and outputs it to a 7-segment LED display for easy visibility. Our favorite part is the ammo sensor, which keeps a tally of how many shots you’ve used. It’s simply an IR photo-diode and IR transistor in a Darlington configuration, connected to the GPIO interrupt pin on the fake Arduino.

Continue reading “Upgraded Nerf Gun Keeps Track Of Your Ammo”

A Most Impractical Gear Position Indicator

GPI A few years ago, [Pat] sent in a really nice gear position indicator for his Suzuki V-Strom. With a single seven-segment display , a small microcontorller, and wires tied right into the bike’s ECM, it’s more than enough to do its job, and is much cheaper than aftermarket gear indicators. A simple, elegant solution that does one job well. How could this possibly be any better?

‘Better’ is a relative term, and depending on what you’re optimizing for, a more complex solution can easily be superior. [Pat] figured tripling the value of his motorcycle is a worthwhile goal, so he replaced that seven-segment display with an oscilloscope. It’s the world’s only oscilloscope based motorcycle gear position indicator, and now [Pat] needs a really, really long extension cord.

Like the earlier, more practical version, This build reads the voltage off the bike’s ECM to determine what gear the bike is in. The current gear is then displayed on a Tek MDO3000 with two PWM pins on a microcontroller. Practical? No, but it does look cool. Video below.

Continue reading “A Most Impractical Gear Position Indicator”

ServoBender, The Electronic Pedal Steel

You’ve most certainly heard a pedal steel guitar before, most likely in any ‘old’ country song, or more specifically, any country song that doesn’t include the word ‘truck’ in its lyrics. Pedal steels are strange devices, looking somewhat like a 10-string guitar with levers that change the pitch of individual strings. Historically, there have been some attempts to put a detuning mechanism for individual strings in normal electric guitars, but these are somewhat rare and weird. [Gr4yhound] just nailed it. He’s come up with the perfect device to emulate a pedal steel in a real guitar, and it sounds really, really good.

The imgur album for this project goes over the construction of the ServoBender in a bit more detail than the video. Basically, four servos are mounted to a metal plate below the bridge. Each servo has a spring and cam system constructed out of 3D printed parts. The detuning is controlled by an Arduino and a few sustain pedals retrofitted with hall effect sensors. Simple, really, but the effect is astonishing.

[Gra4hound]’s contraption is actually very similar to a B-Bender where a guitarist pushes on the neck to raise the pitch of the B string. This setup, though, is completely electronic, infinitely adjustable, and can be expanded to all six strings. Very, very cool, and it makes us wonder what could be done with one of those freaky robot guitars, a soldering iron, and a bit of code.

Video below, because you should watch it again.

Continue reading “ServoBender, The Electronic Pedal Steel”

Light Pen Draws On LED Matrix

dot-matrix01

Who needs a 1920×1080 OLED display when you can have an 8×8 matrix of LED goodness? That’s the question [Kathy] asked when she built this LED matrix light pen project. It looks simple enough – a 64-LED matrix illuminates as the pen draws shapes. But how does the circuit know which LED is under the pen? Good old fashioned matrix scanning is the answer. Only one LED is lit up at any time.

[Kathy] used a pair of 74LS138 3-to-8 line decoders to scan the matrix. The active low outputs on the ‘138 would be perfect for a common cathode matrix. Of course [Kathy] only had a common anode matrix, so 8 PNP transistors were pressed into service as inverters.

The pen itself is a phototransistor. [Kathy] originally tried a CdS photoresistor, but found it was a bit too slow for matrix scanning. An LM358 op-amp is used to get the signal up to a reasonable level for an Arduino Uno to detect.

The result is impressive for such a simple design. We’d love to see someone use this platform as the start of an epic snake game.

THP Entry: TOME, The Portable 3D Printer

TOME 
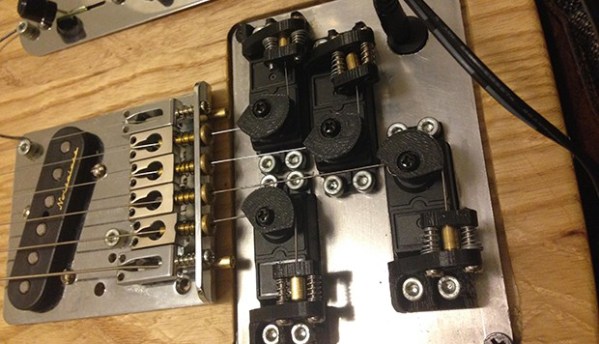
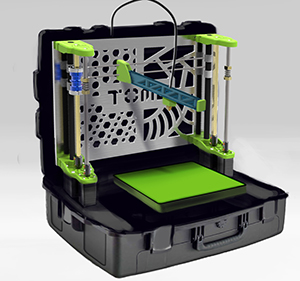
Alright, 3D Printers exist. They’re machines you can simply buy for a few hundred dollars, set them on your desk, and have them start churning out plastic parts. A little pedestrian, isn’t it? How about something you can take into the field for a client, and print out some new parts right there? How about sending a printer to the latest humanitarian crisis? After all, all those humanitarian uses for 3D printers we’ve been hearing about won’t do any good without a 3D printer.

TOME is [Philip]’s attempt at portabilizing a 3D printer and also his entry into The Hackaday Prize. The preliminary goals for TOME are the ability to print for four hours on a single battery, an auto leveling bed, and an accessible hot end that’s easy to replace.

Already the design for TOME is rather interesting. The astute printer aficionado will notice there is no stepper motor on the X carriage. The task of moving the head in the X axis is taken care of by a stepper in the base, with a square shaft and set of gears moving everything back and forth.

With this odd yet ingenious motor setup, the entire printer is able to collapse in on itself, allowing it to be installed in a waterproof plastic case. That’s something you’re going to need if you’re taking a printer on the road.


SpaceWrencherThe project featured in this post is an entry in The Hackaday Prize. Build something awesome and win a trip to space or hundreds of other prizes.