DIY pickup winder

Pro-Quality Pickup Winder You Can Make At Home

A lot of people find the art of building a guitar to be a worth while and pleasurable hobby. The task can be as easy as buying pre-made parts and assembling the guitar or as complicated as starting with just a piece of wood. Even advanced guitar builders normally do not get involved enough to wind their own pickups as it can be a tedious and labor intensive task. A low-end professional pickup winder can be purchased for about $450 which is certainly not economical for the hobbyist. [Doug] is one of those folks that wanted a pickup winder but didn’t want to shell out the big bucks. So what did he do? Build his own, of course.

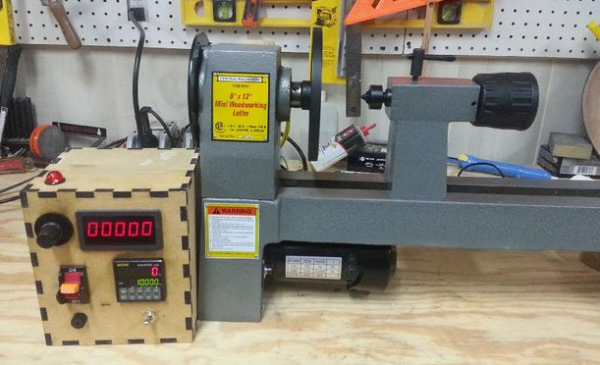
If [Doug] was going to build a winder he was going to do it right, with all the features to make pickup winding as quick and painless as possible. The winder needed to be fast, count the windings and stop after a pre-programmed amount of revolutions. To keep this machine safe and reliable while maintaining the ability to spin quickly, [Doug] chose to base the machine on an off-the-shelf wood lathe since they are sturdy and made to spin at high speeds. The lathe is equipped with a face plate where the pickup is mounted.

Once the pickup is mounted to the face plate, the desired amount of turns is programmed into a digital counter that receives a signal from an opto switch and encoder disk attached to the lathe spindle. The motor speed is manually controlled by a user-adjustable potentiometer. There is also a stand alone tachometer that gives speed feedback to the user. Once the counter reaches the pre-programmed limit, it trips a relay that cuts power to the motor. This way the amount of windings can be precisely controlled. There is even a switch that changes the motor direction for reverse winding humbuckers without the need to remove and flip over the pickup.

Continue reading “Pro-Quality Pickup Winder You Can Make At Home”

THP Hacker Bio: Felix Rusu

As far as entries for The Hackaday Prize go, Moteino is exceptionally interesting. It’s the only project to be used in other projects for The Hackaday Prize. The two other projects making use of the Moteino, 433MHz transceiver and Plant Friends didn’t make the cut, but [Felix]’s Moteino did.

Like many of the Internet of Things project, Moteino is a radio module and a microcontroller in an extremely convenient package. The radio is a HopeRF RFM69 operating in the  315, 433, 868 and 915MHz ISM bands. The microcontroller is everyone’s favorite – the ATMega328, but [Felix] also has a Mega version with the ATMega1284 on board. Already there are a few great examples of what the Moteino can do, including a mailbox notifier, a sump pump monitor, and a way to Internetify a water meter.

[Felix]’s bio below.

Continue reading “THP Hacker Bio: Felix Rusu”

Rotating Plants For Time-Lapse Purposes

Automating the growing process of plants and vegetables is an increasing trend among gardening enthusiasts and hobbyists. It’s no surprise, either, with microcontrollers, moisture sensors, Co2 detectors, and even time-lapse cameras with rotating wooden rigs that are in the hands of millions of amateur gardeners around the world.

This project by [Liz] helps to document the sprouting process of her tiny grapefruit bonsai tree that started to flourish at her apartment in Chicago.

Similar rigs can be used for practically any type of indoor plant. They can also be modified to move the plants and vegetables depending on how much light they are getting. Even further, just add some code to splice the photographs together and you’ve got yourself a custom setup that can produce animated GIF files to be uploaded easily to the internet. Pages and pages of happy and healthy growing plants unearthing themselves from the ground up would be pasted all over the web showing the entire sprouting process. An example video of this by [Liz] is embedded below.

Continue reading “Rotating Plants For Time-Lapse Purposes”

Extrinsic Motivation: And You Thought Inverted Pendulums Were Hard

An extremely common project for a control systems class is the inverted pendulum. Basically, it’s a robot mounted on a linear rail, a hinge, and a pendulum sticking straight up in the air. Get your algorithms right, and you have a pendulum that seemingly resists the inexorable pull of gravity and a great understanding of how Segways, balancing robots, and quadcopters work.

[zakowy] is taking this to the next level with his entry to The Hackaday Prize. It’s an inverted pendulum with two counter-rotating propellers in a gimballed fan, and the most unstable UAV design we’ve ever seen.

The mechanics of the build consist of a carbon and epoxy frame, with a motor mount that can move in the X and Y axes. This mount holds two brushless motors and is actuated with rather large pitch and roll servos. The electronics consist of the usual suite of sensors found in a quadcopter – gyros, accelerometers, magnetometers, and a barometric altimeter. Everything is controlled by an Arduino Due, getting commands from an RC receiver and sending telemetry back to a computer

[zakowy]’s project didn’t make the cut for the quarterfinalist selection, but he is undeterred. He’s building this strange contraption because he can, not because we’re dangling some great prizes in front of his nose. Right now, [zakowy] is working on a testing rig. This thing will fly, make no mistakes about that.

Videos available below.


SpaceWrencherThis project is an official entry to The Hackaday Prize that sadly didn’t make the quarterfinal selection. It’s still a great project, and worthy of a Hackaday post on its own.

Continue reading “Extrinsic Motivation: And You Thought Inverted Pendulums Were Hard”

Global Radiation Monitoring Network Update

Things have been busy at Global Radiation Monitoring Network Central Command. As a semifinalist in the Hackaday Prize, project creator [Radu Motisan] has quite a bit of work to do. He’s not slacking off either. With 33 project logs (and counting), [Radu] has been keeping us up to date with his monitoring network and progress on uRADMonitor , the actual monitoring hardware.

[Radu’s] latest news is that he’s ready to go into production with model A of the uRADMonitor. Moving from project to production can be an incredible amount of work due to sourcing parts, setting up assembly houses, and dealing with any snags that come up along the way. We’re sure [Radu] can handle it, though.

The network of uRADMonitors is also growing. A new monitor was just installed in Prescott, Arizona. This is the 10th unit in the USA.  You can view the map, data, and graphs of global radiation live on the uRADMonitor website.


SpaceWrencherThe project featured in this post is a semifinalist in The Hackaday Prize.

Changing Poi Colors Based On Speed And Velocity

LED toys have become synonymous with the underground rave culture as party-goers gaze into vortexes of spinning light known as poi. Most of these objects come pre-programmed, but some can be custom coded. However, only a few tap into an accelerometer changing the colorful circles of energy depending on how fast they move through space. One stunning example is this LED device called the ‘Center Flee’ that translates accelerometer data into sequences of alternating RGB colors.

The LED values are ‘printed’ to the tethered objects at specific points in the rotational arc. The devices are controlled with an Arduino, and a XBee wireless module transmits data to a computer nearby, eliminating the need to manually remove an SD card after each spinning session.

When spun, the poi acts like a colorful, twirling extension of the performer that produces a mesmerizing, vibrant effect. It’s nice to see the progression of glow sticks tied to shoelaces into g-force sensing devices that can captivate surrounding audiences.

Other examples of similar types of ideas include this accelerometer poi that was cut with a CNC machine and these LED staffs for the ultimate portable rave.

Below is a video playlist of the Center Flee being tested out.

Continue reading “Changing Poi Colors Based On Speed And Velocity”

Homemade Omnidirectional Speakers In A Unique Enclosure

While studying acoustics in college (university for non-Americans), [Nick] had a great idea for an omnidirectional speaker. Some models available for purchase have a single speaker with a channel to route the sound in all directions, but [Nick] decided that a dodecahedron enclosure with 12 speakers would be a much more impressive route.

To accommodate the array of speakers, the enclosure needs twelve pentagons with a 58.3 degree bevel so that they fit together in a ball shape. After thinking about all of the complicated ways he could get this angle cut into the wood pentagons, he ended up using a simple circular saw!

Once the enclosure was painted [Nick] started wiring up the speakers. The equivalent impedance of the array of 8-ohm speakers works out to just around 10 ohms, which is easily driven by most amplifiers. The whole thing was hung from a custom-made galvanized pipe (all the weight adds up to about 15 kilograms, or 33 pounds for Americans, so the rig needed to be sturdy). We’ve featured other unique speaker builds, but this is the first 12-speaker omnidirectional speaker we’ve seen. [Nick] is happy to report that the speakers sound great, too!