Home Computers Behind The Iron Curtain

I was born in 1973 in Czechoslovakia. It was a small country in the middle of Europe, unfortunately on the dark side of the Iron Curtain. We had never been a part of Soviet Union (as many think), but we were so-called “Soviet Satellite”, side by side with Poland, Hungary, and East Germany.

My hobbies were electronics and – in the middle of 80s – computers. The history of computers behind the Iron Curtain is very interesting, with a lot of unusual moments. For example – communists at first called cybernetics as “bourgeois’ pseudoscience” (as well as sociology or semiotics), “used to enslave a mankind by machines”. But later on they understood the importance of computers, primarily for science and army. So in 50s the Eastern Bloc started to build its own computers, separately and “in its own way.”

The biggest problem was a lack of modern technologies. There were a lot of skilled and clever people in eastern countries, but they had a lot of problems with the elementary technical things. Manufacturing of electronics parts was divided into diverse countries of Comecon – The Council for Mutual Economic Assistance. In reality, it led to an absurd situation: You could buy the eastern copy of Z80 (made in Eastern Germany as U880D), but you couldn’t buy 74LS00 at the same time. Yes, a lot of manufacturers made it, but “it is out of stock now; try to ask next year”. So “make a computer” meant 50 percent of electronics skills and 50 percent of unofficial social network and knowledge like “I know a guy who knows a guy and his neighbor works in a factory, where they maybe have a material for PCBs” at those times.

Continue reading “Home Computers Behind The Iron Curtain”

LabVolt Robot Arm Reverse Engineering

Reverse Engineering A Robotic Arm

Not too many people will argue that Robot Arms aren’t cool. [Dan] thinks they are cool and purchased a LabVolt Armdroid robotic arm on eBay for a mere $150. Unfortunately, he did not get the power supply or the control unit. To most, this would a serious hurdle to overcome, but not for [Dan]. He opened up the robot and started probing around the circuit board to figure out what was going on.

Since there was a DB9 connector on the outside of the robot arm, he assumed it was a standard RS-232 controlled device. Good thing he checked the internal circuitry because this was not the case at all. There was no mircocontroller or microprocessor found inside.  [Dan] painstakingly reversed engineered the circuit board and documented his results. He found that there were SN76537A chips that drove the 6 unipolar stepper motors and SN75HC259 latches to address each individual motor.

Now knowing how the robot works, [Dan] had to figure out how to control the robot from his computer. He started by making a custom Parallel Port to DB9 cable to connect the computer to the arm. After a series of several programs, starting with simply moving just one arm joint, the latest iteration allows manual control of all joints using the computer keyboard. A big ‘Thanks’ goes out to [Dan] for all his work and documentation.


Paintball Gun From Scratch

Making A Paintball Gun From Scratch

[Ben’s] big brother [Brian] has been slowly building up a respectable mini-machine shop in his garage over the past few years, collecting odds and ends off of Craigslist for cheap. Looking for a fun project to do together, they decided to try their hand at building a paintball gun — completely from scratch.

They have a Spyder paintball gun that they have taken apart many times — but it uses a stacked tube configuration for the firing mechanism — a bit too complex for a first project. After discovering ZDSPB.com (which is an awesome site that has animations of all the different styles of paintball guns) they settled on making a Tippman clone.

Trying to keep the budget as small as possible, [Brian] found a free 3D CAD program from the makers of Pro/E — it’s called Creo Elements/Direct Modeling Express 6.0, and with that they began designing the gun…

Once they had the mechanism down pat they just had to start machining. Here’s the highly anticipated first test fire — can you hear the joy in the success?

Continue reading “Making A Paintball Gun From Scratch”

Gift Your Next Robot With The Brain Of A Roundworm

A group of developers called [OpenWorm] have mapped the 302 neurons of the Caenorhabditis elegans species of roundworm and created a virtual neural network that can be used to solve all the types of problems a worm might encounter. Which, when you think about it, aren’t much different from those a floor-crawling robots would be confronted with.

wormy

In a demo video released by one of the projects founders, [Timothy Busbice], their network is used to control a small Lego-rover equipped with a forward sonar sensor. The robot is able to stop before it hits a wall and determine an appropriate response, which may be to stop, back up, or turn. This is all pretty fantastic when you compare these 302 neural connections to any code you’ve ever written to accomplish the same task! It might be a much more complex route to the same outcome, but its uniquely organic… which makes watching the little Lego-bot fascinating; its stumbling around even looks more like thinking than executing.

I feel obligated to bring up the implications of this project. Since we’re all thinking about it now, let’s all imagine the human brain similarly mapped and able to simulate complex thought processes. If we can pull this off one day, not only will we learn a lot more about how our squishy grey hard drives process information, artificial intelligence will also improve by leaps and bounds. An effort to do this is already in effect, called the connectome project, however since there are a few more connections to map than with the c. elegans’ brain, it’s a feat that is still underway.

The project is called “open”worm, which of course means you can download the code from their website and potentially dabble in neuro-robotics yourself. If you do, we want to hear about your wormy brain bot.

Continue reading “Gift Your Next Robot With The Brain Of A Roundworm”

Chicken_Feed_Indicator

DIY Chicken Feed Indicator Tells You When To Feed The Chickens

While prepping for the upcoming apocalypse, the [prepforshtf] folks had time to design and build an automatic chicken feeder. It’s a very simple design (the best kind) that is made from standard PVC drain pipe. The pipe is positioned vertically and filled with chicken feed. A T-joint at the bottom of the pipe allows chickens to access the food inside. As food is eaten away, gravity pulls more food down to the feeding area.

That sounds pretty straight forward but it quickly became clear that checking the food level was a chore, almost as much as just feeding the chickens everyday. To remedy the requirement to constantly check the food level, the automatic feeder system was taken apart and modified to include a level indicator. Now, inside the 4-inch pipe resides a plate that resembles a butterfly valve.

This plate doesn’t control the flow of feed like a normal butterfly valve would, the feed actually holds the plate in a vertical position until the feed level drops below the plate. Since the plate has a heavier side, it will rotate when the feed no longer holds it in position. A large red pointer was attached to the plate’s axle and, since it is on the outside of the feeder, it allows a clear indication that the feeder needs a refill.

This is a great project that shows that even simple projects can be very beneficial in everyday life. With no electronics or batteries to fail, this feed indicator will certainly be very reliable. No doubt the chickens will be happy. Check this out for a more involved electricity-powered feeder.

Taste The Rainbow One Color At A Time

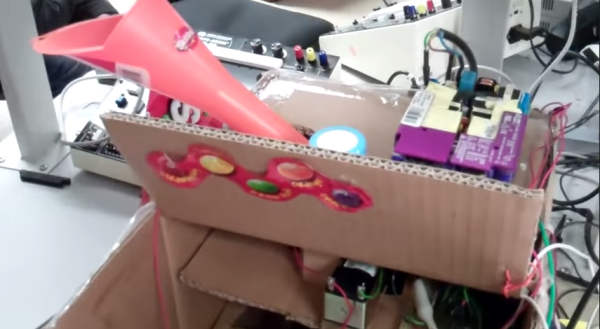
It’s the end of another fall semester of Bruce Land’s ECE4760 class at Cornell, and that means a fresh crop of microcontroller-based student projects. For their project, [Alice, Jesse, and Mikhail] built a Skittle-sorting miniature factory that bags and seals same-colored candies into little pouches of flavor.

Their design is split into three stages, which are visually delineated within the all-cardboard housing. Skittles are loaded into a funnel at the top that leads to the color detection module. The color is determined here with an RGB LED and OPT101 photodiode driven by an ATMega1284.  Because the reflected RGB values of red and orange Skittles are so similar, the detector uses white light to make the final determination.

Once the matchmaking is over, a servo in the second stage rotates to the angle that corresponds with the color outcome. The Skittle then slides down a cardboard chute, passes through a hole in a cardboard disk, and drops into a hanging bag. Once the bags have reached the predetermined capacity, another servo moves the carousel of bags to a nichrome wire sealing rig. Lead factory worker [Jesse] must intervene at this point to pull the bags off the line. You can see the full walk-through and demonstration of this Skittle flavor separator after the break.

Continue reading “Taste The Rainbow One Color At A Time”

Hackaday Links Column Banner

Hackaday Links: December 14, 2014


The Progressive Snapshot is a small device that plugs into the ODB-II port on your car, figures out how terrible of a driver you are, and sends that data to Progressive servers so a discount (or increase) can be applied to your car insurance policy. [Jared] wondered what was inside this little device, so he did a teardown. There’s an Atmel ARM in there along with a SIM card. Anyone else want to have a go at reverse engineering this thing from a few pictures?

[Alex]’s dad received a special gift for his company’s 50th anniversary – a Zippo Ziplight. Basically, its a flashlight stuffed into the metal Zippo lighter we all know and love. The problem is, it’s battery-powered, and Zippo doesn’t make them any more. It also uses AAAA batteries. Yes, four As. No problem, because you can take apart a 9V and get six of them.

‘Tis the season to decorate things, I guess, and here’s a Hackaday snowflake. That’s from [Benjamin Gray], someone who really knows his way around a laser cutter.

HHaviing trouble wiith a debounce ciircut? HHer’s a calculator for just thhat problem. Put iin the logiic hhiigh voltage level, the bounce tiime, and the fiinal voltage, and you get the capaciitor value and resiistor value.

A harmonograph is a device that puts a pen on a pendulum, drawing out complex curves that even a spirograph would find impressive. [Matt] wanted to make some harmonographs, but a CNC and a printing press got in the way. He’s actually making some interesting prints that would be difficult if not impossible to make with a traditional harmonograph – [Matt] can control the depth and width of the cut, making for some interesting patterns.

The Mooltipass, the Developed On Hackaday offline password keeper, has had an interesting crowdfunding campaign and now it’s completely funded. The person who tipped it over was [Shad Van Den Hul]. Go him. There’s still two days left in the campaign, so now’s the time if you want one.