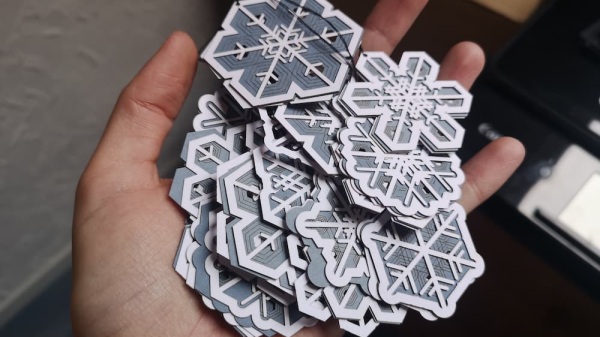
A persons handing holding a pile of generative, laser cut snowflake ornaments

Laser-Cutting A Flurry Of Generative Snowflakes

It’s the holiday season, and what better way to celebrate than to carve out some generative snowflakes on your laser cutter? [Bleeptrack] has developed a web-based tool that creates generative snowflake ornaments which can be exported to SVG files ready-made for laser or vinyl cutting.

True to their namesake, each generated snowflake ornament is (very likely to be) unique, with multiple layers created that can be stacked on top of each other. [Bleeptrack] has showcased a few realizations, using semitransparent paper sandwiched between two top layer cutouts, made out of wood or cardboard.

The snowflakes are a great balance of minimal design while still being beautiful and rich in detail. They can be easily produced on any laser cutter or vinyl cutter that you might have handy. Source code is available on GitHub for those wanting to dive into the details of the web tool. Cutting one of your own would make a perfect addition to a Neodriver ornament or a tiny DOOM playing ornament. Video after the break!

Continue reading “Laser-Cutting A Flurry Of Generative Snowflakes”

Epoxy Too Thin? Use Wood Flour As A Thixotropic Filler

The world of glues is wide and varied, and it pays to use the right glue for the job. When [Eric] needed to stick a wide and flat 3D printed mount onto the back of a PCB that had been weatherproofed with an uneven epoxy coating, he needed a gap-filling adhesive that would bond to both surfaces. It seemed like a job for the hot glue gun, but the surface was a bit larger than [Eric] was comfortable using with hot glue for. The larger the surface to be glued, the harder it is to do the whole thing before hot glue cools too much to bond properly.

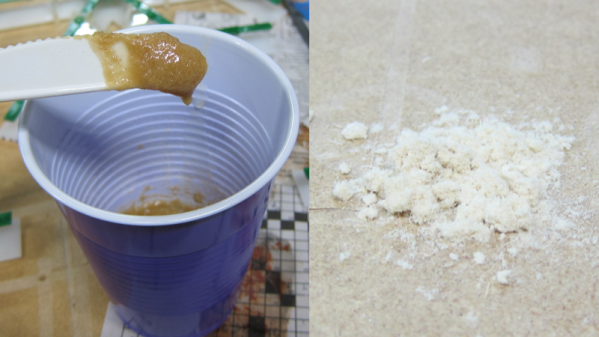
What [Eric] really wanted to use was a high quality two-part epoxy that he already had on hand, but the stuff was too runny to work properly for this application. His solution was to thicken it with a thixotropic filler, which yields a mixture that is akin to peanut butter: sticky, easily spread to where it’s needed, but otherwise stays in place without dripping or sagging and doesn’t affect bonding.

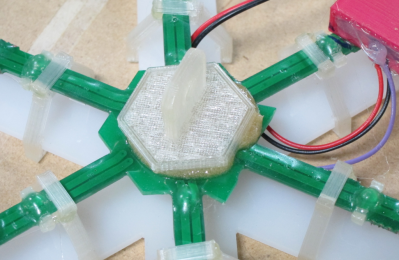
3D printed pad stuck to back of PCB with thickened epoxy.

Common thixotropic fillers include ground silica or plastic fibers, but [Eric]’s choice was wood flour. Wood flour is really just very fine sawdust, and easily obtained from the bag on his orbital sander. Simply mix up a batch of thin two-part epoxy and stir in some wood flour until the sticky mixture holds its shape. Apply as needed, and allow it to cure.

Thanks to this, [Eric] was able to securely glue a 3D printed pad to the back of his animated LED snowflakes to help mount them in tricky spots. Whether for small projects or huge installations, LEDs, PCBs, and snowflakes are a good combination.

SIM Card Connectors And White PCBs Make Huge LED Snowflakes Happen

[Mike Harrison] talked about designing and building a huge scale LED lighting installation in which PCBs were used as both electrical and mechanical elements, and presented at Electromagnetic Field 2016. The project involved 84,000 RGBW LEDs, 14,000 microcontrollers and 25,000 PCBs. It had some different problems to solve compared to small jobs, but [Mike] shared techniques that could be equally applied to smaller scale projects or applications. He goes into detail on designing for manufacture and assembly, sourcing the parts, and building the units on-site.

The installation itself was a snowflake display for a high-end shopping mall in Hong Kong in the 2015 Christmas season. [Mike] wanted a small number of modular boards that could be connected together on-site to make up the right shapes. In an effort to minimize the kinds of manufacturing and parts needed, he ended up using modular white PCBs as structural elements as well as electrical. With the exception of some minor hardware like steel wire supports, no part of the huge snowflakes required anything outside of usual PCB manufacturing processes to make. The fewer suppliers, the fewer potential problems. [Mike] goes into design detail at 6:28 in the video.

For the connections between the boards, he ended up using SIM card connectors intended for cell phones. Some testing led to choosing a connector that matched up well with the thickness of a 1.6mm PCB used as a spacer. About 28,000 of them were used, and for a while in 2015 it was very hard to get a hold of that particular part, because they had cleaned everyone out! Continue reading “SIM Card Connectors And White PCBs Make Huge LED Snowflakes Happen”

World Standard Organizations To Release Entirely Reworked Standards

After months of cross-disciplinary meetings, some of the largest professional associations just announced their plans to submit an entire standard set for engineers with egos too fragile to accept design criticism. The Special Snowflake Standard or S2 (in compliance with Godwin’s law) ensures compromised mechanical and electrical integrity by ignoring proper design methodologies for more fluid definitions of success. The Special Snowflake Standard allows the modern engineer greater flexibility in avoiding self-improvement in their field while maintaining an advanced level of apparent competency.

The Standard follows an ingenious randomly generated naming scheme to hinder cross-checking and look-up. The honesty being the only change from the current system. It took us a while to navigate the websites built to serve the standards, as they themselves were built to the W3C.S2.01.d.f4r.7 Special Snowflake Standard For Geriatric Exclusion From The Study of Modern Web Development and therefore were only accessible through the Gopher protocol running specifically on SPARC workstations.

Nonetheless, after working through multiple W3C.S2.u.r.f4.u17 Probably PEBKAC Self Exclusion Of Responsibility Standard errors, we found a few standards we’re really excited about. Let’s take a look at a the highlights:

Continue reading “World Standard Organizations To Release Entirely Reworked Standards”

Hackaday Links Column Banner

Hackaday Links: December 14, 2014


The Progressive Snapshot is a small device that plugs into the ODB-II port on your car, figures out how terrible of a driver you are, and sends that data to Progressive servers so a discount (or increase) can be applied to your car insurance policy. [Jared] wondered what was inside this little device, so he did a teardown. There’s an Atmel ARM in there along with a SIM card. Anyone else want to have a go at reverse engineering this thing from a few pictures?

[Alex]’s dad received a special gift for his company’s 50th anniversary – a Zippo Ziplight. Basically, its a flashlight stuffed into the metal Zippo lighter we all know and love. The problem is, it’s battery-powered, and Zippo doesn’t make them any more. It also uses AAAA batteries. Yes, four As. No problem, because you can take apart a 9V and get six of them.

‘Tis the season to decorate things, I guess, and here’s a Hackaday snowflake. That’s from [Benjamin Gray], someone who really knows his way around a laser cutter.

HHaviing trouble wiith a debounce ciircut? HHer’s a calculator for just thhat problem. Put iin the logiic hhiigh voltage level, the bounce tiime, and the fiinal voltage, and you get the capaciitor value and resiistor value.

A harmonograph is a device that puts a pen on a pendulum, drawing out complex curves that even a spirograph would find impressive. [Matt] wanted to make some harmonographs, but a CNC and a printing press got in the way. He’s actually making some interesting prints that would be difficult if not impossible to make with a traditional harmonograph – [Matt] can control the depth and width of the cut, making for some interesting patterns.

The Mooltipass, the Developed On Hackaday offline password keeper, has had an interesting crowdfunding campaign and now it’s completely funded. The person who tipped it over was [Shad Van Den Hul]. Go him. There’s still two days left in the campaign, so now’s the time if you want one.

Macro Photos Using An Under-light Rig

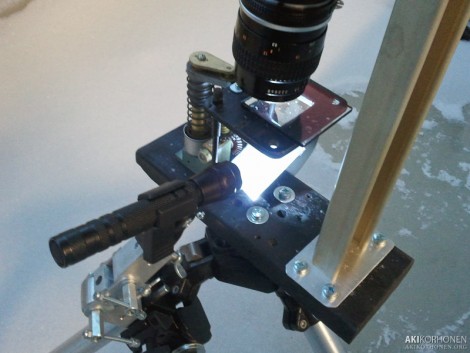
[Aki Korhonen] wanted to tighten up his macro photography setup. He already had the camera for the job, but wanted a fully adjustable target platform that he could easily light. What he came up with is a jig to hold the camera and fine tune the subject of each photo. It uses a frame with a piece of glass whose distance from the lens is adjusted by turning a knob. Below the glass a reflective surface redirects light from an LED flashlight up through the platform, lighting the snowflakes he’s shooting. A fixed LED source is in the plans for the next rendition.

Take a look at the overview of his setup in the quick clip after the break.

Continue reading “Macro Photos Using An Under-light Rig”