EDC CONTEST ROUNDUP: Musician’s Assistant AND BitMasher!

We’re getting all sorts of entries in the Trinket Everyday Carry Contest! Today we’re featuring just a couple of the awesome entries dedicated to creating music!

ma[johnowhitaker] is hard at work on A Musician’s Assistant. [John] is creating a device that does anything a practicing musician might need on the go. The Musician’s Assistant will include a metronome, tap/temp counter, and tuner. He’s hoping to also give it the ability to play back arbitrary notes using the Pro Trinket’s on-board ATmega328. [John] is trying to do all this with just LEDs and buttons as a user interface, though he is willing to go to an LCD or OLED if he needs to.

masher
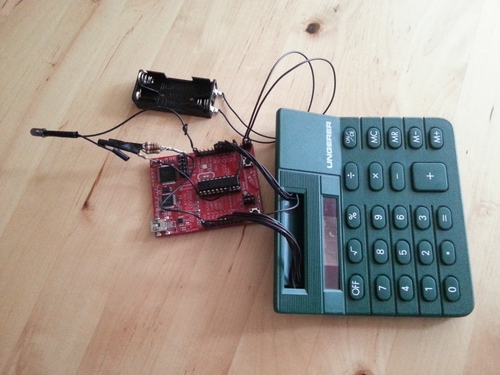
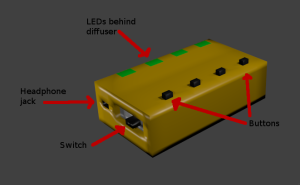
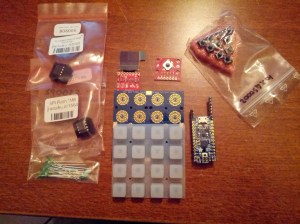
[Michele Perla] is working on BitMasher, portable lo-fi music sequencer. The BitMasher will allow a musician on the go to create music anywhere. [Michele] began with a SID based sequencer in mind, but he’s currently trying to do it all on the Pro Trinket. He’s already got [Roman’s] BTc Sound Compression Algorithm working on an Arduino Leonardo. Lo-Fi for sure, but that’s what makes BitMasher fun! [Michele] envisions the song entry to be similar to that of the classic Roland TR-808.  The primary user interface will be an Adafruit Trellis 4×4 button+LED driver board.

Don’t forget that our second random drawing will be held on Tuesday, December 9th, at 9pm EST.  To be eligible you need to submit your project as an official entry and publish at least one project log during the week. This week’s prize is a Cordwood Puzzle from The Hackaday Store. Check out the contest page for the full details!

Compiling Your Own Programs For The ESP8266

When the ESP8266 was first announced to the world, we were shocked that someone was able to make a cheap, accessible UART to WiFi bridge. Until we get some spectrum opened up and better hardware, this is the part you need to build an Internet of Things thing.

It didn’t stop there, though. Some extremely clever people figured out the ESP8266 had a reasonably high-power microcontroller on board, a lot of Flash, and a good amount of RAM. It looked like you could just use the ESP8266 as a controller unto itself; with this chip, all you need to do is write some code for the ESP, and you have a complete solution for your Internet connected blinking lights or WiFi enabled toaster. Whatever the hip things the cool kids are doing these days, I guess.

But how do you set up your toolchain for the ESP8266? How do you build projects? How do you even upload the thing? Yes, it’s complicated, but never fear; [CNLohr] is here to make things easy for you. He’s put together a video that goes through all the steps to getting the toolchain running, setting up the build environment, and putting some code on the ESP8266. It’s all in a git, with some video annotations.

The tutorial covers setting up the Xtensa toolchain and a patched version of GCC, GDB, and binutils. This will take a long, long time to build, but once it’s done you have a build environment for the ESP8266.

With the build environment put together, [CNLohr] then grabs the Espressif SDK from the official site, and puts together the example image. Uploading to the module requires pulling some of the pins high and some low, plugging in a USB to serial module to send the code to the module, standing well back, and pressing upload.

For his example image, [CNLohr] has a few WS2812 RGB LEDs connected to the ESP8266 WiFi module. Uploading the image turns the LEDs into something controllable with UDP packets on port 7777. It’s exactly what you want in a programmable, WiFi chip, and just the beginning of what can be done with this very cool module.

If you’re looking around for some sort of dev board with an ESP8266 on it, [Mathieu] has been playing around with some cool boards, and we’ve been looking into making a Hackaday version to sell in the store. The Hackaday version probably won’t happen because FCC.

Continue reading “Compiling Your Own Programs For The ESP8266”

The Last Week Of The Mooltipass Approacheth

A year and two days ago, [Mathieu] started out on a quest to develop some hardware with the help of Hackaday readers. This project became known as the Mooltipass, an open source offline password keeper that’s pretty much a password management suite or Post-It notes on a monitor, except not horribly insecure.

The product has gone through multiple iterations of software, [Mathieu] flew out to China to get production started, and the project finally made it to a crowdfunding site. That crowdfunding campaign is almost over with just eight days left and just a little bit left to tip this project into production. This is the last call, all hands in, and if you’re thinking about getting one of these little secure password-storing boxes, this is the time.

You can check out the Developed on Hackaday series going over the entire development of the Mooltipass, made with input from Mooltipass contributors and Hackaday readers. The Venn diagram of those two groups overlaps a lot, making this the first piece of hardware that was developed for and by Hackaday readers.

Even if you have a fool-proof system of remembering all your passwords and login credentials, the Mooltipass is still a very cool-looking Arduino-compatible board. Note that (security device) and (Arduino thing) are two distinct operating modes that should not be conflated.

[Mathieu] and other contributors will be in the comments below, along with a bunch of ‘security researchers’ saying how this device ‘is horrifying’, ‘full of holes’, and ‘a terrible idea’. One of these sets of people have actually done research. Guess which?

Toilet Sink Saves Water

Saving The Planet One Flush At A Time

Water is a natural resource that some of use humans take for granted. It seems that we can turn on a facet to find an unlimited supply. That’s not true in all parts of the world. In the US, toilets use 27% of household water requirements. That’s a lot of water to only be used once. The water filling the toilet after the flush is the same as that comes out of the sink. [gregory] thought it would make sense to combine toilet tank filling with hand washing as those two activities happen at the same time.

To accomplish this, a DIY sink and faucet were put in-line with the toilet tank fill supply. The first step was to make a new tank lid. [gregory] used particle board and admits it probably isn’t the best material, but it is what he had on hand. A hole was cut in the lid where a metal bowl is glued in. Holes were drilled in the bottom of the bowl so that water could drain down into the tank. The faucet is just standard copper tubing. The curve was bent by hand using a wire wrap method to keep it from kinking. The only remaining part was to connect the fill line (after the fill valve) to the faucet. Now, when the toilet is flushed, the faucet starts flowing.

Continue reading “Saving The Planet One Flush At A Time”

Crosswalk Pong Auf Deutschland

What is there to do in America while you’re waiting to cross the street at an intersection? Nothing; listen to that impatient clicking sound, and if you live in a busy city, pray you don’t get plowed into. In Germany however, pedestrians will now get to play Pong with the person on the other side.That’s right, as a means to encourage people to just hang in there and wait out the cycle instead of darting across against the light, design students [Sandro Engel] and [Holger Michel] came up with an entertaining incentive involving a potential conversation sparking duel with your impromptu counterpart across the street.

The first of these interactive cross-walk indicators was installed recently in Hildesheim, Germany, two years after the duo first designed them back in 2012. There was a little friction about installing the touch screen equipped modules initially, but after a proper redesign for functionality taking traffic science into account, the city authorities caved and allowed them to test the wings of their progressive idea on one city intersection so far. The mindset behind the invention of these indicators is part of a larger movement to make public spaces safer through means of fun and entertainment. Instead of threatening to punish those partaking in unsafe activity with fines, the notion is to positively enforce following rules by adding a level of play. While pedestrians have the right to walk, the screen shows how much time is left to make their away across, and for the duration that traffic is rolling through, the score will be kept for an individual game of pong for those on either side of the light.

Since the idea is generating some interest, the group of developers involved with the project have moved to promote their work (now branded as Actiwait) with an Indiegogo campaign. They hope to turn their invention into a full fledged product that will potentially be seen all over the world. Admittedly, it’d be charming to see this sort of technology transform our urban or residential environments with a touch of something that promotes friendly social interaction. Hopefully my faith in our worthiness to have nice things is warranted and we start seeing these here in America too. Nice work!

Check out this encounter with the street indicator here. The guy introducing the invention loses to the girl on the other side, but they share a high-five as they pass in the street:

Continue reading “Crosswalk Pong Auf Deutschland”

Calculator Remote with Launchpad

Calculator + MSP430 + IR LED = TV Remote?

Eschewing the store-bought solution, [Stefan] managed to build a TV remote out of an old calculator. The brains of the calculator were discarded and replaced with an MSP430, leaving only the button matrix and enclosure. Rather than look it up, he successfully mapped the matrix manually before getting stumped with the infrared code timings. Some research pointed him to a peculiarity with Samsung IR codes and with help from an open source remote control library he got it working.

When the range was too limited to satisfy him he added a booster circuit and an LED driver which he snapped off the top of an old remote; now it works from 30 feet away. Some electrical tape and hot glue later and it all fit back into the original case.

It cannot take photos or play Super Smash Brothers, but it does what a remote needs to do: browses channels in the guide, control volume, and turn the TV on or off. Considering that all this calculator was built to do was boring basic arithmetic, it is a procrastination-enabling upgrade.

See the video after the break for some smiles.

Continue reading “Calculator + MSP430 + IR LED = TV Remote?”

Chaos Theory In Practice: Chua’s Circuit

Chua’s circuit is the simplest electronic circuit that produces chaos—the output of this circuit never repeats the same sequence, and is a truly random signal. If you need a good source of randomness, Chua’s circuit is easy to make and is built around standard components that you might have lying around. [Valentine] wrote a comprehensive guide which walks you through the process of building your own source of chaos.

The chaos of Chua’s circuit is derived from several elements, most importantly a nonlinear negative resistor. Unfortunately for us, this type of resistor doesn’t exist in a discrete form, so we have to model it with several other components. This resistor, also known as Chua’s diode, can be created with an op-amp configured as a negative impedance converter and a couple pairs of diodes and resistors. Other variations such, as the schematic above,22`01 model Chua’s diode using only op-amps and resistors.

The rest of the circuit is quite simple: only two capacitors, an inductor, and a resistor are needed. [Valentine] does note that the circuit is quite sensitive, so you might encounter issues when building it on a breadboard. The circuit is very sensitive to vibration (especially on a breadboard), and good solder connections are essential to a reliable circuit. Be sure to check out the Wikipedia article on Chua’s circuit for a brief overview of the circuit’s functionality and a rabbit trail of information on chaos theory.