Digital Counter From Stuff You Have In Your Junk Drawer

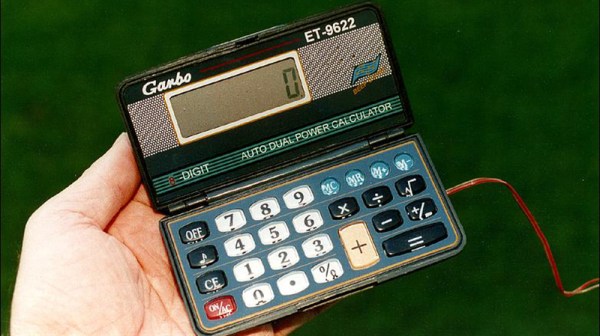
In vehicle racing, a properly tuned suspension is essential for making good time around the track. Weekend Race Warrior [Julian], thought that his right rear suspension might be bottoming out when making hard left turns. After thinking about it for a while, he came up with a super simple way to measure how many times his suspension bottoms out during a lap: a digital counter made from a calculator.

There are two types of calculators out there, one is good for this project and the other won’t work. To figure out which one you have, type in 1+1=. All calculators should display 2. Then, press the = button again. Some calculators will continue to show 2, but some will change to 3, then 4 and so on as many times as the = button is pressed. This is the type of calculator this project requires.

[Julian] opened up his calculator and soldered a pair of wires across the = button terminals. After a hole was drilled in the case for the wires to exit, the calculator was put back together. To count how often his suspension bottomed out, a normally open limit switch was installed on the car at a point where it would be triggered when the suspension bottomed out. The 2 added wires coming out of the modified calculator connect to that switch. Switch presses now emulate a = button press. Before starting a lap, 1+1= is pressed to display 2. At the end of the lap, if the suspension bottomed out, the switch would be triggered and the displayed value would increase. Remember to subtract 2 from that value to get the total number of events that occurred.

A mechanical switch makes this a great application for counting when things move a certain way but there are some more options. Connecting the switch-side of a relay to the calculator allows [Julian] to count brake presses (via the break light signals) or count how often his boost pressure goes over a certain amount (using a pressure switch).

Typewriter Types, Plays Music

[Chris Gregg] had a dream. He wanted to convert use a typewriter as a printer. Sure this has been done before, but [Chris] wanted to create his own version. He picked up a 60’s era Smith Corona electric typewriter, with the hopes of driving its key switches with a computer. You can imagine his surprise when he discovered the keys were not electric switches at all, but a complex mechanical system which triggered a clutch to strike the actual paper. Realizing this was not going to be a simple wiring job, [Chris] set the project aside, where it remained for several years.

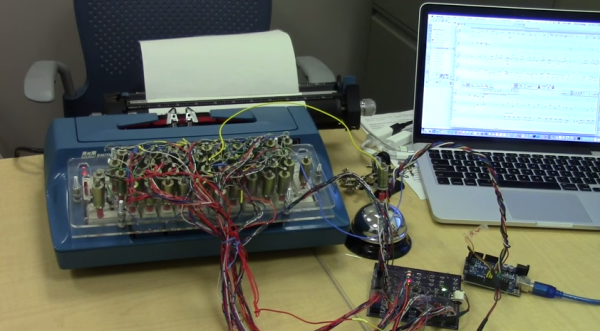
A conversation with [Bruce Molay], a coworker at Tufts University reignited [Chris’] interest in project. [Bruce] suggested using solenoids to press the keys. [Chris] dove in, and quickly had 48 solenoids on hand. The first problem was mounting the solenoids on the keys. [Chris’] roommate happens to be [Derek Seabury], president of Artisan’s Asylum Hackerspace. [Derek] created an acrylic frame which holds the solenoids and fits directly over the typewriter’s keyboard. This meant that no modifications needed to be made to the typewriter itself. Simply lift off the solenoid array and you’re ready to rock like it’s 1965.

The next step was driving all those solenoids. For that, Chris worked with [Kate Wasynczuk], one of his students at Tufts. [Chris] designed a board using Texas Instruments  TPIC6A595 shift registers. The TIPC “power logic” series work like regular 74 series logic, but have seriously beefy outputs. These chips can handle up to 50 volts and 1.5 amps pulsed output current – plenty for [Chris’] 24 volt solenoids. [Chris] taught himself schematic entry and PCB layout in Eagle. After only two tries, he had a working board from OSHPark.

An Arduino Uno converts serial over USB output to a bit stream ready to clock into the shift registers. On the computer side, [Chris] wrote up a basic CUPS driver which allows him to print from his Macbook. The perfect demo for this project turned out to be musical. Click past the break to see The Smith Corona perform “The Typewriter Symphony”, by Leroy Anderson. This may be the first time this particular piece of music has been performed with actual words being typed, rather than random keys.

Continue reading “Typewriter Types, Plays Music”

The Alexanderson Transmitter: Very-low Frequency Radio Rides Again!

Is your ham radio rig made of iron and steel? Is it mechanically driven? Classified as a World Heritage Site? We didn’t think so. But if you’d like to tune in one that is, or if you’re just a ham radio geek in need of a bizarre challenge, don’t miss Alexanderson Day 2015 tomorrow, Sunday, June 28th

The Alexanderson Transmitter design dates back to around 1910, before any of the newfangled tube technology had been invented. Weighing in at around 50 tons, the monster powering the Varberg Radio Station is essentially a high-speed alternator — a generator that puts out 17.2 kHz instead of the 50-60 Hz  that the electric companies give us today.

Most of the challenge in receiving the Alexanderson transmitter broadcasts are due to this very low broadcast frequency; your antenna is not long enough. If you’re in Europe, it’s a lot easier because the station, SAQ, is located in Sweden. But given that the original purpose of these behemoths was transcontinental Morse code transmission, it only seems sporting to try to pick it up in the USA. East Coasters are well situated to give it a shot.

And of course, there’s an app for that. The original SAQrx VLF Receiver and the extended version both use your computer’s sound card and FFTs to extract the probably weak signal from the noise.

We scouted around the net for an antenna design and didn’t come up with anything more concrete than “few hundred turns of wire in a coil” plugged into the mic input.  If anyone has an optimized antenna design for this frequency, post up in the comments?

Thanks [Martin] for the tip!

Custom Downdraft Fume Extractor for Soldering

Downdraft Fume Extractor Saves Your Lungs

When you’re soldering, smoke rises from your iron. That smoke is full of a variety of chemicals, depending on what type of solder you’re using, but it’s almost certainly not good for you. That’s why you can buy fume extractors to suck smoke away.

But benchtop extractors tend to suck, and not in the way they’re supposed to. It can be hard to get the extractor to pick up all the fumes, leaving fumes that float into your face.

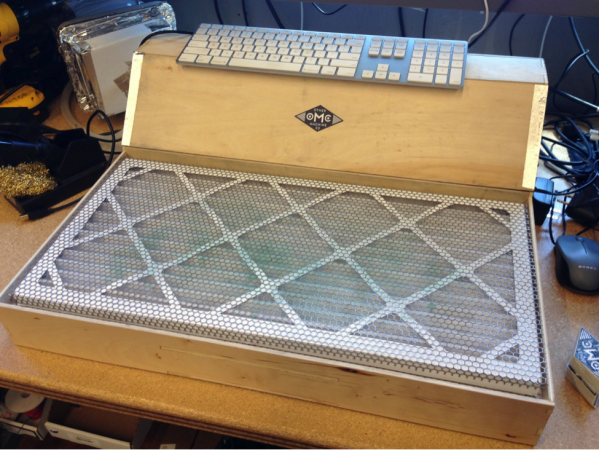
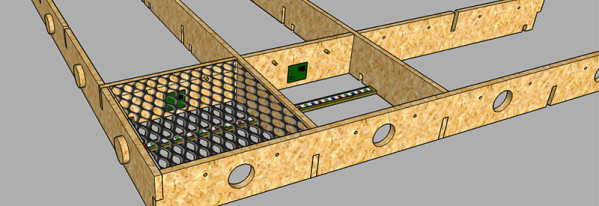
Over at Other Machine Co., they built up a custom downdraft fume extractor to solve this problem. The downdraft extractor is a table that you work on, providing downwards suction that grabs the fumes. Their table uses a standard MERV13 air filter that’s rated to trap particles as small as 1.0–0.3 μm. Cooling fans provide the airflow, and a piece of perforated sheet metal acts as a work surface.

The table works great for soldering, and is also helpful for working with other chemicals like adhesives and solvents. DXF files for the frame parts are provided, and everything else can be sourced from McMaster.

Human-Machine Interface Projects At TEI 2016

For many of us, interacting with computers may be as glorious as punching keys and smearing touch screens with sweaty fingers and really bad posture. While functional, it’s worth reimagining a world where our conversation with technology is far more intuitive, ergonomic, and engaging. Enter TEI, an annual conference devoted to human-computer interaction and a landmark for novel projects that reinvent the conventional ways we engage our computers. TEI isn’t just another sit-down conference to soak in a wealth of paper talks. It’s an interactive weekend that combines these talks with a host of workshops provided by the speakers themselves.

Last year’s TEI brought us projects like SPATA, digital calipers that sped up our CAD modeling by eliminating the need for a third hand, and TorqueScreen, a force-feedback mechanism for tablets and other handhelds.

Next February’s conference is no exception for new ways to interact with novel technology. To get a sense of what’s to come, here’s a quick peek into the past from last year’s projects:

Continue reading “Human-Machine Interface Projects At TEI 2016”

KeyMouSerial Solves Your Raspberry Pi Keyboard Problems

All laptops have a working keyboard and mouse built into them, the only problem is that you can’t use these tools on other computers that don’t have them. At least, until now. [Peter] has created the KeyMouSerial in order to use his laptop’s keyboard and mouse as physical devices on his Raspberry Pi, finally freeing the bonds holding our laptops’ human interface devices back.

The software for KeyMouSerial copies keystroke and mouse information and sends this out via a serial port on his laptop (using a USB to serial adapter). From there the information is translated by an Arduino into HID commands which are sent via USB to the target computer, in this case a Raspberry Pi. It’s a pretty elegant solution to carrying a bulky keyboard and mouse along just for a Raspberry Pi, or for any computer that might not have access to a network and SSH.

[Peter] has also been working on using his iPod as a serial-to-USB converter, so if you’re a Rockbox developer and want to help out then drop him a line. All of the software is available (for Windows, Mac, or Linux) including the Arduino sketch if you want to try this software out for yourself. And, if you don’t want to turn a computer into a keyboard and want to go the other direction and turn a keyboard into a computer, that is also an option.

Hackaday Prize Entry: Lose Yourself To Dance

Not every project for The Hackaday Prize needs to solve a pressing concern, save the planet, or help people. Sometimes, it just needs to be cool. [Jeremy]’s project is certainly cool. He’s building a touch-sensitive disco floor for the awesomeness of Saturday Night Fever combined with the technical complexity of the Billy Jean music video.

We’ve seen a few disco floor builds over the years, and for the most part, [Jeremy] isn’t straying too far from a well-tread path. He’s using LED strips to light his build, cutting the frame for the floor out of plywood and translucent squares, and using an ATMega to control each panel. So far, nothing out of the ordinary.

The trick to this build is that every square has a capacitive touch sensor. Underneath each translucent panel is a bit of wire mesh. Because the disco floor has 144 nodes, running the standard capacitive sensor library just wouldn’t work; the delay in measuring each node adds up very fast. By rewriting [Paul Stoffregen]’s capacitive sensor library, [Jeremy] was able to run many panels at once.

Right now [Jeremy] has a single panel that responds equally well to bare feet as it does to motorcycle boots. It’s exactly what you need in an interactive dance floor, and we can’t wait to seen the entire floor running.


The 2015 Hackaday Prize is sponsored by: