Dual UART/I2C Breakout Goes Both Ways

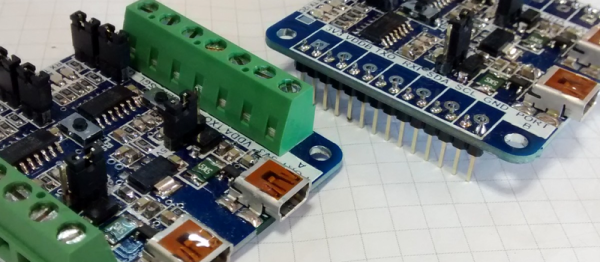
[Jesus Echavarria] sent us a link to this cute little tool that he’s built. It’s a dual USB-to-I2C-or-UART adapter, with a few more oddball features thrown in for good measure. If you were electronics Batman, you’d have this on your utility belt.

[Jesus] originally designed the board because he wanted to sniff a bi-directional UART conversation using his computer, and get it all done in inexpensive hardware with minimal fuss. So he looked to the Microchip MCP2221 chip, which is an inexpensive USB to serial and I2C chip, but with some extras. In particular, it’s got four GPIOs, a ten-bit ADC and a five-bit DAC with selectable reference voltage, and it’s all controllable over USB. And [Jesus]’s board has two of them.

Implementing USB on a microcontroller isn’t always that much fun, so we can see why he took the straight-ahead hardware approach. And as a side benefit, he gets all the other kooky functionalities that the chip brings. And we have been introduced to what looks like a neat chip to use in USB and microcontroller projects. We’re going to put one in our next random chip order.

Polyhedrone

[Brainsmoke] had a simple plan. Make a quadcopter with lots of addressable LEDs.

Not just a normal quadcopter with ugly festoons of LED tape though. [Brainsmoke] wanted to put his LEDs in a ball. Thus was born the polyhedrone, the idea of a flying deltoidal hexecontahedron covered as you might expect with all those addressable LEDs.

polyhedrone-PCB-kicadA Catalan solid makes a good choice for the homebrew polyhedron builder because its faces are all identical. Thus if you are making PCBs to carry LEDs, for example, you need only create a single PCB design to use on all faces. A bit of work in KiCAD, and a single face design with interlocking edges was ready. The boards were tested, a wiring layout was worked out, and the polyhedron was assembled.

But [Brainsmoke] didn’t stop there. He produced a flight case for the polyhedron, in the form of a larger polyhedron from what looks like lasercut thin ply.

Having a finished polyhedron, the next thing was to hook up a Raspberry Pi and write some software. First in Python, then in Go.

polyhedrone-light-1The results are simply stunning. If the mathematics and construction of a polyhedron were not enough to make this project worth a second look, then the gallery of images should be enough. You’ll notice that this is ostensibly a quadcopter project, yet no mention of flying has been made on this page. That’s because this is still a work in progress at Tech Inc Amsterdam, and there is more to come. But it honestly doesn’t matter if this project never moves a millimeter off the ground, as far as we are concerned [Brainsmoke] has created a superbly built thing of beauty in its own right, and we like that.

As you might expect, this is just the latest of many projects featured here that have involved addressable LEDs or quadcopters. Of note among them is this LED polyhedron that cleverly closes in all its bits, and this LED-equipped quadcopter that generates very pleasing patterns with a hi-res cross of pixels.

Connect Four Robot Uses Raspberry Pi

Most people play games for entertainment. Hackers build robots to play games for entertainment. That’s what [piandchips] did. He used a Raspberry Pi and a MeArm kit to build a Connect 4-playing robot. The robot–named 4-Bot–has to do two things: the first is it has to be able to manipulate the pieces. Secondly, it has to be able to see the board. The MeArm imbues 4-Bot with the manipulation ability, and a clever scanning system does the trick.

Continue reading “Connect Four Robot Uses Raspberry Pi”

World’s Smallest Cordless Power Tools, 3D Printed Of Course

What is this?  A circular saw for ants?!

There isn’t much information we could find on this one (sorry, no source files that we know of), but this little hack is so playful and fun, we just had to share it with you. [Lance Abernethy] has built both a working cordless drill, and circular saw using nothing more than a 3D printer, what seems to be a pager-type vibration motor, a tactile switch and a coin cell battery – you can see them both working in the video after the break.

drillinside

[Lance] used an Ultimaker 2, running a 0.25mm nozzle, and printing at a 0.04mm layer height in PLA. As you would expect, the 0.25mm nozzle is needed for such small parts – it’s also close to the limit of what extruder can still squeeze plastic through. it greatly increases the chance of blocked or clogged nozzles.

[Lance] admits that the saw can’t quite cut anything just yet, but he does say that he has plans to make more miniature cordless tools.  We can’t wait to see how he might manage the mechanism for a jig-saw.

[VIA adafruitdaily.com newsletter]

Continue reading “World’s Smallest Cordless Power Tools, 3D Printed Of Course”

Get Really Basic With Steppers And Eight Buttons

[Kevin Darrah] put together a good video showing how to control a stepper motor with, not a motor driver, but our fingers. Taking the really low-level approach to do this sort of thing gave us a much better understanding about the features of our stepper driver chips. Such as, for example, why a half step needed twice the current to operate.

[Kevin] starts with the standard explanation of coils, transistors, and magnets that every stepper tutorial does. When he hooks up simple breadboard with passives and buttons, and then begins to activate the switches in sequence is when we had our, “oh,” moment. At first even he has trouble remembering the correct sequence, but the stepper control became intuitive when laid out with tactile switches.

We set-up our own experiment to see if we remembered our lessons on the subject. It was a fun way to review what we already knew, and we learned some more along the way. Video after the break.

Continue reading “Get Really Basic With Steppers And Eight Buttons”

Etching PCBs With A 3D Printer

With the coming of very cheap blue laser diodes, PCB fabrication has become increasingly interesting. Instead of making a photoresist, placing it over a piece of pre-sensitized copper clad board, and putting the whole assemblage under a blacklight, it’s possible to put a photomask on a board with a tiny bit of very blue light. All you need is a CNC machine. A 3D printer can be a very precise CNC machine, and when you combine these two ideas together, you can make printed circuit boards with an Ultimaker.

[Geggo] had the idea of attaching a blue laser diode to his Ultimaker to burn a few traces into presensitized copper board. With a 3D printed adapter, he was able to mount the diode and associated electronics right on the extruder body. With a small ring to tighten up the aperture, [geggo] was able to put a 50 micrometer wide dot of light on a piece of copper. The laser is powered directly from the PWM fan output on the printer controller board, allowing this entire mish-mash of cheap electronics to be controlled via G-code.

A few experiments were necessary to determine the correct speeds and power settings, with the best results being 1000 mm per minute at 40 mA. The finished board looks fantastic, and a few minutes after [geggo] was done etching a board, he started using his 3D printer as a printer. It’s a result that is so good, so easy to accomplish, and requires so little effort it makes us wonder why we don’t see more of this.

Materials To Know: Acetal And Delrin

Delrin, Acetal, and its many trade names is a material properly known as Polyoxymethylene or POM. It is one of the strongest plastics and is a good go-to material when you want the best properties of plastic, and don’t need the full strength of a metal part. It was originally formulated to compete with Zinc and Aluminum castings after all.

I won’t go too deep into the numbers behind POM. If you need the Young’s Modulus, you probably don’t need this guide. This is intended to be more of a guide to its general properties. When you’re looking for something to fit an application it is usually easier to shift through the surface properties to select a few candidates, and then break the calculator out later to make sure it will work if you’re uncertain about the factor of safety.

The most popular property of POM is its ease of machining. While doing this research every single site I came across referred to it as the most machinable plastic. That’s about as objective as subjective praise can get. It doesn’t tend to grab tools like, for example, HDPE. It also chips nicely unlike UHMW and Nylon. Some plastics, like UHMW, have the unfortunate tendency to render the dials on a mill or lathe meaningless as the plastic deflects away from the tool. POM does not do this as much. Of course these other plastics have their strengths as well, but if any plastic will do, and you’re machining, POM is a very good choice.

Continue reading “Materials To Know: Acetal And Delrin”