We don’t know why [stoppi71] needs to do gamma spectroscopy. We only know that he has made one, including a high-voltage power supply, a photomultiplier tube, and–what else–an Arduino. You also need a scintillation crystal to convert the gamma rays to visible light for the tube to pick up.
He started out using an open source multichannel analyzer (MCA) called Theremino. This connects through a sound card and runs on a PC. However, he wanted to roll his own and did so with some simple circuitry and an Arduino.
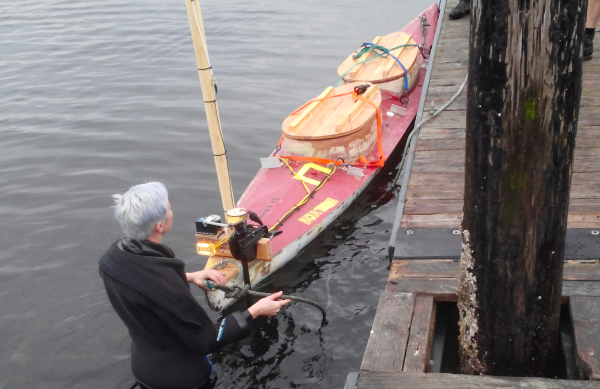
Last year we wrote about Hackerbot Labs’ autonomous boat, which project members hope to someday circumnavigate the globe. Now called Project Ladon, progress continues apace with a recent ocean test of their modified 18’ kayak, the TSV Disputed Right of Way. The kayak’s internal spaces contain a pair of lead-acid truck batteries controlled by a home-brewed control system that uses relays to control the craft’s trolling motor, with a Beaglebone and Arduino Mega under the hood.
The test was not exactly a success, with the boat actually avoiding the waypoints rather than sticking to them. Fortunately the team was aboard a chase boat so they were able to keep tabs on the craft. Unlike a quadcopter, which just falls down, a watercraft that borks may never be seen again.
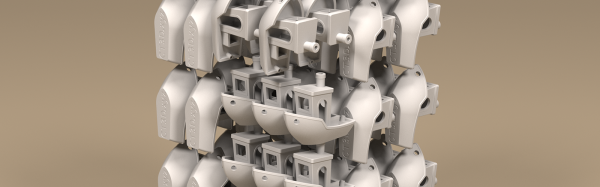
Form Labs recently announced the launch of the Fuse 1, a desktop SLS printer that will print all your parts using nylon powder and a laser. This a fundamentally different method of 3D printing as compared to filament-based machines, and the best way to use a Fuse 1 is to fill the entire volume of the machine with 3D printed parts. [Michael Fogelman] decided to investigate the 3D packing problem, and managed to fill this printer with the maximum number of 3D printed tugboats. If you’re wondering, it’s 113, as compared with 82 tiny Benchies using naive bin packing.
The formal definition of this sort of problem is the bin packing problem, or simply calculating the maximum number of items can be packed into a finite volume. There is no general solution to this problem, and it’s probably impossible to create an algorithm that will solve this problem for any collection of 3D models. Nevertheless, it’s possible to create a solution that shows marked improvement over a naive solution.
[Michael]’s solution involves simulated annealing. This algorithm begins by randomly placing tugboats, then mutating the position or rotation of one of the boats for each iteration. The code is less than 1000 lines of Go and is available on GitHub if you already have an SLS printer at your disposal.
It should be noted this type of problem isn’t particularly new to the world of 3D printers. There have been a few tools to solve the bin-packing problem for filament-based printers, but the solutions to these problems are two-dimensional; since filling a bed is a problem that only uses the ‘shadow’ of the Z-axis of each part, it’s a slightly easier problem to solve.
Now that Form Labs’ Fuse 1 SLS printer has been announced, there is a new application for this type of problem in the space of 3D printers. It’s not a perfect solution — and it’s doubtful there will ever be a perfect solution — but if you’re looking for a way to fill the volume of your powder printer with parts, this is the best you’re going to do.
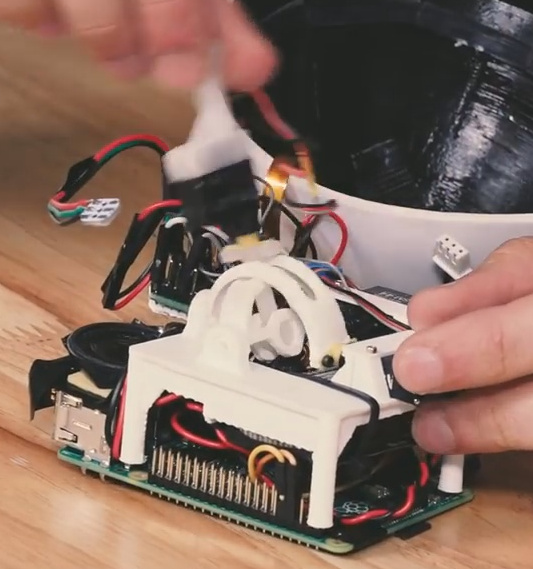
[Alonso Martinez] is an artist working on virtual characters at Pixar so it’s no wonder that his real life robots, Mira and Gertie, have personalities that make them seem like they jumped straight out of a Pixar movie. But what we really like are the tricks he’s used inside to bring them to life that are sure to get reused for the same or other things.
Mira’s head rotation mechanism
For example, Mira’s head can rotate in yaw, pitch and roll. To figure out how to make it do that he recalled having a joystick called the Microsoft Sidewinder Pro that had force feedback. That meant it might have had motors in line with the motions, much like what he wanted. To see how it worked, he bought one on eBay, took it apart, and improved on it to come up with his own design. But besides making use of the design in joysticks and heads, we can imagine it used to make robot eyeballs rotate in their sockets too. And as a side note, he’s running the robot off a Raspberry Pi, but notice the clever, space-saving way he’s mounted the whole mechanism to the Pi’s four mounting holes.
What also piqued our interest are the two tiny servos used in the head mechanism, two HD-DSM44 digital servos. These are even smaller than Tower Pro SG90s and with the added advantage of being metal geared.
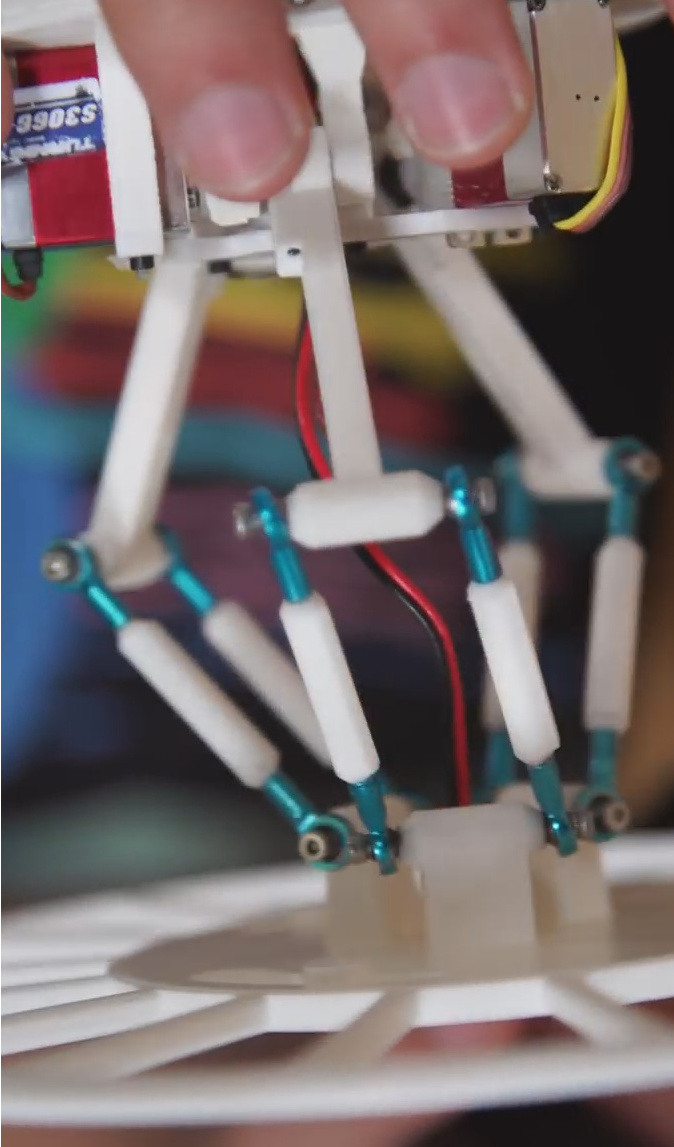
Gertie’s delta jumping legs
To make the eyes blink he had to overcome the fact the head was a thin-walled sphere sliding over the body, and the eyes had to fit in the thin wall without contacting the body. His solution was to make them out of OLED screens with acrylic hemispheres for the protruding eyeballs. The circuit boards talk to the screens through ribbon cables that are around 32 connections per inch, which made for some careful soldering. And to further create a thin profile he even sanded the solder points flat.
His other robot, the yellow and green Gertie, jumps to move around and its internal mechanism is also a joy to examine. To swivel and hop, it uses much the same design as a delta 3D printer, with three legs that can move the upper body in any direction, and compress like a spring before leaping. We like how his method for determining the appropriate thickness of 3D printed PLA parts such that they wouldn’t break was simply trial an error, taking advantage of the rapid prototyping possible with 3D printers. He did cheat on one main part of each leg though, and that was to go with RC car tie rods for the lower half of each leg — but we won’t tell on him if you won’t.
And that’s only a small sample of the neat tips and tricks you’ll find in the video below (they start looking inside the robots at 7:35).
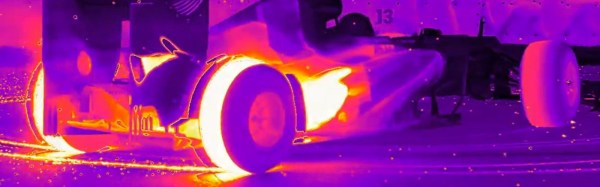
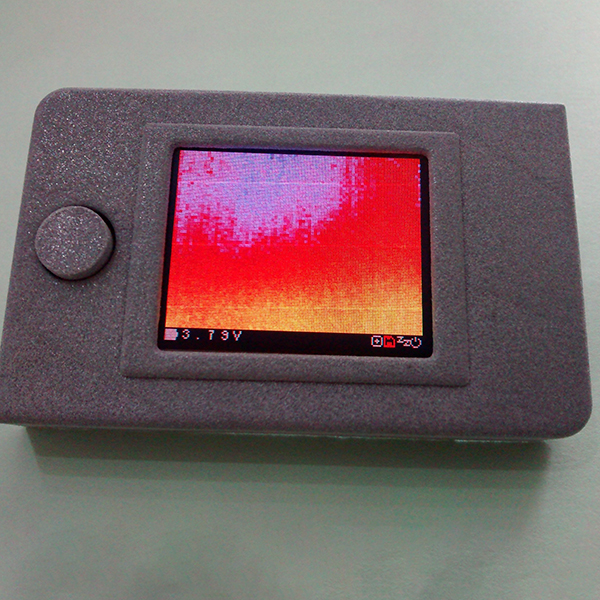
One of the entries in the Hackaday Prize Best Product competition is [x-labz]’s pocket thermal imager. It’s more than a prototype, it’s a design conceived to get out into the world and be used by many. Best Product entries are open until July 24th, and with a $30,000 cash prize on the line let’s take a look at some of the things that elevate a project to product status.
Thanks to recent advances in the state of thermal image sensors, a tool that gives you Predator vision is almost a necessity on the modern workbench. The pocket thermal imager will find drafts in your house during winter, will tell you how to cook a steak, figure out what part is shorting out in your latest electronics project, and will tell you how terrible the heated bed is on your 3D printer.
[x-labz]’s thermal camera is based around the FLIR Lepton image sensor, an 80×60 pixel thermal imaging sensor that’s good enough for most uses. This camera is soldered onto a PCB sandwich containing an Atmel SAMD21 microcontroller, full-color OLED display, SD card, and a battery management system.
What we’ve mentioned so far isn’t out of the ordinary for any other entry in the Hackaday Prize. Building something for the Best Product competition is different, though: a lot of thought has to go into the manufacturability and the fit and finish of this device. So far, everything’s looking great for [x-labz]’s camera. There’s a 3D printed case that looks like it could be easily translated into an injection-moldable shell and at least some of the parts of the user interface are unbelievably satisfying. We’re looking forward to seeing the full Bill of Materials and a business plan (a new requirement this year). That’s an area where many hardware designers lack experience; being able to study the examples from Best Product entries will be a welcomed resource.
There’s a world of difference between building a project and building a product, and the entire goal of the Best Product portion of the Hackaday Prize is to reward those people who go the extra mile as aspiring entrepreneurs and show us how that’s done. $50k in cash prizes are set aside for Best Product; $30,000 for the winner as we mentioned before, but there is also $1000 for each of the twenty entries that make it to the finals in this category in addition to some much deserved notoriety from Hackaday’s community of hardware aficionados and early adopters.
If you mis-spent your teenage years fishing broken televisions from dumpsters and either robbing them for parts or fixing them for the ability to watch The A Team upstairs rather than in the living room as I did, then it’s possible that you too will have developed a keen interest in analogue television technology. You’ll know your front porch from your blanking interval and your colour burst, you might say.
An illustration of a simple Nipkow disk. Hzeller (CC BY-SA 3.0).
There was one piece of television technology that evaded a 1980s dumpster-diver, no 625-line PAL set from the 1970s was ever going to come close to the fascination of the earliest TV sets. Because instead of a CRT and its associated electronics, they featured a spinning disk with a spiral pattern of holes. These mechanical TV systems were quickly superseded in the 1930s by all-electronic systems, so of the very few sets manufactured only a fraction have survived the intervening decades.
The spinning disk in a mechanical TV is referred to as a Nipkow disk, after its inventor, [Paul Gottlieb Nipkow]. [Nipkow] conceived and patented the idea of a spinning disk with a spiral of holes to dissect an image sequentially into a series of lines in the 1880s, but without the benefit of the electronic amplification that would come a few decades later was unable to produce a viable system to demonstrate it. It would be in the 1920s before [John Logie Baird] would develop the first working television system using [Nipkow]’s invention.
This Friday, we’re talking climate change. Is it possible to remove carbon from the atmosphere before most cities are underwater? What role can hackers play in alleviating climate change? It’s all going down this Friday on the Hack Chat on Hackaday.io
We’ve invited [Tito Jankowski] and [Matthew Eshed] to talk about climate change this Friday over on hackaday.io. [Tito] and [Matthew] are the founders of Impossible Labs, and they’re looking for ways to find, test, and build technology that will remove carbon from Earth’s atmosphere. Their goal is to return the earth’s atmosphere to 300 parts per million of carbon dioxide by 2050. Will they succeed? If someone doesn’t, you can kiss every coastal city goodbye.
Their first job is getting everyone to care. [Jankowski] thinks it can be done through better access to information and snazzy graphics — if people knew what was going on, maybe they’d give a darn. So whether you’d like to talk graphics and data or the engineering of carbon sequestration devices, this is a Hack Chat of global importance. Join us!
Here’s How To Take Part:
Our Hack Chats are live community events on the Hackaday.io Hack Chat group messaging. This Hack Chat will take place at noon Pacific time on Friday, June 30th. Confused about where and when ‘noon’ is? Here’s a time and date converter!
Log into Hackaday.io, visit that page, and look for the ‘Join this Project’ Button. Once you’re part of the project, the button will change to ‘Team Messaging’, which takes you directly to the Hack Chat.
You don’t have to wait until Friday; join whenever you want and you can see what the community is talking about.