Laser Cutter Resurrection Uncovers A Magnificent Machine Beneath The Ash

Trash is relative. When my coworker accidentally lit an ABS-barbecue inside the company laser cutter, he made trash. The wreckage was headed for the dump, but I managed to save it and pass it on to my friend [Amy]. Four months later, she phoenixed it back to life from the trash-it-was to a glorious new system more powerful than the original. This is her story, carefully told in detail in a three-part series (part one, part two, part three) that takes us on a journey from trash to triumph. She even recorded video of the entire process (also embedded below)

Get your notes out because while [Amy] spares every expense to keep this project cheap, she spares no expense at laying out the details for anyone’s path to success when working with these beasts.

Free Laser Cutter Starter Pack

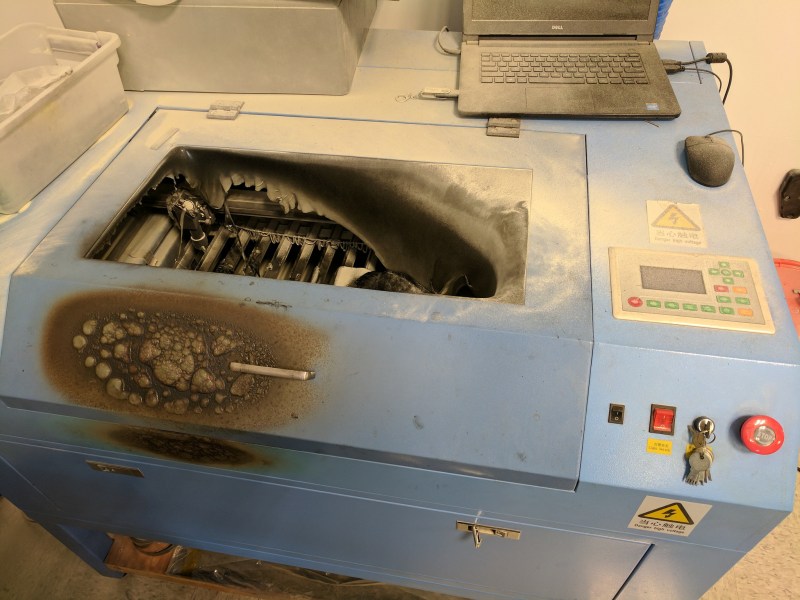
As far as origin stories go, our story starts at my last employer’s office. I was in the machine shop asking one of our MechEs a question when the intern points a finger towards the corner of the room and asks: “hey is that supposed to be on fire?” I turn around to see billowing flames coming from our budget Chinese laser cutter. “Nope!” I say. “We need a fire extinguisher!” But our MechE was already on it. In half a moment he returned with an extinguisher. With one squirt the fire was out, but the machine was caked with a nasty powdery debris. It turns out another coworker had committed the almighty sin of laser cutting: he turned it on and walked away. Better yet, it was cutting ABS with a disconnected air nozzle.

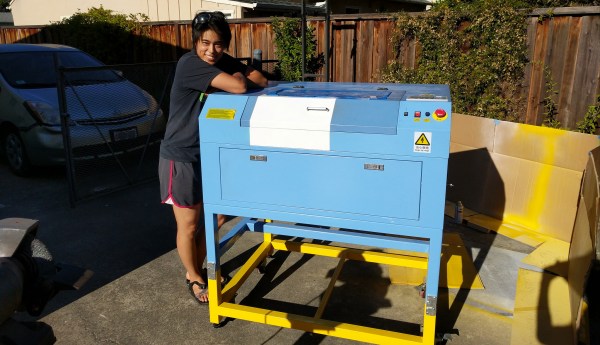
This cutter was headed to the dump, but a few shenanigans later, I managed to divert this heap to [Amy]. The paint job was an absolute disaster on the outside, and the gooey ABS-and-powder mixture had caked over the inside. [Amy] dug in, stripping off the paint flakes and re-coating it. Apart from the belts, she salvaged every other part inside the machine. Her secret: “IPA and steel wool.” From there, she built her own fume extractor and lofted the whole system onto a frame she welded herself so that she could push both extractor and cutter around her wood shop as a unit. These days, it’s seeing some mileage for cutting out jigs for her woodworking projects.

Perhaps what’s truly special about this project is that she restored it with the camera rolling. As if building projects isn’t hard enough, getting the right lighting and camera angles while you’re doing the work is even more work! There’s no drop-down lofted camera setup in her garage, so each documented step is carefully set up so it captures what’s happening onscreen. While the IPA-and-steel wool might’ve been one nifty trick, by the end of these videos you’ll find that there really aren’t any secrets: just one engineer who sees the dignity in a project done well and has the patience to carry it out.

Get to know [Amy] on her blog, and you’ll discover the true finesse of her scavenging and engineering wielded hand-in-hand. From Ukuleles borne of fallen tree branches to a garage woodshop bootstrapped from a series of Craigslist adventures, it’s no surprise that a broken laser cutter would find a new life when it landed in her hands.

Continue reading “Laser Cutter Resurrection Uncovers A Magnificent Machine Beneath The Ash”

The BNC Connector And How It Got That Way

When I started working in a video production house in the early 1980s, it quickly became apparent that there was a lot of snobbery in terms of equipment. These were the days when the home video market was taking off; the Format War had been fought and won by VHS, and consumer-grade VCRs were flying off the shelves and into living rooms. Most of that gear was cheap stuff, built to a price point and destined to fail sooner rather than later, like most consumer gear. In our shop, surrounded by our Ikegami cameras and Sony 3/4″ tape decks, we derided this equipment as “ReggieVision” gear. We were young.

For me, one thing that set pro gear apart from the consumer stuff was the type of connectors it had on the back panel. If a VCR had only the bog-standard F-connectors like those found on cable TV boxes along with RCA jacks for video in and out, I knew it was junk. To impress me, it had to have BNC connectors; that was the hallmark of pro-grade gear.

I may have been snooty, but I wasn’t really wrong. A look at coaxial connectors in general and the design decisions that went into the now-familiar BNC connector offers some insight into why my snobbery was at least partially justified.

Continue reading “The BNC Connector And How It Got That Way”

A Robotic Arm For Those Who Like Their Kinematics Both Ways

A robotic arm is an excellent idea if you’re looking to get started with electromechanical projects. There’s linkages to design, and motors to drive, but there’s also the matter of control. This is referred to as “kinematics”, and can be considered in both the forward and inverse sense. [aerdronix] built a robotic arm build that works in both ways.

The brains of the build is an Arduino Yun, which receives commands over the USB interface. Control is realised through the Blynk app, which allows IoT projects to easily build apps for smartphones that can be published to the usual platforms.

The arm’s position is controlled in two fashions. When configured to use inverse kinematics, the user commands an end effector position, and the arm figures out the necessary position of the linkages to make it happen. However, the arm can also be used in a forward kinematics mode, where the individual joint positions are commanded, which then determine the end effector’s final position.

Overall, it’s a well-documented build that lays out everything from the basic mechanical design to the software and source code required to control the system. It’s an excellent learning resource for the newcomer, and such an arm could readily be used in more complex projects.

We see plenty of robotic arms around these parts, like this fantastic build based on an IKEA lamp. If you’ve got one, be sure to hit up the tip line. Video after the break.

Continue reading “A Robotic Arm For Those Who Like Their Kinematics Both Ways”

Decorative Light Box Lets You Guess The Time

Telling time by using the current position of the sun is nothing revolutionary — though it probably was quite the “life hack” back in ancient times, we can assume. On the other hand, showing time by using the current position of the sun is what inspired [Rich Nelson] to create the Day Cycle Clock, a color changing light box of the Philadelphia skyline, simulating a full day and night cycle in real time — servo-controlled sun and moon included.

At its core, the clock uses an Arduino with a real-time clock module, and the TimeLord library to determine the sunrise and sunset times, as well as the current moon phase, based on a given location. The sun and moon are displayed on a 1.44″ LCD which doubles as actual digital clock in case you need a more accurate time telling after all. [Rich] generally went out of his way with planning and attention to detail in this project, as you can see in the linked video, resulting in an impressively clean build surely worthy as gift to his brother. And if you want to build one for yourself, both the Arduino source code and all the mechanical parts are available on GitHub.

An interesting next iteration could be adding internet connectivity to get the current weather situation mixed into the light behavior — not that it would be the first time we’d see weather represented by light. And of course, simulating the northern lights is also always an option.

Continue reading “Decorative Light Box Lets You Guess The Time”