Ask Hackaday: Does Your Car Need An Internet Killswitch?

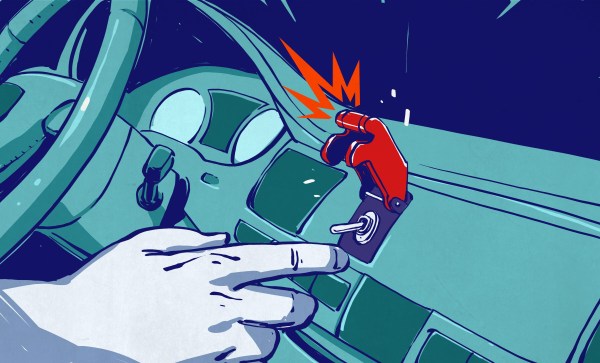
Back in the good old days of carburetors and distributors, the game was all about busting door locks and hotwiring the ignition to boost a car. Technology rose up to combat this, you may remember the immobilizer systems that added a chip to the ignition key without which the vehicle could not be started. But alongside antitheft security advances, modern vehicles gained an array of electronic controls covering everything from the entertainment system to steering and brakes. Combine this with Bluetooth, WiFi, and cellular connectivity — it’s unlikely you can purchase a vehicle today without at least one of these built in — and the attack surface has grown far beyond the physical bounds of bumpers and crumple zones surrounding the driver.

Cyberattackers can now compromise vehicles from the comfort of their own homes. This can range from the mundane, like reading location data from the navigation system to more nefarious exploits capable of putting motorists at risk. It raises the question — what can be done to protect these vehicles from unscrupulous types? How can we give the user ultimate control over who has access to the data network that snakes throughout their vehicle? One possible solution I’m looking at today is the addition of internet killswitches.

Continue reading “Ask Hackaday: Does Your Car Need An Internet Killswitch?”

A Web API For Your Pi

There are many ways to attach a project to the Internet, and a plethora of Internet-based services that can handle talking to hardware. But probably the most ubiquitous of Internet protocols for the average Joe or Jane is the web browser, and one of the most accessible of programming environments lies within it. If only somebody with a bit of HTML and Javascript could reach a GPIO pin on their Raspberry Pi!

If that’s your wish, then help could be at hand in the form of [Victor Ribeiro]’s RPiAPI. As its name suggests, it’s an API for your Raspberry Pi, and in particular it provides a simple web-accessible endpoint wrapper for the Pi’s GPIO library from which its expansion port pins can be accessed. By crafting a simple path on the address of the Pi’s web server each pin can be read or written to, which while it’s neither the fastest or most accomplished hardware interface for the platform, could make it one of the easiest to access.

Security comes courtesy of Apache password protected directories via .htaccess files, so users would be well-advised to consider the implications of connecting this to a public IP address very carefully. But for non experts in security it still has the potential to make a very useful tool in the armoury of ways to control hardware from the little single board computer. It’s not the first try at this idea as we’ve seen a PHP example early in the Pi’s lifetime as well as one relying upon MySQL, but it does seem to be a simpler option than the others.

3D Print Your Own Thermal Insert Press

Thermal inserts are a big thing when it comes to engineering with plastic. They make it easy to use threaded fasteners with plastic parts, and they work great with 3D printing too. There’s a bit of a knack to installing them without damaging your workpiece, however, and [John Culbertson] wanted to make using them as easy as possible. Thus, he created a thermal insert press of his very own!

If you’re not using heat-set inserts with your 3D printed parts you’re missing out. Hackaday’s own [Joshua Vasquez] wrote a great guide on thermal inserts which you heat up to securely melt the plastic as they are pushed into a slightly under-sized hole. While it’s possible to install these inserts by hand, using a press means much more consistent results.

This press relies on 3D printed components in combination with off-the-shelf bearings and fasteners. There’s a linear rail as well, to give the soldering iron a  clean, smooth downward motion. This helps make sure that the inserts go in straight and true, first time, every time. We’ve seen other DIY builds before, like this modified arbor press that gets the job done. Continue reading “3D Print Your Own Thermal Insert Press”

Entombed Secrets Partially Unearthed As Researchers Dissect Clever Maze-Generating Algorithm

If you look at enough of another developer’s code, you will eventually say, “What were you thinking, you gosh-darn lunatic?” Now, this exchange can precede the moment where you quit a company and check into a padded room, or it can be akin to calling someone a mad genius and offering them a beer. In the case of [Steven Sidley]’s 1982 game Entombed, [John Aycock] and [Tara Copplestone] found a mysterious table for generating pseudo-random mazes and wrote a whitepaper on how it all works (PDF). The table only generates solvable mazes, but if any bits are changed, the puzzles become inescapable.

The software archaeologists are currently in a labyrinth of their own, in which the exit is an explanation of the table, but the path is overgrown with decade-old vines. The programmer did not make the table himself, and its creator’s name is buried somewhere in the maze. Game cart storage was desperately limited so mazes had to be generated on-the-fly rather than crafted and stored. Entombed‘s ad-hoc method worked by assessing the previous row and generating the next based on particular criteria, with some PRNG in places to keep it fresh. To save more space, the screen was mirrored down the center which doubles the workload of the table. Someday this mysterious table’s origins may be explained but for now, it is a work of art in its own right.

Aside from a table pulled directly from the aether, this maze game leaned on pseudo-random numbers but there is room for improvement in that regard too.

Via BBC Future.

Compiler Explorer, Explored

It wasn’t long ago that we introduced you to a web site, the Godbolt compiler explorer, that allows the visitor to compile code using a slew of compilers and compare their output. We suspect some number of readers said, “Wow! I can use that!”, while perhaps everyone else said, “Huh?” Well if you were in the second group, you ought to watch [What’s a Creel’s] video below where he walks through using the website. He looks at four different algorithms using four different compilers and it is a good example of how you might use the tool to make decisions about how you write software.

Continue reading “Compiler Explorer, Explored”

Take A Break From Arduinos, And Build A Radio Transmitter

When you start watching [learnelectronic’s] two-part series about making a radio transmitter, you might not agree with some of his history lessons. After all, the origin of radio is a pretty controversial topic. Luckily, you don’t need to know who invented radio to enjoy it.

The first transmitter uses a canned oscillator, to which it applies AM modulation. Of course, those oscillators are usually not optimized for that service, but it sort of works. In part two he reduces the frequency to 1 MHz at which point it can be listened to on a standard AM radio, before adding an amplifier so any audio source can modulate the oscillator. There’s a lot of noise, but the audio is clearly there.

This is far from practical of course, but combined with a crystal radio it could make an awesome weekend project for a kid you want to hook on electronics. The idea that a few simple parts could send and receive audio is a pretty powerful thing. If you get ready to graduate to a better design, we have our collection.

Continue reading “Take A Break From Arduinos, And Build A Radio Transmitter”

Meet MutantC: Raspberry Pi Sidekick Complete With Sliding Screen, QWERTY

Over the years we’ve seen the Raspberry Pi crammed into almost any piece of hardware you can think of. Frankly, seeing what kind of unusual consumer gadget you can shoehorn a Pi into has become something of a meme in our circles. But the thing we see considerably less of are custom designed practical enclosures which actually play to the Pi’s strengths. Which is a shame, because as the MutantC created by [rahmanshaber] shows, there’s some incredible untapped potential there.

The MutantC features a QWERTY keyboard and sliding display, and seems more than a little inspired by early smartphone designs. You know, how they were before Apple came in and managed to convince every other manufacturer that there was no future for mobile devices with hardware keyboards. Unfortunately, hacking sessions will need to remain tethered as there’s currently no battery in the device. Though this is something [rahmanshaber] says he’s actively working on.

The custom PCB in the MutantC will work with either the Pi Zero or the full size variant, but [rahmanshaber] warns that the latest and greatest Pi 4 isn’t supported due to concerns about overheating. Beyond the Pi the parts list is pretty short, and mainly boils down to the 3D printed enclosure and the components required for the QWERTY board: 43 tactile switches and a SparkFun Pro Micro. Everything is open source, so you can have your own boards run off, print your case, and you’ll be well on the way to reliving those two-way pager glory days.

We’re excited to see where such a well documented open source project like MutantC goes from here. While the lack of an internal battery might be a show stopper for some applications, we think the overall form factor here is fantastic. Combined with the knowledge [Brian Benchoff] collected in his quest to perfect the small-scale keyboard, you’d have something very close to the mythical mobile Linux device that hackers have been dreaming of.

Continue reading “Meet MutantC: Raspberry Pi Sidekick Complete With Sliding Screen, QWERTY”