3D Printing With Tomography In Reverse

The 3D printers we’re most familiar with use the fused deposition process, in which hot plastic is squirted out of a nozzle, to build up parts on a layer by layer basis. We’ve also seen stereolithography printers, such as the Form 2, which use a projector and a special resin to produce parts, again in a layer-by-layer method. However, a team from the University of North Carolina were inspired by CT scanners, and came up with a novel method for producing 3D printed parts.

The process, as outlined in the team’s paper.

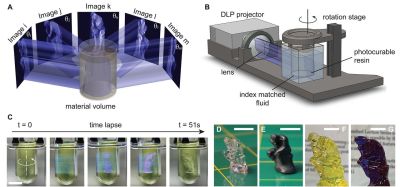
The technique is known as Computed Axial Lithography. The team describe the system as working like a CT scan in reverse. The 3D model geometry is created, and then a series of 2D images are created by rotating the part about the vertical axis. These 2D images are then projected into a cylindrical container of photosensitive resin, which rotates during the process. Rather than building the part out of a series of layers in the Z-axis, instead the part is built from a series of axial slices as the cylinder rotates.

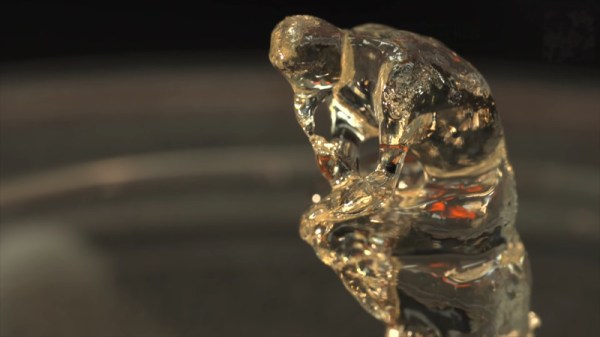
The parts produced have the benefit of a smooth surface finish and are remarkably transparent. The team printed a variety of test objects, including a replica of the famous Thinker sculpture, as well as a replica of a human jaw. Particularly interesting is the capability to make prints which enclose existing objects, demonstrated with a screwdriver handle enclosing the existing steel shank.

It’s a technique which could likely be reproduced by resourceful makers, assuming the correct resin isn’t too hard to come by. The resin market is hotting up, with Prusa announcing new products at a recent Makerfaire. We’re excited to see what comes next, particularly as the high cost of resin is reduced by economies of scale. Video after the break.

[via Nature, thanks to Philip for the tip!]

Continue reading “3D Printing With Tomography In Reverse”

What Happened To The 100,000-Hour LED Bulbs?

Early adopters of LED lighting will remember 50,000 hour or even 100,000 hour lifetime ratings printed on the box. But during a recent trip to the hardware store the longest advertised lifetime I found was 25,000 hours. Others claimed only 7,500 or 15,000 hours. And yes, these are brand-name bulbs from Cree and GE.

So, what happened to those 100,000 hour residential LED bulbs? Were the initial estimates just over-optimistic? Was it all marketing hype? Or, did we not know enough about LED aging to predict the true useful life of a bulb?

I put these questions to the test. Join me after the break for some background on the light bulb cartel from the days of incandescent bulbs (not a joke, a cartel controlled the life of your bulbs), and for the destruction of some modern LED bulbs to see why the lifetimes are clocking in a lot lower than the original wave of LED replacements.

Continue reading “What Happened To The 100,000-Hour LED Bulbs?”

Back To Video Basics With An ESP32 VGA Display

In a world where standards come and go with alarming speed, there’s something comforting about VGA. It’s the least common denominator of video standards, and seeing that chunky DB15 connector on the back of a computer means that no matter what, you’ll be able to get something from it, if you can just find a VGA cable in your junk bin.

But that’s the PC world; what about microcontrollers? Can you coax VGA video from them? Yes, you can, with an ESP32, a handful of resistors, and a little bit of clever programming. At least that’s what [bitluni] has managed to do in his continuing quest to push the ESP32 to output all the signals. For this project, [bitluni] needed to generate three separate signals – red, green, and blue – but with only two DACs on board, he had to try something else. He built external DACs the old way using R/2R voltage divider networks and addressed them with the I2S bus in LCD mode. He needed to make some compromises to fit the three color signals and the horizontal and vertical sync pulses into the 24 available bits, and there were a few false starts, but the video below shows that he was able to produce a 320×240 signal, and eventually goosed that up to a non-native 460×480.

It’s a pretty impressive hack, and we learned a lot about both the ESP32 and the VGA standard by watching the video. He’s previously used the ESP32 to build an AM radio station and to output composite PAL video, and even turned his oscilloscope into a vector display with it. They’re all great learning projects too.

Continue reading “Back To Video Basics With An ESP32 VGA Display”

Yell At Your Desk To Get Up In The Morning

Standing desks are great conversation starters in the office – whether you like it or not. How do you know someone’s got a standing desk? Don’t worry, they’ll tell you. Standing desks have their benefits, but for maximum flexibility, many people choose a desk that can raise and lower depending on their needs. [Wassim] had just such a desk, but found pushing the buttons too 20th century for his tastes. Naturally, Google Assistant integration was the key here.

[Wassim] started out intending to capture and then spoof the desk controller’s signals to the motors, before realising it was likely easier to simply spoof button presses instead. This was achieved through a handful of NPN transistors and an Onion Omega2+ microcontroller board. Then it was a simple case of coding the controller to press the various buttons in response to HTTP requests received over WiFi. Google Assistant integration was then handled with IFTTT, though [Wassim] also discusses the possibility of implementing the full Smart Home API.

It’s entertaining to watch [Wassim] issue commands and have the desk slowly rise in response. Of course, there are other approaches, like this sneaky use of PVC to hack the office furniture.

https://medium.com/@wassimchegham/hey-google-set-my-desk-to-standing-mode-b21dcc40d4b5