ATtiny Name Badges Are Hugely Creative

We’re not sure exactly why [Justin Garrison] decided to make these awesome name badges for himself and his coworkers at Disney+ streaming, but it’s fun to imagine them all lighting up a team-building ride down Space Mountain, isn’t it? Whatever the reason, they sure do look good.

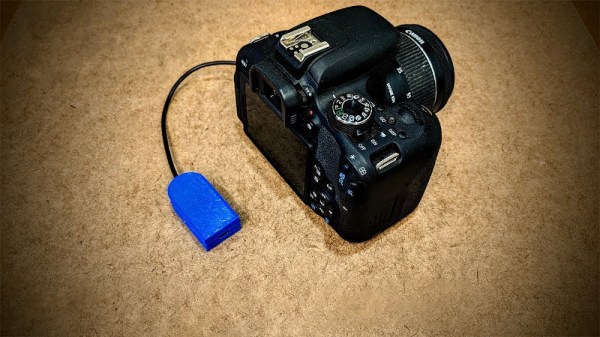
Each badge has an ATtiny85 that drives the ten individually-addressable RGB LEDs, and both the wire and the LEDs are powered by the EL power inverter. [Justin] bought the thinnest EL wire he could find, which is conveniently also the brightest and probably the easiest to manipulate.

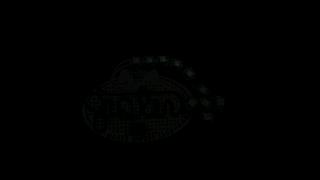
Nevertheless, we can’t get over how good the names look, and wonder if [Justin] missed his calling as a neon artist. He cleverly stuck wires through the protoboard to help form the letters, and then used superglue to hold them in place. [Justin] has the code up on GitHub and an album full of build pictures if you want to give this a go.

If this has made you want to give EL bending another go, try using a 3D printed frame to help get it into shape.

This Week In Security: DNSSEC Temporarily Lost Their Keys, FIDO, And One Weird Windows Trick

DNSSEC is the system that allows for cryptographically secure DNS. It’s all based on a root cryptographic key, maintained by the Internet Assigned Numbers Authority (IANA). Ever wondered where the root Key Signing Key is stored, and how it’s accessed? Four times a year, a ceremony is held where the root key is pulled out of a physical safe, and maintenance tasks are performed in front of a group of witnesses.

Such an event was scheduled for February 12th, but a teensy problem was discovered. One of the safes that holds the key media had a broken lock, and the root key signing key was inaccessible for a few days while repairs were effected. The open nature of IANA means that much of their operations are publicly reported, and you can even watch the key signing ceremony, which was finally held on February 16th.

Continue reading “This Week In Security: DNSSEC Temporarily Lost Their Keys, FIDO, And One Weird Windows Trick”

Relive The Glory Days Of Cable TV With This Retro Weather Feed

This may surprise younger readers, but there was once a time when the reality programming on The Weather Channel was simply, you know, weather. It used to be no more than a ten-minute wait to “Local on the Eights”, with simple text crawls of local conditions and forecasts that looked like they were taken straight from the National Weather Service feed. Those were the days, and sadly they seem to be gone forever.

Or perhaps not, if this retro weather channel feed has anything to say about it. It’s the product of [probnot] and consists of a simple Python program that runs on a Raspberry Pi. Being from Winnipeg, [probnot] is tapping into Environment Canada for local weather data, but it should be easy enough to modify to use your local weather provider’s API. The screen is full of retro goodness, from the simple color scheme to the blocky white text; the digital clock and local news crawl at the bottom complete the old school experience. It doesn’t appear that the code supports the period-correct smooth jazz saxophone, but that too should be a simple modification.

All jibing aside, this would be a welcome addition to the morning routine. And for the full retro ride, why not consider putting it in an old TV case?

Continue reading “Relive The Glory Days Of Cable TV With This Retro Weather Feed”

Bluetooth Intervalometer Makes Time Lapses Easy

Taking timelapses is a fun pastime of many a photographer. While most modern cameras have some features to pull this off, if you want to get really into it, you’ll want an intervalometer to run the show. Chasing just that, [Zach] decided that rather than buying off-the-shelf, a DIY build was in order.

The build relies on an Arduino Nano to run the show, in combination with the popular HC-05 Bluetooth module. The Bluetooth module allows the device to communicate with a smartphone app which [Zach] created using RoboRemo. This is a platform that makes creating custom USB, WiFI and Bluetooth apps easy for beginners. The app sends instructions to the intervalometer regarding the number of photos to take, and the time to wait between each shot. Then, it triggers the time lapse, and the Arduino triggers the camera by shorting the relevant pins on a TRS plug inserted into the camera.

It’s a straightforward build that most hackers could probably complete with parts from the junk box. Plus, building your own offers the possibility of customising it exactly to your needs. Of course, you can eschew modernity and do things mechanically instead. Video after the break.

Continue reading “Bluetooth Intervalometer Makes Time Lapses Easy”