Improving Cheap Ball Screws

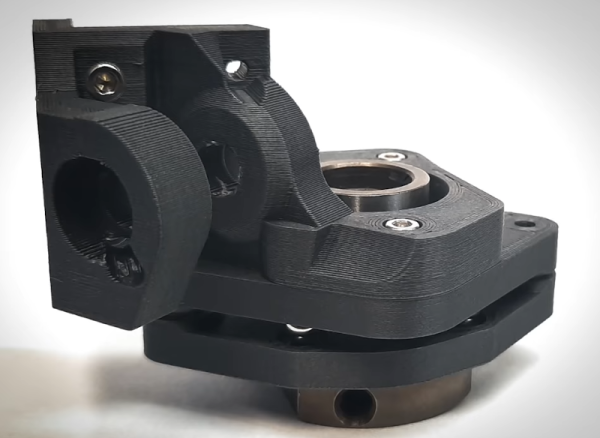
Most 3D printers use leadscrews for at least one axis. These are simple devices that are essentially a steel screw thread and a brass nut that travels on it. However, for maximum precision, you’d like to use a ball screw. These are usually very expensive but have many advantages over a leadscrew. [MirageC] found cheaper ball screws but, since they were inexpensive, they had certain limitations. He designed a simple device that improves the performance of these cheap ball screws.

Superficially, a ball screw looks like a leadscrew with an odd-looking thread. However, the nut is very different. Inside the nut are ball bearings that fit in the grooves and allows the nut to spin around with much less friction. A special path collects the ball bearings and recirculates them to the other side of the nut. In general, ball screws are very durable, can handle higher loads and higher speeds, and require less maintenance. Unlike leadscrews, they are more expensive and are usually quite rigid. They are also a bit noisier, though.

Ball screws are rated C0 to C10 precision where C10 is the least accurate and the price goes up — way up — with accuracy. [MirageC] shows how cheaper ball screws can be rolled instead of precision ground. These screws are cheaper and harder, but exhibit more runout than a precision screw.

This runout caused wobble during 3D printing that was immediately obvious on the prints. Using a machinist’s dial gauge, [MirageC] found the screws were not straight at all and that even a relatively poor C7 ball screw would be more precise.

The solution? A clever arrangement of 3D printed parts. ball bearings, and magnets. The device allows the nut to move laterally without transmitting it to the print bed. It is a clever design and seems to work well.

Continue reading “Improving Cheap Ball Screws”

A Brief History Of Viruses

It was around the year 1590 when mankind figured out how to use optical lenses to bring into sight things smaller than the natural eye can observe. With the invention of the microscope, a new and unexplored world was discovered. It will likely be of great surprise to the reader that scientists of the time did not believe that within this new microscopic realm lay the source of sickness and disease. Most would still hold on to a belief of what was known as Miasma theory, which dates back to the Roman Empire. This theory states that the source of disease was contaminated air through decomposing organic materials. It wouldn’t be until the 1850’s that a man by the name of Louis Pasteur, from whom we get “pasteurization”, would promote Germ Theory into the spotlight of the sciences.

Louis Pasteur experimenting in his lab.
Louis Pasteur. Source

Pasteur, considered by many as the father of microbiology, would go on to assist fellow biologist Charles Chameberland in the invention of the aptly named Pasteur Chamberland filter — a porcelain filter with a pore size between 100 and 1000 nanometers. This was small enough to filter out the microscopic bacteria and cells known at that time from a liquid suspension, leaving behind a supply of uncontaminated water. But like so many other early scientific instrumentation inventions it would lead to the discovery of something unexpected. In this case, a world far smaller than 100 nanometers… and add yet another dimension to the ever-shrinking world of the microscopic.

This is when we began to learn about viruses.

Continue reading “A Brief History Of Viruses”

Slick Web Oscilloscope Is Ready In A Flash (Literally)

A bench oscilloscope is one of the most invaluable tools in the hardware hacker’s arsenal, but even the slimmest digital models are a bit large to be part of your everyday electronic carry. Sure you could throw one of those cheap pocket scopes in your bag, but what if there was an even easier way to take a peek at a few signals while you’re on the go?

For those who roam, the Arduino-web-oscilloscope project created by [David Buezas] is worth a close look. Using the Web Serial API built into recent versions of Google’s Chrome browser, this project allows you to pop open a software oscilloscope without installing anything locally. Whether it’s a public computer or that cheap Chromebook you keep around for emergencies, a valuable tool is just a few clicks away.

Flashing the MCU from the web interface.

Of course, there has to be some hardware involved. Despite what you might think given the name of the project, the code currently only supports the Logic Green LGT8F328P microcontroller. This cheap ATmega328P clone not only runs at 32 Mhz but according to [David], many operations can be done in fewer clock cycles than on the original 328P. In short it’s fast, and fast is good if you want more samples.

One of the best parts about this project is that a function to flash the firmware to the LGT8F328P is built right in the web interface. With the oscilloscope running in the browser, you just need to plug in a blank board, click the button to flash it, and start taking measurements. You could outfit a whole classroom or hackerspace with basic oscilloscopes in minutes, with a per-seat cost of just a few bucks.

Now as you might expect, there are some pretty hard limits on what you can realistically measure with this setup. For one thing, the board can’t handle anything higher than 5 volts. Even the cheapest oscilloscope kit is still going to be an upgrade, but the fact you can spin this up almost anywhere for the cost of a cheap MCU board makes it hard to complain about the results.

[Thanks to Bill for the tip.]

Mastering The Tricky Job Of Soldering SMA Connectors

There’s a satisfaction in watching someone else at work, particularly when they are demonstrating a solution to a soldering problem you have encountered in the past. SMA panel sockets have a particularly tiny solder bucket on their reverse, and since they often need to be soldered onto brass rod as part of microwave antenna construction they present a soldering challenge. [Andrew McNeil] is here to help, with a foolproof method of achieving a joint that is both electrically and mechanically sound.

The best connections to a solder bucket come when the wire connected to it nestles within its circular center. If this doesn’t happen and a blob of solder merely encapsulates both wire and bucket, the mechanical strength of the solder blob alone is not usually sufficient. The brass rod is wider than the bucket, so he takes us through carefully grinding it down to the right diameter for the bucket so it sits in place and can have the solder sweated into the gap. The result is very quick and simple, but has that essential satisfaction we mentioned earlier. It’s a small hack, but if you’ve ever soldered to a too-small RF connector you’ll understand. For more fun and games with RF connectors, take a look at our overview.

Continue reading “Mastering The Tricky Job Of Soldering SMA Connectors”