(Re)designing The LumenPnP Tape Feeder

Many of the hardware orientated hackers among us will likely have been following along with the story of [Stephen Hawes] and the Lumen pick-and-place project but kind of waiting a bit for the project to mature some more before maybe taking the plunge and ordering a kit. One reason for this might be that whilst the basic machine design is there and working, the tape feeders did need a fair bit of work, and a lack of usable feeders does not make a great PnP machine. [Stephen] has been working on a newer design that addresses some of the identified shortcomings, and has started documenting his progress (video, embedded below) along the way.

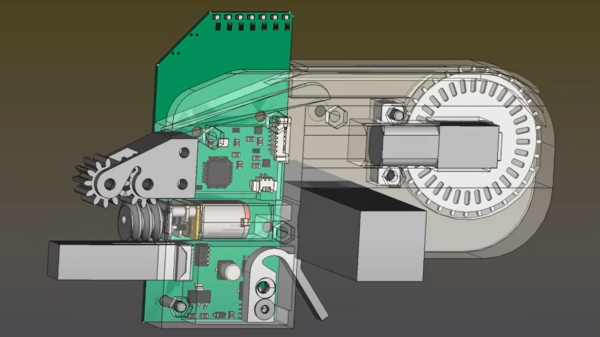
Gone is the PCB-based ‘case’, reverting back to a 3D printable affair and a much smaller PCB. After flip-flopping a bit between different geared DC motors, [Stephen] settled back on the original, smaller unit, which after a wee spot of hacking, was convinced to accept an optical encoder stripped from another unit, and this proved that it was indeed more than up to the tape-advancement duty. The reason for this change was physical size — the original motor resulted in an assembly 38mm wide — this limited the number for feeders on the front rail to barely eleven units. This is not really enough, but with the narrower assembly, the width is reduced to 15.5mm allowing 27 feeders to snuggle together on the rail, and that should make the machine much more usable.

Continue reading “(Re)designing The LumenPnP Tape Feeder”

Getting To The TrackPoint Quicker

Love it or hate it, TrackPoint can be a powerful tool. Love it or hate it, the idea of moving the mouse without removing your hands from the keys has an appeal. [Alon Swartz] incorporated one into his custom wired split mechanical keyboard and wrote a helpful guide on how to do it yourself.

The first step was to determine the pinout of the Trackpoint, which he provides a handy repository of various devices with annotations and pictures. The next step is swapping the little rubber nub at the top for something a bit longer. As the PCB sits below the keys, a labret cheek piercing happens to be a perfect candidate. Strong, thin, easily obtainable in different lengths, and threaded on one end. With jewelry in hand, [Alon] created a reset circuit with just a few resistors and a capacitor so the teensy can trigger a reset of the Trackpoint. The keyboard’s TMK firmware also needed a few tweaks to support reading the Trackpoint.

It’s a great guide, and we love the use of the jewelry as a piece of the keyboard. A knitting needle was used in a previous attempt to add a Trackpoint to a mechanical keyboard, and we’re excited to see what other household items end up in keyboards.

Fytó Is Fido For Phytophiles

On the surface, most plants really aren’t all that exciting, save for maybe the Venus flytrap. Sure, you can watch them grow in the long run, but for the most part, they’re just kind of there, quietly bringing peace and cleaner air. Day by day, they hardly move at all, although if you’re one of those people who likes to get the Sim into the pool and take the ladder away, you could always play the drought game just to watch it droop and come back to life a half hour later.

Fytó the smart planter is a much more cool and far less cruel way of spicing up your plant life. The idea is to turn a plant into a pet by giving it an expressive face. Sure, plants have needs, but they communicate them more subtly than the average Earthing. By assigning animated emoji to various conditions, the plant becomes more familiar and in turn, feels more like a pet. Plus, the whole thing is just so darn cute.

Fytó runs on a Raspberry Pi 2W and has six emotions that are based on a capacitive soil moisture sensor, an LM35 temperature sensor, and an LDR module to detect light levels. If everything is copacetic, Fytó puts on a happy face, and will lick its lips after getting a drink of water. If the light is insufficient, Fytó looks sleepy; if the plant needs water, Fytó appears sweaty, red-faced, and parched. Don’t conflate this with the temperature-taking emoji, which indicates that Fytó is too hot. Finally, if the spot is too drafty and cold, Fytó looks like it’s nearly frozen. Be sure to check out the video after the break and watch Fytó work through their range of emotions.

Would you rather hear your plant complain in English? There’s a build for that.

Continue reading “Fytó Is Fido For Phytophiles”

DIY Gaming Mouse Beats The Competition, Costs Less

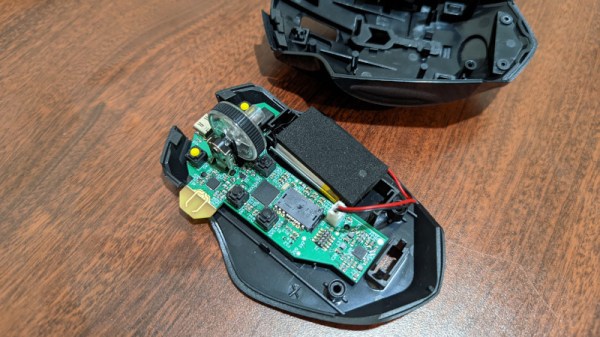
We’ve seen plenty of custom keyboards here on Hackaday. Seriously, like more than we can count. But custom mice? Those are far more elusive. Though we wouldn’t be surprised to see that change should this excellent example from [Tyler Richard] catch on.

How the mouse sees the date on a US quarter

The goal was to build a customizable mouse that could match the performance of Logitech’s MX Master 3, but without the $100 USD price tag. In the end, [Tyler] says his mouse is around 10x as responsive thanks to a 1,000 Hz refresh rate, and the total cost is just a fraction of the retail price of the Logitech. Though as you might expect, there’s a catch or two.

For one thing, he says getting your hands on the PixArt PMW3389 mouse sensor in single quantities can be difficult. It seems like he was able to secure a sample because he’s a student, but you’ll have to figure out your own way to con secure one from the company. There’s also no friendly GUI to configure the mouse, and indeed, you’ll need to write some code should you want to modify any of its buttons. Oh, and despite the fact that the cheapo donor mouse you need to use for parts is wireless, the replacement guts you’ll be fitting it with currently only support wired operation.

Alright, we’ll admit it’s not perfect. But it’s still a huge step in the right direction if you care about being able to spin up your own input devices. With some refinement, and perhaps somebody willing to do bulk buy of the sensors, we could see this project becoming quite popular. In the meantime, you may have to settle for a macro stool.

Get Your Raspberry Pi Jamming With MuPiBox

Over the years we’ve seen a lot of Raspberry Pi boards pushed into service as media players. In fact, second to emulating old game consoles, that’s probably the Pi’s most common vocation when it comes to DIY builds. But despite the popularity of this particular use case, it seems like each one has had to reinvent the wheel.

Perhaps there’s where MuPiBox fits in. Developed by [Eric Gerhardt] and [Olaf Split] with the assistance of [Andreas Lippmann] and [Andrew Frericks], this project aims to turn everyone’s favorite Linux single-board computer into everyone’s favorite music player. MuPiBox provides not only the software to run your new high-tech boom box, but it even standardizes the hardware design and provides a 3D printable enclosure — though naturally there’s still room for interpretation if you don’t want yours to look exactly like all the others.

Your MuPiBox can look like whatever you want.

At the very minimum you’ll need a Raspberry Pi, a HifiBerry MiniAmp, and a speaker, though the instructions also recommend you invest in a Pimoroni OnOff SHIM (or wire up something comparable) to facilitate more graceful shutdowns. For the best experience you’ll also want a five inch Waveshare touch screen display and a USB power bank so your beats can go mobile.

The video below shows off the polished stock GUI, which is simple enough that even children should be able to navigate around and find their favorite tracks. Which is good, especially since it’s in German. The video also shows off some advanced setup features so you don’t have to pull the SD card out of the Pi just to change the WiFi network it’s attached to. There’s also a web interface that you can access from other devices on the network.

It’s a slick project, and we really like the aesthetics of the 3D printable enclosure. But even if you don’t want to replicate the project exactly, there’s certainly components here which could be utilized in your own Pi media center build.

Continue reading “Get Your Raspberry Pi Jamming With MuPiBox”

2022 Hackaday Supercon Tickets On Sale Now

Did I tell you about the time that [Spetku] turned the schwag bottle into a Jacob’s Ladder?
Supercon Tickets go on sale right now! And the true-believer tickets usually sell out fast, so if you’re as excited about the thought of a real-life Supercon as we are, get yours now for a healthy discount.

We might be biased, but Supercon is our favorite conference of the year. Smaller than most and hardware-focused, you really can’t beat the signal/noise ratio of the crowd in attendance and the talks on the stage. People bring their projects, their great ideas, and their big dreams with them. And we have a cool badge to boot. It’s Hackaday, but in real life. And you should join us!

The conference starts on Friday Nov. 4th with registration, a mellow afternoon of badge-hacking, and a party to kick things off right. Saturday and Sunday are the main show, with a hacker village in the alley, workshops aplenty, and of course all of the talks. It’s only a weekend, but it’s one you’ll keep going back to in your mind for the whole year.

The Nitty Gritty Details

One hundred (100) True-believer Tickets are on sale now for $128 apiece, or until Aug. 29th. We call them True-believer Tickets because we haven’t even finished the call for proposals yet, much less selected the talks, but trust us, it’s going to be a good slate. (In past years, the True-believer tickets have sold out in as little as a day, so don’t sleep on this!) After that, regular admission is $256.

Of course, there’s always a back door if you want to sneak in for free. In our opinion, the coolest way to attend a conference is to give a talk, and you’ll get a complimentary ticket to boot! And even if you don’t get selected, we’ll give everyone who submits a serious talk proposal a ticket at the discounted price, so don’t hesitate. Volunteers also get in free, and we’ll be putting out the call on Aug 29th.

No matter how you get yourself a ticket, get one, and get to Supercon. We’re excited to see you in person again!

Steam Power Hack Chat

Join us on Wednesday, August 17 at noon Pacific for the Steam Power Hack Chat with Quinn Dunki!

The steam power age may be behind us now, but that doesn’t mean that the engineering that went into steam engines isn’t worth exploring. In a lot of ways, the steam age is what made modern engineering what we know it as today. Where wind- and water-powered devices could often work well enough with a couple of inches of tolerance, steam engines required parts measured to the hundredth or even thousandth of an inch. Optimizing steam engines required a deep understanding of thermodynamics, too, which unveiled more about the way the universe works than had ever been realized before. And the need for parts strong enough to withstand steam pressure and the lubricants needed to keep the wheels turning paved the way for advances in materials science and chemical engineering that are still paying dividends today.

Celebrating the achievements of steam power may seem anachronistic, but in light of everything steam has done for us, it makes a lot of sense. And that’s not to mention the cool aesthetics of steam engines, with beefy castings and brass parts sliding back and forth, complicated linkages doing who-knows-what to make the engine work on nothing more than a little bit of boiling water. There’s the attraction of danger, too; improperly built boilers can be a disaster, so building one that’s safe to use can be quite a challenge.

join-hack-chatAll this and more is what the steam hobby is all about, an area that Quinn Dunki has been exploring for a while now. Over on her YouTube channel, Quinn has documented the process of turning raw metal into a working steam engine and boiler, and is currently working on a bigger, more powerful engine. We’ve invited her on the Hack Chat to talk about all things steam — where to get started in the hobby, what kinds of things you can learn by building your own steam engines, and how her current builds are going. If you’ve ever wanted to explore steam power, here’s your chance to ask a real steam aficionado.

Our Hack Chats are live community events in the Hackaday.io Hack Chat group messaging. This week we’ll be sitting down on Wednesday, August 17 at 12:00 PM Pacific time. If time zones have you tied up, we have a handy time zone converter.