3D Print Yourself A Split Flap Display

Split flap displays! They’re mechanical, clickety-clackity, and largely commercially irrelevant in our screen-obsessed age. That doesn’t mean you can’t have a ball making one of your own, though! [Morgan Manly] did just that, with tidy results.

An ESP32 C3 SuperMini serves as the boss of the operation, running the whole display. The display is designed to be modular, so you can daisy chain multiple characters together to spell longer words. Each module has 37 characters, so it can display the alphabet, numerals 0 to 9, and a blank. Each module contains a 28BYJ-48 stepper motor for controlling the flaps, and a ULN2003 driver board to run it and a PCF8575 IO expander to handle communciation. An A3144 hall effect sensor is also used for positional feedback to ensure the display always shows the right character. The flap mechanism itself is relatively straightforward—a drum with all 37 flaps is until the correct character is reached, with the blank flaps hosting a magnet to trigger the aforementioned hall effect sensor. The flaps themselves are 3D-printed, with filament changes used to color the characters against the background.

If you’ve ever dreamed of building a flap-display clock or ticker, you needn’t dream of finding the perfect vintage example. You can just build your own! The added bonus is that you can make it as big or as small as you like. We’ve seen some interesting variations on the split flap concept recently, too. If you’re cooking up your own kooky electromechanical displays, don’t hesitate to let us know!

Microsoft (Again) Claims Topological Quantum Computing With Majorana Zero Mode Anyons

As the fundamental flaw of today’s quantum computers, improving qubit stability remains the focus of much research in this field. One such stability attempt involves so-called topological quantum computing with the use of anyons, which are two-dimensional quasiparticles. Such an approach has been claimed by Microsoft in a recent paper in Nature. This comes a few years after an earlier claim by Microsoft for much the same feat, which was found to be based on faulty science and hence retracted.

The claimed creation of anyons here involves Majorana fermions, which differ from the much more typical Dirac fermions. These Majorana fermions are bound with other such fermions as a Majorana zero mode (MZM), forming anyons that are intertwined (braided) to form what are in effect logic gates. In the Nature paper the Microsoft researchers demonstrate a superconducting indium-arsenide (InAs) nanowire-based device featuring a read-out circuit  (quantum dot interferometer) with the capacitance of one of the quantum dots said to vary in a way that suggests that the nanowire device-under-test demonstrates the presence of MZMs at either end of the wire.

Microsoft has a dedicated website to their quantum computing efforts, though it remains essential to stress that this is not a confirmation until their research is replicated by independent researchers. If confirmed, MZMs could provide a way to create more reliable quantum computing circuitry that does not have to lean so heavily on error correction to get any usable output. Other, competing efforts here include such things as hybrid mechanical qubits and antimony-based qubits that should be more stable owing to their eight spin configurations.

Open-Source Random Numbers

Whether it’s a game of D&D or encrypting top-secret information, a wide array of methods are available for generating the needed random numbers with high enough entropy for their use case. For a tabletop game this might be a single die but for more sensitive applications a more robust method of generating random numbers is needed. Programmers might reach for a rand() function of some sort, but these pseudorandom numbers don’t cut the mustard for encryption. For that you’ll need a true random number generator (RNG), and this open-source hardware RNG uses one of the better methods we’ve seen.

The device, called RAVA, is based on a property found in many electronic devices called avalanche breakdown. Avalanche breakdown occurs when a high voltage (in this case approximately 25V) is applied in the reverse bias direction, with this device using a pair of Zener diodes. When this high voltage is applied, an “avalanche” of electrons occurs which allows the diodes conduct in the opposite direction that they would when they are forward biased. This isn’t a constant current flow, though; there are slight variations over time which can be amplified and used as the random number generator. The noise is amplified over a series of op amps and then fed to an ATmega32U4 microcontroller which can provide the user with 136.0 Kbit/s of random data.

Unlike other random number generators, this device is based on a method generally accepted to be truly random. Not only that, but since it’s based on discrete hardware it can be accessed directly for monitoring and replacement in case of faults, unlike other methods which are more “black boxes” and are more opaque in their processes which are thus harder to audit. We also appreciate it’s open-source nature as well, and for some more information on it be sure to check out the paper on it in IEEE. If you’re looking for something to generate random numbers but will also bring some extra flair to the next game night, take a look at this radioactive dice replacement.

DIY Yagi Antenna Sends LoRa Signals Farther

LoRa gear can be great for doing radio communications in a light-weight and low-power way. However, it can also work over great distances if you have the right hardware—and the right antennas in particular. [taste_the_code] has been experimenting in this regard, and whipped up a simple yagi antenna that can work at distances of up to 40 kilometers.

The basic mathematics behind the yagi antenna are well understood. To that end, [taste_the_code] used a simple online calculator to determine the correct dimensions to build a yagi out of 2 mm diameter wire that was tuned for the relevant frequency of 868 MHz. The build uses a 3D-printed boom a handle and holes for inserting each individual wire element in the right spot—with little measuring required once the wires are cut, since the print is dimensionally accurate. It was then just a matter of wiring it up to the right connector to suit the gear.

The antenna was tested with a Reyas RYLR998 module acting as a base station, with the DIY yagi hooked up to a RYLR993 module in the field. In testing, [taste_the_code] was able to communicate reliably from 40 kilometers away.

We’ve featured some other unique LoRa antenna builds before, too. Video after the break.

Continue reading “DIY Yagi Antenna Sends LoRa Signals Farther”

UNIX Archaeology Turns Up 1972 “V2 Beta”

In 1997 a set of DEC tapes were provided by Dennis Ritchie, as historical artifacts for those interested in the gestation of the UNIX operating system. The resulting archive files have recently been analysed by [Yfeng Gao], who has succeeded in recovering a working UNIX version from 1972. What makes it particularly interesting is that this is not a released version, instead it’s a work in progress sitting somewhere between versions 1 and 2. He’s therefore taken the liberty of naming it “V2 Beta”.

If you happen to have a PDP-11/20 you should be able to run this operating system for yourself, and for those of us without he’s provided information on which emulator will work. The interesting information for us comes in the README accompanying the tapes themselves, and in those accompanying the analysis. Aside from file fragments left over from previous users of the same tape, we learn about the state of UNIX time in 1972. This dates from the period when increments were in sixtieths of a second due to the ease of using the mains power frequency in a PDP, so with a 32-bit counter they were facing imminent roll-over. The 1970-01-01 epoch and one second increments would be adopted later in the year, but meanwhile this is an unusual curio.

If you manage to run this OS, and especially if you find anything further in the files, we’d love to hear. Meanwhile, this is not the oldest UNIX out there.

Featured image: “PDP-11/20 Rocker Switches” by Don DeBold

Pico Gets A Speed Bump

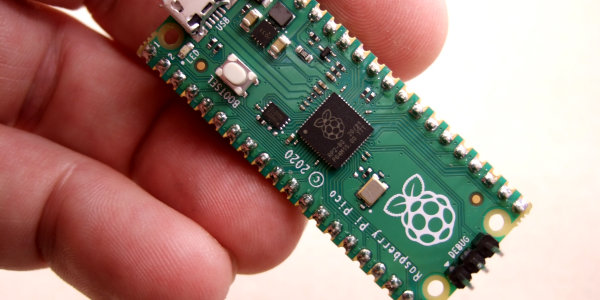
The release notes for the 2.1.1 Raspberry Pi Pico SDK have a late holiday present: The RP2040 chip is now certified to run at 200 MHz if you use at least 1.15V as the supply voltage.

Previously, the certified speed was 125 MHz, although it was well-known you could overclock the device. By default, the 125 MHz figure is still what you’ll get, though. If you want a higher frequency, you need to set SYS_CLK_MHZ to 200 before doing a build. Continue reading “Pico Gets A Speed Bump”

Microwave Motion Detector Notifies Your Smart Phone

Your garden variety motion detector uses IR, but these days, there are fancier technologies for achieving similar goals. If so desired, you can source yourself a microwave-based presence sensor instead. Indeed, like [N-08 Labs], you might like to whip one up into a basic intrusion detection system.

The idea is simple enough—take a RCWL-0516 microwave presence sensor, and set it up to detect motion and warn you when it happens. It’s a simple part to use—it simply drives a 3.3 volt logic output high if it detects someone or something. It basically just emits a microwave signal and detects a change in phase when someone or something—usually something fleshy—is in front of it. [N-08 Labs] simply hooked one up to an IO pin on an ESP8266, with the microcontroller board set up to communicate wirelessly with a Blynk IoT app, which then in turn fires off a smartphone notification that the sensor picked something up. The whole thing is built inside the shell of an AC adapter that provides power and let it easily hide in plain sight.

A project like this doesn’t just have to be for security purposes. You might even just use it to determine when your pet (or a racoon) is using the cat door, or similar. Indeed, we’ve seen great solutions to that particular problem, too. Video after the break.

Continue reading “Microwave Motion Detector Notifies Your Smart Phone”