Create Green, Soldermasked PCBs With Fritzing

Even though you can easily order a PCB from any one of a dozen board houses and have it on your desk in a few weeks, there’s still a need for home-made circuit boards. If it’s because you have very special or strange requirements, you want to save money, or you need to suffer for your art, you can make printed circuit boards at home. You can even apply soldermask. It’s easy, and [Renzo] is here to show you how.

The beginnings of this tutorial cover well-tread territory such as building a CNC router, laying out a circuit, and cutting a piece of single-sided, copper clad board. If you stopped right there, after milling traces into a board, you would have a functioning circuit. But it wouldn’t look good; a piece of copper does not a PCB make, and you need soldermask. That’s where the real work comes in.

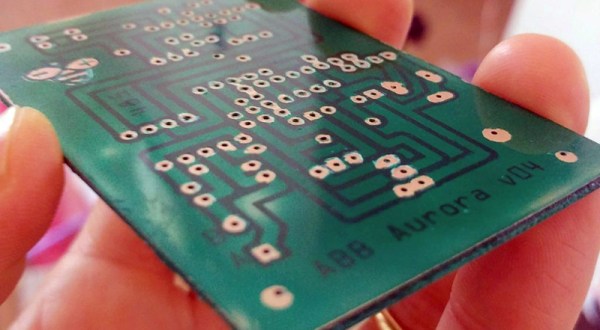
Applying the soldermask meant there needed to be places without soldermask, mostly the vias and through-holes. For this, [Renzo] pulled the copper pad layer out of Fritzing, printed it on a transparency sheet, and finally applied the UV-curing soldermask. This came as a kit, and right now, you can get 10 ml of green, red, blue, yellow, and black UV-curing soldermask, and a UV flashlight for ten dollars on the usual Internet shops. This soldermask was lathered on, rolled out, and exposed with the UV flashlight. After a quick wash in acetone, the result is a perfect PCB.

The Multichannel Field Recorder You Can Build Right Now

Field recorders, or backpackable audio recorders with a few XLR jacks and an SD card slot, are a niche device, and no matter what commercial field recorder you choose you’ll always compromise on what features you want versus what features you’ll get. [Ben Biles] didn’t feel like compromising so he built his own multichannel audio DSP field recorder. It has a four channel balanced master outputs, with two stereo headphone outputs, eight or more inputs, digital I/O, and enough routing for multitrack recording.

Mechanically, the design of the system is a 3D printed box studded on every side with various connectors and patch points. This is what you get when you want a lot of I/O, and yep, those are panel mount connectors so get ready to pony up on the price of your connectors. The analog front end is a backplane sort of thing on a piece of perfboard, containing an eight channel differential I/O.

Of course any audio recorder is awful to use unless there’s a great user interface, and for that you can’t get any better than a high-resolution touchscreen on a phone. This led [Ben] to use Bluetooth to connect to an app showing the gain, levels, a toggle for phantom power, and a checkbox for line or microphone. If that’s not enough there are also some MIDI knobs for volume, because MIDI is still great for user input. It’s everything you want in a portable recording rig, and yes, there is a soundcloud demo. You can also check out a demo video below.

Continue reading “The Multichannel Field Recorder You Can Build Right Now”

A Steady Hand Makes This Chip Work Again

What do you do when you’re working with some vintage ICs and one of the tiny legs pops off? That’s what happened to [Kotomi] when working with an old Super Nintendo. A single lead for the sound chip just snapped off, leaving [Kotomi] one pin short of a working system (the Google Translatrix). This is something that can be fixed, provided you have a steady hand and a rotary tool that’s spinning at thousands of RPM.

Fixing this problem relies on a little bit of knowledge of how integrated circuits are built. There’s a small square of silicon in there, but this tiny die is bonded to a metal leadframe, which looks like the ribcage of a robotic centipede. This leadframe is covered in epoxy, the pins are bent down, and you have an IC. Removing just a tiny bit of epoxy grants access to the leadframe which you can then solder to. Don’t breathe the repair, it’s not pretty, but it does work.

While this technique makes use of a Dremel to break into the chewy nougat center of a vintage chip, and in some ways this could be called decapsulation, it really isn’t. We’ve seen people drop acid to get to the center of a chip and a really hot torch will get to the middle of a ceramic chip, but this technique is just accessing the lead frame of the IC. All ICs have a stamped (or photoetched) metal frame to which the silicone die is bonded. Running a Dremel against some epoxy doesn’t access the silicon, but it does grant access to the signals coming off the chip.

Volkswagen Tools Turned To The Space Age

The Volkswagen Beetle, and yes the bus and the sexiest car ever made, are cars meant for the people. You can pull the engine out with a strong friend, and you can fix anything in an old Volkswagen. VW realized this, because in the 1950s and ’60s, they came up with plans for tools designed to tear apart an old VW, and these tools were meant to be manufactured in a local shop. That really turns that right to repair on its head, doesn’t it?

While working on his van, [Justin Miller] came across a reference to one of these tools meant to be made at home. The VW 681 is a seal puller, designed to be manufactured out of bar stock. It’s an old design, but now we have interesting tools like 3D printers and parametric CAD programs. Instead of making one of these DIY seal pullers with a grinder, [Justin] brought this tool from the space age into the modern age. He took the design, modelled it in OpenSCAD, and printed it out.

The VW reference book that lists this tool is Workshop Equipment for Local Manufacture, and for this seal puller, it gives perfectly dimensioned drawings  that are easily modelled with a few lines of code. The only real trouble is filing down the pointy bit of the puller, but a bit of boolean operations fixed that problem. After 15 minutes of printing and a few hours finding the right documentation and writing fifteen lines of code, [justin] had a plastic VW 681 in his hands. Yes, it was probably a waste of time as a regular seal puller could have done the job, but it’s an excellent example of what can happen when manufacturers support their local repairman.

Dancing Arrows To Break Your Brain

Last year, mathematician and professional optical illusionist [Kokichi Sugihara] came up with an arrow that only points one way. Technically, it’s ‘anomalous mirror symmetry’, but if you print this arrow and look at it juuuussst right, it appears this arrow only points one way.

[Ali] had the idea to turn this arrow illusion into something motorized, and for that he turned to 3D printing. The models for the illusion arrows were already available, but there had to be a way to turn a single arrow into an art installation. For that, you just need a few 9g servos. [Ali] slightly modified his servos so they would turn a full 180 degrees, and designed a magnetic mount to allow easy swap-out of these arrows.

The servos are attached to a 3D printed frame with heat-staked threaded inserts, and driven by a Pololu servo driver. The effect is great, with multiple arrows twisting and turning but still only appearing to point to the right. [Ali] put together two videos of this arrow illusion, one that’s effectively a build guide, and of course all the STLs are available in a link in the description.

Continue reading “Dancing Arrows To Break Your Brain”

Introducing The Shitty Add-On V1.69bis Standard

The last few years have seen a rise of artistic PCBs. Whether these are one-off projects with a little graphic on the silkscreen or the art of manufacturing and supply chains, these fancy PCBs are here to stay. Nowhere is this more apparent than the loose confederation of Badgelife enthusiasts, a hardware collective dedicated to making expressive and impressive electronic baubles for various hacker conferences. Here, hundreds of different hardware badges are created every year. It’s electronic art, supported by a community.

Some of these badges aren’t technically badges, but rather small, blinky add-ons meant to connect to a main badge, and these add-ons are all backed by a community-derived standard. The Shitty Add-On Standard is how you put smaller PCBs onto bigger PCBs. It is supported by tens of thousands of badges, and all of the people who are spending their free time designing electronic conference badges are using this standard.

It’s been more than a year since the Shitty Add-On standard was created, and in that time the people behind the work have seen the shortcomings of the first edition of the standard. Mechanically, it’s not really that strong, and it would be neat if there were a few more pins to drive RGB LEDs. This has led to the creation of the latest revision of the Shitty Add-On Standard, V.1.69bis. Now, for the first time, this standard is ready for the world to see.

Continue reading “Introducing The Shitty Add-On V1.69bis Standard”

A USB MUXer, For All Your Programming Needs

What if there were something like a KVM switch for your micro programmer, logic analyzer, and other various tools? There was a time when KVM switches (keyboard, video, and mouse, by the way) were metal enclosures surrounding an absurdly complicated rotary switch. This fact has a few applications if you ever want to switch a whole lot of stuff; if you ever need a bazillion-pole, two-way rotary switch, don’t spend your money at Mouser or Digikey, just look at eBay for some really old KVM or parallel port switches. Modern times require modern solutions, so here’s a 16-channel, bi-directional switched bus multiplexer. It connects wires to other wires with USB control, and if you need something like this, you really need something like this.

The SensorDots Port MuxR is a crowdfunding project for a project that began as a programming jig for another project. The MappyDot is a micro LIDAR unit that’s about the size of a postage stamp and has a microcontroller. Obviously, programming those microcontrollers was a pain (and don’t get me started on buying pre-programmed microcontrollers from the manufacturer), but there was a solution: a custom programming rig with dozens of pogo pins that automated the programming of an entire panel of boards. It was a useful tool, and now it’s a good idea for a Kickstarter project.

The Port MuxR takes a set of eight pins, and sends that out to one of eight ports. Alternatively, it can take a set of four pins, and send that to sixteen ports. All of this is controlled via USB, and it works with 0-5V signaling. If you know what this means, you probably have a reason to be interested in it.

Is it a sexy project? No, not at all. It’s an 8-pole, 8-throw rotary switch, controllable over USB. It is interesting, and it’s something a lot of us are going to need eventually.