A Macbook Air And A Thunderbolt GPU

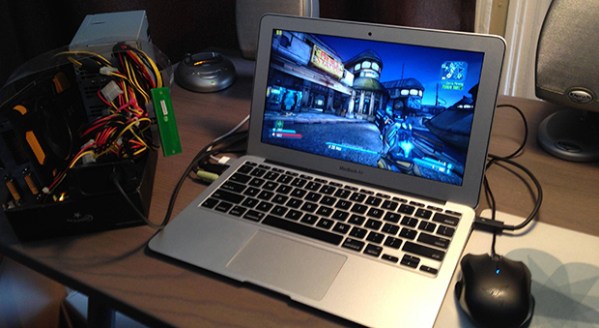
When Intel and Apple released Thunderbolt, hallelujahs from the Apple choir were heard. Since very little in any of Apple’s hardware lineup is upgradeable, an external video card is the best of all possible world. Unfortunately, Intel doesn’t seem to be taking kindly to the idea of external GPUs. That hasn’t stopped a few creative people like [Larry Gadea] from figuring it out on their own. Right now he’s running a GTX 570 through the Thunderbolt port of his MacBook Air, and displaying everything on the internal LCD. A dream come true.

[Larry] is doing this with a few fairly specialized bits of hardware. The first is a Thunderbolt to ExpressCard/34 adapter, after that an ExpressCard to PCI-E adapter. Couple that with a power supply, GPU, and a whole lot of software configuration, and [Larry] had a real Thunderbolt GPU on his hands.

There are, of course, a few downsides to running a GPU through a Thunderbolt port. The current Thunderbolt spec is equivalent to a PCI-E 4X slot, a quarter of what is needed to get all the horsepower out of high-end GPUs. That being said, it is an elegant-yet-kludgy way for better graphics performance on the MBA,

Demo video below.

Continue reading “A Macbook Air And A Thunderbolt GPU”

FLAMEnco Guitar

flamenco

[John] says, “I noticed an unfortunate lack of many flamethrower guitars on the web so I filled the need. ” That’s just awesome by us.

This series of guitar-mounted flamethrowers started with a small build, able to shoot a six-foot flame for about 40 seconds. Yes, very theatrical, but not something you’d want to change out after every song. From there the builds progressed to systems with more barrels, more fuel tanks, and a huge system that shoots 18-foot long flames colored with standard pyrotechnic supplies.

It should go without saying that this stuff probably isn’t something you should try at home. That being said, you really have to admire the craftsmanship and tenacity to make a guitar mounted flamethrower. Just don’t bring it to an indoor gig.

Continue reading “FLAMEnco Guitar”

An Introduction To Inertial Navigation Systems

acc_sens

Long before ships relied on GPS to determine their location – and even before radio navigation systems such as LORAN, vessels relied on a still impressively sophisticated means of determining their position: inertial navigation. The theory is simple: if you keep a few very accurate gyroscopes and accelerometers on board, you’ll be able to calculate where you are relative to your previous position. Since electronic gyros and accelerometers are all over the place, [Sebastian] thought he would have a go at creating his own inertial navigation system.

The difficulty in using this method is that every gyroscope invariably has some error. Since the measurements from the gyros and accelerometers are integrated together, the error is also integrated, resulting in an increasing positioning error as time goes on. With a few clever algorithms and very good sensors, it’s possible to minimize this error.

[Sebastian] doesn’t have really great hardware – he’s only working with a accelerometer/gyro breakout board that’s good enough for experimental purposes. After reading the accelerometer data with an Arduino, he’s able to capture all the sensor data and read it into a Python script.

The next steps are to figure out a decent algorithm to integrate all the sensor data, and possibly add a barometer and magnetic compass for better compensation for errors. The project is still in the early phases, but seeing as how an inertial navigation system is one of the engineering triumphs of the early 20th century, we’re eagerly awaiting any progress updates.

Touch Control For Every Key On The Keyboard

keys

Of all the musical instruments out there, the keyboard is among the worst for changing the pitch and timbre of individual notes. Wind and stringed instruments can do this easily in the hands of a skilled player, but outside the wheel and joystick controls of a few electronic keyboards, tickling the ivories means the only thing you can really change about how something sounds is the volume.

TouchKeys wants to put an end to this severe lack of dynamics available on keyboard instruments. Basically, it turns every single key on a keyboard into a multi-touch sensor, allowing any keyboardist to change the pitch, filter, timbre, or any other parameter of their instrument simply by moving their finger around on a key.

TouchKeys works by overlaying all the keys on a keyboard with circuit boards that plug into a module hidden under the hood. These boards are studded with capacitive sensing points, allowing a computer to recognize where the player is touching each key, and modifying filters or volume for each key independently.

The TouchKeys Kickstarter is offering a kit to equip a 25-key keyboard with these sensors for about $550. A hefty price tag, but hopefully we’ll see this tech in real production keyboards in the future.

BeagleBone Black Becomes A Handheld Classic Gaming Console

Over at TI, the 2013 Intern Design Challenge is underway, an opportunity for the interns of TI to flex their engineering muscle for a few prizes and a chance to have their designs turned into actual products. We’re thinking [Max] might just pull this one out with his BeagleBone Gaming Cape, an add-on to the BeagleBone Black that turns this ARM-powered Linux board into a retro gaming system.

The build was inspired by [Max]’s earlier MSP430 Launchpad GamingPack, an add-on board for the Launchpad that put two NES controllers, a VGA out, and an FPGA to create a custom gaming console that’s up there with the brightest and best consoles of the 16-bit era. For the new BeagleBone-based build, [Max] eschewed off-board processing, but did manage to include a magnetometer/accelerometer and an audio codec IC to provide the best gaming experience for all those NES, Game Gear. Gameboy, GBA and Doom .wad games.

In addition to a fabulous piece of hardware, [Max] also has the case design down to a tee. He first printed out a dozen or so layers of his case, sandwiching the BeagleBone, his cape, battery holders, and LCD display. Once he knew the dimensions would work, he sent his files off to be laser cut out of a matte black delrin. The finished piece is a work of art, and considering how well everything goes together, we wouldn’t mind giving this new retro-gaming console a spin ourselves.

Racing Telemetry On A Cockpit View

ODB

[Martin] has a Lotus Elise and access to a track. Sounds like fun, huh? The only problem is that the dashcam videos he makes are a little bit boring. Sure, they show him flying around the track, but without some sort of data it’s really hard to improve his driving skills. After thinking about it for a while, [Martin] decided he could use his Raspberry Pi and camera module to record videos from the dashboard of his car, and overlay engine data such as RPM, throttle, and speed right on top of the video.

Capturing video is the easy part of this build – [Martin] just connected his Raspi camera module and used the standard raspivid capture utility. Overlaying data on this captured video was a bit harder, though.

[Martin] had previously written about using the Raspi to read OBD-II data into his Raspi. Combine this with a Python script to write subtitles for his movies, and he’s off to the races, with a video and data replay of every move on the track.

The resulting movie and subtitle files can be reencoded to an HD movie. Reencoding a 13 minute HD video took 9 hours on the Raspi. We’d suggest doing this with a more powerful compy, but at least [Martin] has a great solution to fix his slightly uninformative track videos.

PCBs With Powder Coat

pcb

The toner transfer method of PCB production should be a staple in every maker’s bag of tricks. That being said, it’s a far from ideal solution with a lot of things that can go wrong, ruining hours of work. [Ryan] thinks he has a better solution up his sleeve, still using heat activated toner, but replacing the laser printer with a powder coating gun and a laser engraver.

[Ryan] is using a powder coating gun he picked up from Amazon for about $100. The theory behind it is simple: particles of toner coming out of the gun are statically charged, and bonded to the grounded copper clad board. In real powder coat shops, this coating is baked, resulting in a perfectly hard, mirror-like finish. [Ryan] skipped the baking step and instead through the powder coated board into a laser engraver where the PCB design is melted onto the copper. After that, wash the board off, etch it, and Bob’s your uncle.

What’s really interesting about this method of PCB production is that it doesn’t require a very high power laser. [Ryan] was actually having a problem with the toner burning with his laser engraver, so it might be possible to fab PCBs with a high power handheld laser, or even a Blu Ray laser diode.