The Leap Motion Makes Robots Bend To Your Will

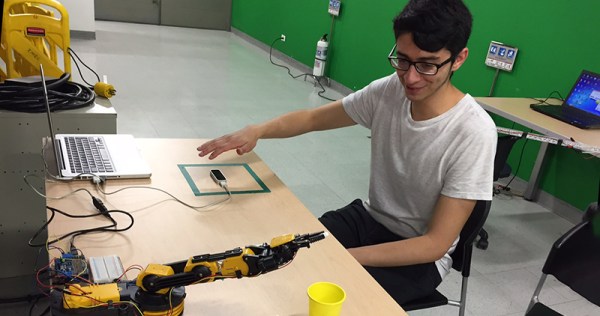
We just wrapped up the Human Computer Interface challenge in this year’s Hackaday Prize, and this project is pushing boundaries we’ve hardly seen before. [Giovanni Leal] is using a Leap Motion controller to move a robotic arm around in space.

The robot arm in question comes from Owi, and it is by every measure not a good robot arm. It is, however, an excellent toy filled with motors and plastic linkages that serves as a good stand-in for a proper robotic arm.

Control of this toy robot arm is done through a Leap Motion controller. While the Leap Motion is a few years old at this point, it is a very effective way to ‘measure’ the position and rotation of a hand in 3D space. The only thing that’s required is the Leap Motion controller itself and a tabletop.

The end result is a robot that can be controlled by a hand. While this robot arm is really just a toy, it was fun to assemble and a little bit of hardware hacking with an Arduino turned this into a working robot arm controlled by a human. Scale this up, establish an island lair, and you’re on your way to taking over the world.

Hackaday Links Column Banner

Hackaday Links: September 30, 2018

If you’re looking for an Open Source computer, good luck. The RISC-V stuff isn’t there yet, and with anything else you’re going to be dealing with NDA’d Intel, AMD, or some other proprietary cruft. System76, however, makes the most big-O Open computer, and they will be announcing a new Open computer called the Thelio next month. It was on display at the Open Hardware Summit, although smartly there were no pictures taken of this box. Liliputing has reported on it, but there are a few things wrong with that speculation. No, it’s not RISC-V. We’re looking at x86 here. It’s a desktop. It has wood (walnut or maple). It doesn’t have enough cold cathode lighting to blind you, but I guess that’s a matter of taste. Everything will be announced in October.

I have a plan in the works to sell snake oil to people. Actually, it’s not snake *oil*, but it is derived from snakes. There are rattlesnake farmers out there, who breed snakes for meat (tastes like chicken!) and their skins for boots. The fascia of the skins is disposed of when this leather is being prepared, and this can be used as the base component of a glue, or something resembling gelatin. It’s basically no different than fish or animal glue, except it’s from snakes. This can be used as one of the ingredients in gummy candy. This is my plan: I’m going to sell snake oil, except it’s really snake-based gummies. They promote digestion and get rid of ions in your body, or something. Better living through snake gummies.

The paragraph you just read is a better business plan than this bit of snake oil. It’s a battery that recharges itself. It’s unclear if it recharges itself over time; if if it just recharges itself automatically, wouldn’t the battery just have more energy in it? It’s hitting all the checkmarks of snake oil too: there are references to Tesla being a ‘forgotten genius’, zero-point energy fields, and a countdown timer to their crowdfunding campaign. This rabbit hole goes deep.

Did you know Hackaday has a Retro Edition, specifically designed for old computers that somehow have web browsers? It’s true! Sometimes, we even add pics of people pulling the Retro Edition up on their ancient devices. [Steven McDonald] wondered if his Blackberry counted. Sure thing! If you can pull up the Retro Edition on your ancient computer, we’ll mention it in the Links post, too. We’re also taking suggestions on how to improve the Retro Edition; I’ll get around to improving it eventually.

Give Yourself A Sixth Sense With An Arduino

If you carry a smartphone around in your pocket, you have a GPS navigation system, a compass, an altimeter, and a very powerful computer at your fingertips. It’s the greatest navigational device ever created. To use this sextant of the modern era you’ve got to look down at a screen. You need to carry a phone around with you. It’s just not natural.

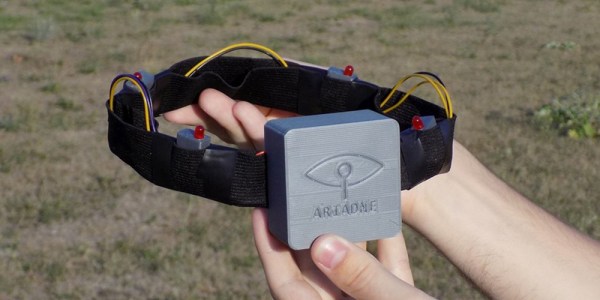
For this entry into the Hackaday Prize, [Vojtech Pavlovsky] has an innovative solution to direction finding that will give you a sixth sense. It’s a headband that turns your temples into the input for a clever way to find yourself around the city or a forest, and it does it with just an Arduino and a few other bits.

The idea behind the Ariadne Headband is to create a haptic navigation system for blind people, runners, bikers, or really anybody. It does this by mounting four vibration motors on a headband, connecting those motors to an Arduino, sniffing data from a digital compass, and getting data over Bluetooth from an Android app.

All of these parts come together to form a new sense — a sense of direction. By simply telling the app to make sure you’re always oriented North, or to guide you along the grid of city streets, this headband becomes an inconspicuous and extraordinarily useful way to get around.

FPGA Jacked Into Pinball Machine Masters High Scores

How do you preserve high scores in an old arcade cabinet when disconnecting the power? Is it possible to inject new high scores into a pinball machine? It was the b-plot of an episode of Seinfield, so it has to be worth doing, leading [matthew venn] down the rabbit hole of FPGAs and memory maps to create new high scores in a pinball machine.

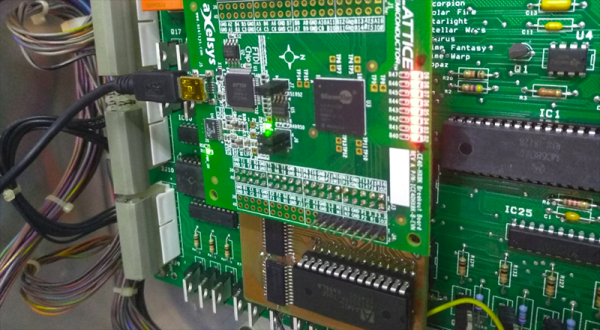
The machine in question for this experiment is Doctor Who from Williams, which, despite being a Doctor Who pinball machine isn’t that great of a machine. Still, daleks. This machine is powered by a Motorola 68B09E running at 2MHz, with 8kB of RAM at address 0x0000. This RAM backed up with a few AA batteries, and luckily is in a DIP socket, allowing [matthew] to fab a board loaded up with an FPGA development board that goes between the CPU and RAM.

The basic technique for intercepting and writing a new high score for this pinball machine comes from the incredible [sprite_tm] who is tweeting high scores from a 1943 cabinet. The idea is simple: just have an FPGA look at one specific memory address, and send some data to a computer when the data at that address is updated. For the Doctor Who pinball machine, this is slightly harder than it sounds: the data isn’t stored in hex, but packed BCD. After a little bit of work, though, [matthew] was able to write new high scores from a Python script running on a laptop. All the code (and a few more details) are over on a Github

Extending arcade games by tapping into address and data lines isn’t something we see a lot of, but it has been done, most famously with the Church of Robotron. Here, a few MAME hacks turn a game of Robotron into a Church for the faithful to fully commit themselves to the savior of the world, due to arrive in 66 years and save the remaining humans from the robot apocalypse. This hack of a Doctor Who pinball machine goes beyond a modded version of MAME, and if we’re ever going to make a real chapel with a real game of Robotron, these are the techniques we’re going to use.

The New, Improved Open Hardware Certification Program

Today at the Open Hardware Summit at MIT, OSHWA, the Open Source Hardware Association has announced a huge revision to the Open Hardware certification process. The goal here is to design a better platform for creating Open Hardware.

While all hardware already certified as Open Hardware will remain Open Hardware, this revamp of the ‘hub’ of the certification process is greatly improved. There’s a new website. There are learning modules telling everyone what it means to be Open Source hardware. There are community examples — real-life walk-throughs of projects that have already been created. There’s a streamlined certification process, and an improved listing of Open Hardware projects.

But Why A Certification Program?

While Open Source in the world of software is easily defined, it is effectively a hack of copyright law; all software is closed by default, and an Open Source software license is merely that; a license for anyone to use it, with the various restrictions and philosophical battles. Hardware, on the other hand, is big-O Open by default. The code used to program an FPGA is covered by copyright, but the circuit itself isn’t. The firmware on your Arduino project is covered by Open Source software licenses, but the physical implementation of your Fritzing picture isn’t.

In the absence of a legal framework to truly make an Open Hardware license work, the only other option is a certification program. The current Open Source Hardware certification program launched in 2016, and has since seen hundreds of projects certified from dozens of countries. It is, by any measure, a remarkable success. The people who make hardware are certifying that their work complies with community-set standards, and all of these projects are registered.

The New, Improved Interface for the Certification Program

While the core of the Open Hardware Certification program hasn’t changed, the user interface — the ‘killer app’ of a directory of Open Hardware projects — has. According to the press release put out by OSHWA ahead of the announcement, “The revamped website consolidates a broad range of information about open source hardware onto a single site. To maximize comprehension for people pursuing certification for their own hardware, important documentation and licensing concepts are illustrated with specific existing examples from the registry. An improved directory and search function makes it easy to find hardware that matches a broad range of criteria.”

Compared to last week’s version of OSHWA’s website, this is a huge improvement. Now, you can easily find information about what it means to make Open Hardware. The complete directory of Open Hardware projects isn’t just a spreadsheet on a webpage anymore, you can actually search for projects now. This is a huge improvement to the Open Hardware certification program, and we can’t wait to see how this new platform will be used.

You can check out the rest of the Open Hardware Summit over on the livestream.

The Exquisite Badges Of Open Hardware Summit

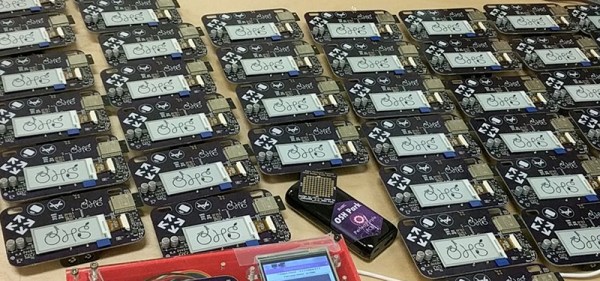
The past few years have been all about electronic conference badges and this year is no different. Right now, we’re setting up at the Open Hardware Summit at MIT, and this year’s badge is nothing short of extraordinary. It’s a WiFi and Bluetooth-enabled e-paper badge, individually programmed for every attendee. The 2018 Open Hardware Summit badge is a work of art, and it was all created over on hackaday.io.

This board is based on the ESP trINKet designed by [Mike Rankin] with additional hardware design from [Alex Camilo]. The badge is based around the ESP32-wroom-32 module with a 2.13 inch e-paper display with a resolution of 250 x 122 pixels. To this, the badge adds an I2C accelerometer and support for add-ons. There’s also pads for an SD card holder — a soldering challenge, if you will — and few additional pads for bits and bobs.

But a badge is nothing without software, and that’s where this really gets good. The ESP32 module is a powerhouse, capable of emulating NES games or serving as a file server. Here, the stock configuration of the badge is rather simplistic: you can start a WiFi AP, log onto a web page, and change the name displayed on the badge. You can also start an FTP server, which is where things get really fun. Drop an application on that FTP server, and you can run Micro Python.

The badge is great, but the programming jig is awesome

The boards were made through OSH Park, and Screaming Circuits took care of the assembly. Anyone who has ever built a badge will tell you it isn’t the assembly that gets you — it’s the programming and provisioning. This is especially true since the Open Hardware Summit badge is distributed with the attendee’s names already preloaded. That’s a few hundred badges, all with unique firmware. This is a nightmare by any definition.

However, there’s always a good solution to a problem, and [Drew] from OSH Park showed me the best programming jig I’ve ever seen during the Summit pre-game at Artisan’s Asylum.

What you’re looking at is a 3D printed box loaded up with a touch-screen display, a Raspberry Pi Zero W, and a few pogo pins. This Raspberry Pi does all the heavy lifting by connecting to the Internet, pulling down the current version of the firmware, and loading that firmware onto the badge. There are a few more options thanks to the touch-screen interface, including provisioning all the badges with the names of the attendees — this can be done by reading a list of attendees and uploading the next one to the badge in the jig. All of this is wrapped up with a nice laser-cut cover that securely holds each badge exactly where it needs to be for the pogo pins to make contact.

This is, without question, the best programming jig I’ve seen. Any badge makers out there should take note: this is how you program a few hundred badges. The badge, itself, is great and just as this post is published there will be hundreds of eager hackers futzing about with this remarkable piece of hardware. If you want to check out the current progress of the badge hacking, check out the updates on Twitter

Maker Faire NY: Infinite Autonomous 3D Printing

Although it’s not an idea that has yet trickled down to $200 printers drop-shipped from China, one of the most innovative ideas in the 3D printing world in the last few years is putting plastic down on a conveyor belt. Yes, MakerBot was doing it back in 2010, but we’re not going to talk about that. Printing on a conveyor belt instead of a static bed allows you to easily print multiples of an object autonomously, without any human interaction. If you’re really clever, you could rotate the hot end 45° and build a piece of plastic that is infinitely long, like the printer [Bill Steele] built, the Blackbelt, or ‘the CAD files might exist somewhere’ Printrbot infinite build volume printer.

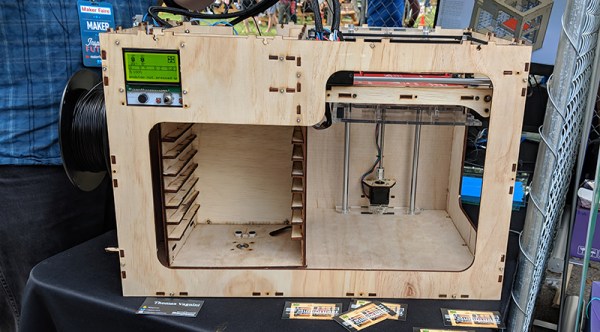
At this year’s World Maker Faire, we didn’t see an infinite printer, but we did catch a glimpse of an idea that could reliably take 3D printers into production. It’s a Multiprinter Autonomous 3D Printer, designed and built by [Thomas Vagnini].

The idea of using 3D printers for production and manufacturing is a well-studied problem. Lulzbot has a heated room filled with printers they use to manufacture all their machines. Prusa’s manufacturing facility is similarly well-equipped. However, both of these setups require helper monkeys to remove a part from the bed and set the machine up for the next print.

Instead of a strictly manual process, [Thomas]’ machine uses a sort of cartridge-based system for the printing bed. The glass beds are stored in a cassette, and for the first print, the printer pulls a bed onto the heated build plate through a system of conveyors. When the print is finished, the part and the bed ar fed into a rotating cassette, where it can be removed by a tech, prepped for the next print, and placed back in the ‘bed feeder’. It’s a system that brings the manual intervention cycle time of a 3D printer down to zero. If you’re producing hundreds of parts, this will drastically speed up manufacturing.

While it is a relatively niche idea, this is a very well-designed machine. It’s all laser cut, uses core-XY mechanics, and with the right amount of tuning, it does exactly what it says it will do. It’s not for everybody, but that’s sort of the point of manufacturing parts on a 3D printer.