How To Build An Inverter, And Why Not To Bother

It’s ridiculously easy to lay hands on a cheap DC-to-AC inverter these days. They’re in just about every discount or variety store and let you magically plug in mains powered devices where no outlets exist. Need 120- or 240-VAC in your car? No problem – a little unit that plugs into the lighter socket is available for a few bucks.

So are these commodity items worth building yourself? Probably not as [GreatScott!] explains, but learning how they work and what their limitations are will probably help your designs. The cheapest and most common inverters have modified square wave outputs, which yield a waveform that’s good enough for most electronics and avoids the extra expense of producing a pure sinusoidal output. He explains that the waveform is just a square wave with a slight delay at the zero-crossing points to achieve the stepped pattern, and shows a simple H-bridge circuit to produce it. He chose to drive the output section with an Arduino, to easily produce the zero-crossing delay. He uses this low-voltage inverter to demonstrate how much more complicated the design needs to get to overcome the spikes caused by inductive loads and the lack of feedback from the output.

Bottom line: it’s nice to know how inverters work, but some things are better bought than built. That won’t stop people from building them, of course, and knowing what you’re doing in this field has been worth big bucks in the past.

Continue reading “How To Build An Inverter, And Why Not To Bother”

What’s The Cheapest Way To Scan Lots Of Buttons?

So you’re building a new mechanical keyboard. Or attaching a few buttons to a Raspberry Pi. Or making the biggest MIDI grid controller the world has ever know. Great! The first and most important engineering question is; how do you read all those buttons? A few buttons on a ‘Pi can probably be directly connected, one for one, to GPIO pins. A mechanical keyboard is going to require a few more pins and probably some sort of matrix scanner. But the grid controller is less clear. Maybe external I/O expanders or a even bigger matrix? Does it still need diodes at each button? To help answer these questions the folks at [openmusiclabs] generated a frankly astounding map which shows, given the number of inputs to scan and pins available, which topology makes sense and roughly how much might it cost. And to top it off they link into very readable descriptions of how each might be accomplished. The data may have been gathered in 2011 but none of the fundamentals here have changed.

How do you read this chart? The X axis is the number of free pins on your controller and the Y is the number of I/Os to scan. So looking at the yellow band across the top, if you need to scan one input it always makes the most sense to directly use a single pin (pretty intuitive, right?). Scrolling down, if you need to read 110 inputs but the micro only has eight pins free there are a couple choices, keys E and F. Checking the legend at the top E is “Parallel out shift register muxed with uC” and F is “Parallel in shift register muxed with uC“. What do those mean? Checking the table in the original post or following the link takes us to a handy descriptive page. It looks like a “parallel out shift register” refers to using a shift register to drive one side of the scan matrix, and “parallel in shift register” refers to the opposite.

Continue reading “What’s The Cheapest Way To Scan Lots Of Buttons?”

Hackaday Links Column Banner

Hackaday Links: September 30, 2018

If you’re looking for an Open Source computer, good luck. The RISC-V stuff isn’t there yet, and with anything else you’re going to be dealing with NDA’d Intel, AMD, or some other proprietary cruft. System76, however, makes the most big-O Open computer, and they will be announcing a new Open computer called the Thelio next month. It was on display at the Open Hardware Summit, although smartly there were no pictures taken of this box. Liliputing has reported on it, but there are a few things wrong with that speculation. No, it’s not RISC-V. We’re looking at x86 here. It’s a desktop. It has wood (walnut or maple). It doesn’t have enough cold cathode lighting to blind you, but I guess that’s a matter of taste. Everything will be announced in October.

I have a plan in the works to sell snake oil to people. Actually, it’s not snake *oil*, but it is derived from snakes. There are rattlesnake farmers out there, who breed snakes for meat (tastes like chicken!) and their skins for boots. The fascia of the skins is disposed of when this leather is being prepared, and this can be used as the base component of a glue, or something resembling gelatin. It’s basically no different than fish or animal glue, except it’s from snakes. This can be used as one of the ingredients in gummy candy. This is my plan: I’m going to sell snake oil, except it’s really snake-based gummies. They promote digestion and get rid of ions in your body, or something. Better living through snake gummies.

The paragraph you just read is a better business plan than this bit of snake oil. It’s a battery that recharges itself. It’s unclear if it recharges itself over time; if if it just recharges itself automatically, wouldn’t the battery just have more energy in it? It’s hitting all the checkmarks of snake oil too: there are references to Tesla being a ‘forgotten genius’, zero-point energy fields, and a countdown timer to their crowdfunding campaign. This rabbit hole goes deep.

Did you know Hackaday has a Retro Edition, specifically designed for old computers that somehow have web browsers? It’s true! Sometimes, we even add pics of people pulling the Retro Edition up on their ancient devices. [Steven McDonald] wondered if his Blackberry counted. Sure thing! If you can pull up the Retro Edition on your ancient computer, we’ll mention it in the Links post, too. We’re also taking suggestions on how to improve the Retro Edition; I’ll get around to improving it eventually.

Dr. Hallards Dream transmission box

An Enigma Wrapped In A Riddle Wrapped In A Vintage Radio

Puzzle boxes are great opportunities for hacking. You can start with a box which was originally used for something else. You get to design circuitry and controls which offer a complex puzzle for the players. And you can come up with a spectacular reward for those who solve it. [thomas.meston’s] Dr. Hallard’s Dream Transmission Box, which he created for an original party game, has all those elements.

The box was a broken 1948 National NC-33 Ham Radio purchased on eBay after a number of failed bids. Most of it was removed except for the speaker. The electronics is Arduino based, so most of the smarts are in the form of code. Potentiometers and a switch provide the mechanism for players to enter codes. And when the correct code is entered, a relay triggers an external smoke machine and turns on a laser which illuminates a party ball, rewarding the victors. And of course, there are also sound effects as well as a recorded message.

We weren’t kidding when we said puzzle boxes make great hacks. Here’s one which ignites fireworks, one made only from discrete components, and a valentine based one which makes your significant other work for their gift.

ICEstick Makes Terrible Radio Transmitter

We’ve done a lot of posts on how to use the Lattice iCEstick ranging from FPGA tutorials to how to use one as a logic analyzer. If you picked up one of these inexpensive boards here’s a fun little experiment. [T4D10N] saw a project [Hamster] put together to send SOS on the FM radio band using nothing but an FPGA. [Hamster used a Spartan], so he decided to do the same trick using an iCEstick with the open source IceStorm tools.

You might be surprised that the whole thing only takes 53 lines of Verilog — less if you cut out comments and whitespace. That’s because it uses the FPGA’s built-in PLL to generate a fast clock and then uses a phase accumulator divider to produce three frequencies on the FM radio band; one for a carrier and two for a tone, spaced 150 Hz apart. The result is really frequency shift keying but you can hear the results on an FM radio.

Continue reading “ICEstick Makes Terrible Radio Transmitter”

Tindie Guides That Hackaday Prize Entry Into Your Hands

The Hackaday Prize invites everyone to focus on specific challenges with encouragement of prize money and motivation of deadlines. But what happens after the award ceremony? While some creators are happy just to share their ideas, many projects need to get into the real world to make their full impact. Several past prize winners have used their award as seed money to start production and go into business. Recognizing this as something worth supporting, a new addition this year is Tindie’s Project to Product program.

Tindie is a marketplace for makers to sell to other makers, hence a natural place for Hackaday.io projects to find an audience. (And many have found success doing so.) For Project to Product, two Hackaday Prize semifinalists will receive support from mentors to transition their hand crafted project into something that can be produced in quantity. In addition to engineering support, there’s also funding (above and beyond their prize winnings) towards their first production run. In exchange, Tindie asks for the first production run to be sold exclusively on Tindie marketplace.

Of course, some entries are ahead of the curve and already available on Tindie, like Reflowduino and Hexabitz. We know there are more creators with ambition to do the same, putting in effort cleaning up their design and sorting out their BOM (Bill of Materials) towards production. They’ve done a lot of work, and we hope Tindie can give them that final push. They see their invention become reality, Tindie gets cool new exclusive products for the marketplace, and the rest of us can buy some to play with. Everyone wins.

If this sounds like something you want to join in as a creator, there’s still time. The final Musical Instrument Challenge is accepting entries for one more week. Better hurry!

(Disclaimeroo: Supplyframe, which owns Hackaday and is a sponsor of the Prize, also owns Tindie.)

Maker Faire NY: Getting Physical With Minecraft

If you’ve been hanging around Hackaday for a while, you’ve likely seen a few attempts to bridge the real world with the voxel paradise that is Minecraft. In the past, projects have connected physical switches to virtual devices in the game, or took chunks of the game’s blocky landscape and turned it into a 3D printable file. These were interesting enough endeavors, but fairly limited in their scope. They assumed you had an existing world or creation in Minecraft that you wanted to fiddle with in a more natural way, but didn’t do much for actually playing the game.

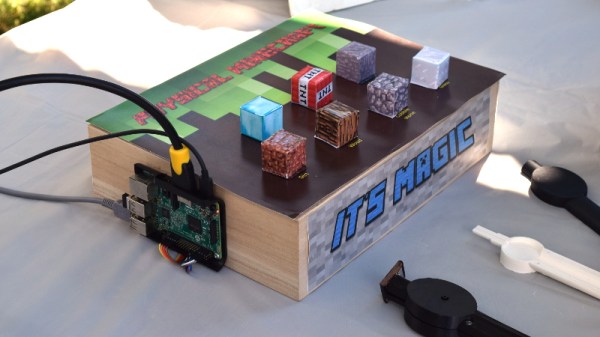
But “Physical Minecraft” presented at the 2018 World Maker Faire in New York, offered a unique way to bring players a bit closer to their cubic counterparts. Created by [Manav Gagvani], the physical interface has players use a motion detecting wand in combination with an array of miniature Minecraft blocks to build in the virtual world.

The wand even detects various gestures to activate an array of “Spells”, which are effectively automated build commands. For example, pushing the wand forward while making a twisting motion will automatically create a tunnel out of the selected block type. This not only makes building faster in the game, but encourages the player to experiment with different gestures and motions.

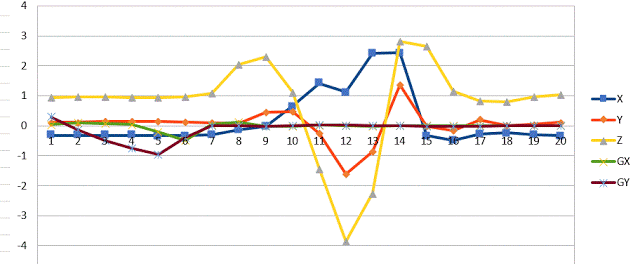
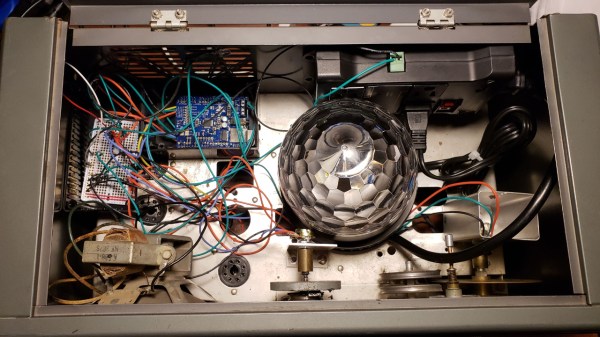
A Raspberry Pi 3 runs the game and uses its onboard Bluetooth to communicate with the 3D printed wand, which itself contains a MetaWear wearable sensor board. By capturing his own moves and graphing the resulting data with a spreadsheet, [Manav] was able to boil down complex gestures into an array of integer values which he plugged into his Python code. When the script sees a sequence of values it recognizes, the relevant commands get passed onto the running instance of Minecraft.

You might assume the wand itself is detecting which material block is attached to it, but that bit of magic is actually happening in the base the blocks sit on. Rather than trying to uniquely identify each block with RFID or something along those lines, [Manav] embedded an array of reed switches into the base which are triggered by the presence of the magnet hidden in each block.

These switches are connected directly to the GPIO pins of the Raspberry Pi, and make for a very easy way to determine which block has been removed and installed on the tip of the wand. Things can get tricky if the blocks are put into the wrong positions or more than one block are removed at a time, but for the most part it’s an effective way to tackle the problem without making everything overly complex.

We’ve often talked about how kid’s love for Minecraft has been used as a way of getting them involved in STEM projects, and “Physical Minecraft” was a perfect example. There was a line of young players waiting for their turn on the wand, even though what they were effectively “playing” was the digital equivalent of tossing rocks. [Manav] would hand them the wand and explain the general idea behind his interface, reminding them that the blocks in the game are large and heavy: it’s not enough to just lower the wand, it needs to be flicked with the speed and force appropriate for the hefty objects their digital avatar is moving around.

Getting kids excited about hardware, software, and performing physically demanding activities at the same time is an exceptionally difficult task. Projects like “Physical Minecraft” show there can be more to playing games than mindless button mashing, and represent something of a paradigm shift for how we handle STEM education in an increasingly digital world.