Maker Faire NY: Getting Physical With Minecraft

If you’ve been hanging around Hackaday for a while, you’ve likely seen a few attempts to bridge the real world with the voxel paradise that is Minecraft. In the past, projects have connected physical switches to virtual devices in the game, or took chunks of the game’s blocky landscape and turned it into a 3D printable file. These were interesting enough endeavors, but fairly limited in their scope. They assumed you had an existing world or creation in Minecraft that you wanted to fiddle with in a more natural way, but didn’t do much for actually playing the game.
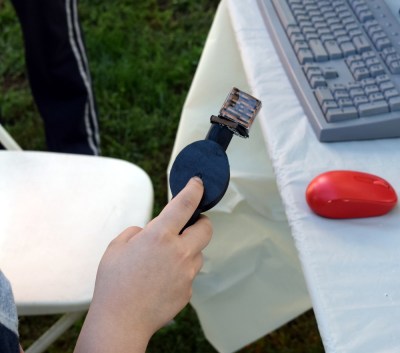
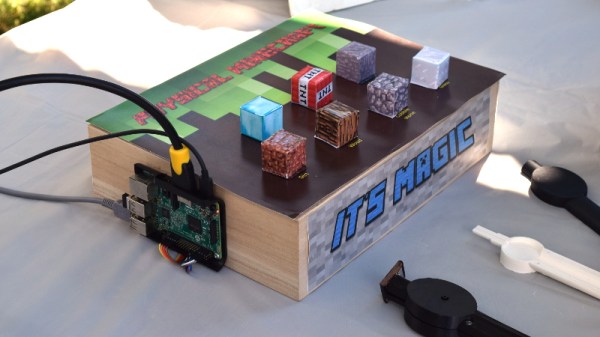
But “Physical Minecraft” presented at the 2018 World Maker Faire in New York, offered a unique way to bring players a bit closer to their cubic counterparts. Created by [Manav Gagvani], the physical interface has players use a motion detecting wand in combination with an array of miniature Minecraft blocks to build in the virtual world.

The wand even detects various gestures to activate an array of “Spells”, which are effectively automated build commands. For example, pushing the wand forward while making a twisting motion will automatically create a tunnel out of the selected block type. This not only makes building faster in the game, but encourages the player to experiment with different gestures and motions.

A Raspberry Pi 3 runs the game and uses its onboard Bluetooth to communicate with the 3D printed wand, which itself contains a MetaWear wearable sensor board. By capturing his own moves and graphing the resulting data with a spreadsheet, [Manav] was able to boil down complex gestures into an array of integer values which he plugged into his Python code. When the script sees a sequence of values it recognizes, the relevant commands get passed onto the running instance of Minecraft.

You might assume the wand itself is detecting which material block is attached to it, but that bit of magic is actually happening in the base the blocks sit on. Rather than trying to uniquely identify each block with RFID or something along those lines, [Manav] embedded an array of reed switches into the base which are triggered by the presence of the magnet hidden in each block.

These switches are connected directly to the GPIO pins of the Raspberry Pi, and make for a very easy way to determine which block has been removed and installed on the tip of the wand. Things can get tricky if the blocks are put into the wrong positions or more than one block are removed at a time, but for the most part it’s an effective way to tackle the problem without making everything overly complex.

We’ve often talked about how kid’s love for Minecraft has been used as a way of getting them involved in STEM projects, and “Physical Minecraft” was a perfect example. There was a line of young players waiting for their turn on the wand, even though what they were effectively “playing” was the digital equivalent of tossing rocks. [Manav] would hand them the wand and explain the general idea behind his interface, reminding them that the blocks in the game are large and heavy: it’s not enough to just lower the wand, it needs to be flicked with the speed and force appropriate for the hefty objects their digital avatar is moving around.

Getting kids excited about hardware, software, and performing physically demanding activities at the same time is an exceptionally difficult task. Projects like “Physical Minecraft” show there can be more to playing games than mindless button mashing, and represent something of a paradigm shift for how we handle STEM education in an increasingly digital world.

Maker Faire NY: Cocoa Press Chocolate Printer

If you haven’t figured it out by now, the hype over desktop filament printers is pretty much over. But that doesn’t mean there aren’t new avenues worth exploring that use the basic FDM printer technology. If anything, the low cost and high availability of 3D printer parts and kits makes it easier to branch off into new territory. For example, experimenting with other materials which lend themselves to being “printed” layer by layer like a thermoplastic. Materials such as cement, clay, or even chocolate.

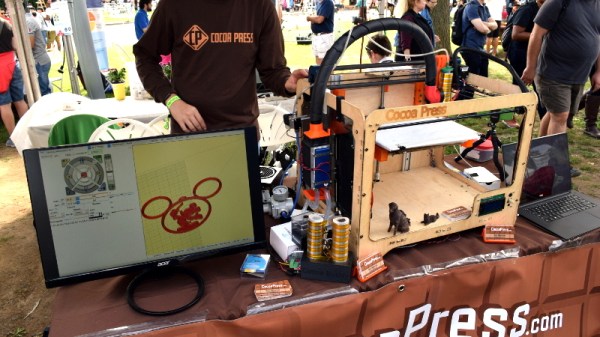
[Ellie Weinstein] brought her Cocoa Press printer to the 2018 World Maker Faire in New York, and we have to say it’s a pretty impressive piece of engineering. Hackers have been known to throw a syringe-based paste extruder onto a regular 3D printer and try their luck with squirting out an edible object from time to time, but the Cocoa Press is truly a purpose built culinary machine.

Outwardly it features the plywood case and vaguely Makerbot-looking layout that we’ve seen plenty of times before in DIY 3D printers. It even uses the same RAMPS controller running Marlin that powers your average homebrew printer. But beyond these surface similarities, the Cocoa Press has a number of purpose-built components that make it uniquely qualified to handle the challenges of building with molten chocolate.

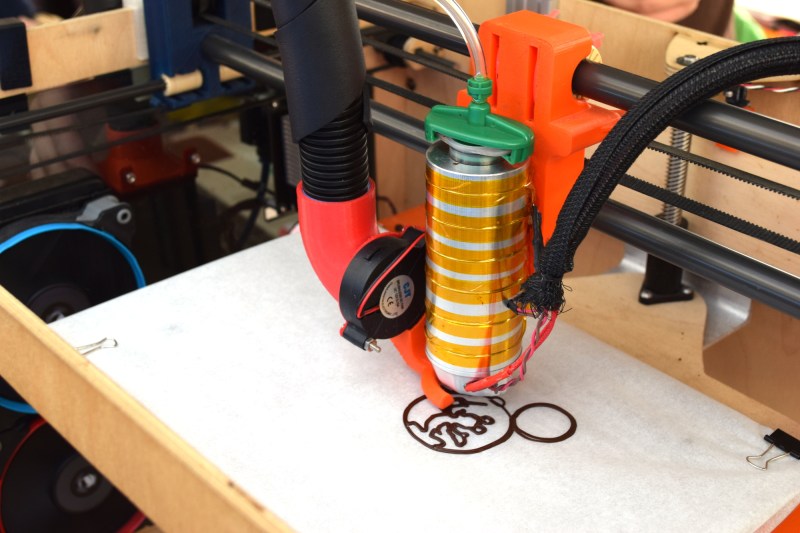
For one, beyond the nozzle and the walls of the syringe, nothing physically comes into contact with the chocolate to be printed; keeping the mess and chance of contamination to a minimum. The leadscrew actuated plunger used in common paste extruders is removed in favor of a purely air powered system: a compressor pumps up a small reservoir tank with filtered and dried air, and the Marlin commands which would normally rotate the extruder stepper motor are intercepted and used to trigger an air valve. These bursts of pressurized air fill the empty area above the chocolate and force it out of the 0.8 mm nozzle.

In a normal 3D printer, the “melt zone” is tiny, which allows for the heater itself to be relatively small. But that won’t work here; the entire chocolate load has to be liquefied. It’s a bit like having to keep a whole roll of PLA melted during the entire print. Accordingly, the heater on the Cocoa Press is huge, and [Ellie] even had a couple spare heaters loaded up with chocolate syringes next to the printer to keep them warm until they’re ready to get loaded up.

Of course, getting your working material hot in a 3D printer is only half the battle, you also need to rapidly cool it back down if you want it to hold its shape as new layers are placed on top of it. A normal 3D printer can generally get away with a little fan hanging next to the nozzle, but [Ellie] found the chocolate needed a bit of a chill to really solidify.

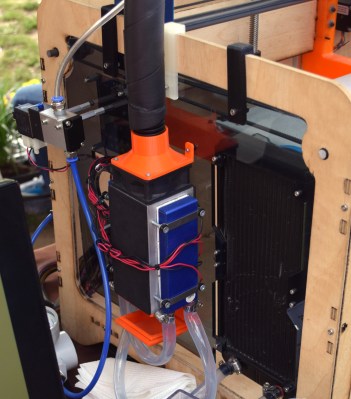
So she came up with a cooling system that makes use of water-cooled Peltier units. The cold side of the Peltier array is inside a box through which air is forced, which makes its way through an insulated hose up to the extruder, where a centrifugal fan and 3D printed manifold direct it towards the just-printed chocolate. She reports this system works well under normal circumstances, but unusually high ambient temperatures can overwhelm the cooler.

While “the man” prevented show goers from actually eating any of the machine’s creations (to give out food in New York, you must first register with the city), they certainly looked fantastic, and we’re interested in seeing where the project goes from here.

Maker Faire NY: Developing For The Final Frontier

The cost of getting a piece of hardware into space is now cheaper than ever, thanks in no small part to the rapid progress that’s been made by commercial launch providers such as SpaceX. In the near future, as more low-cost providers come online, it should get even cheaper. Within a few years, we could be seeing per kilogram costs to low Earth orbit that are 1/10th what they were on the Space Shuttle. To be sure, this is a very exciting time to be in the business of designing and building spacecraft.

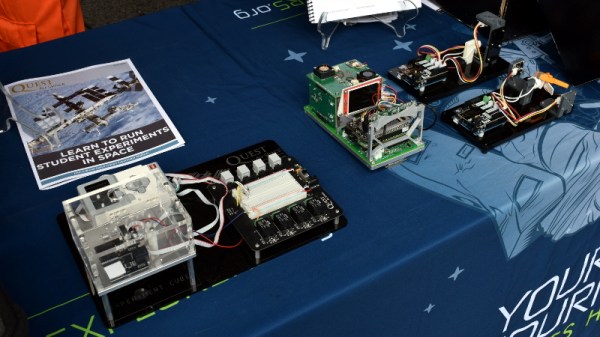
But no matter how cheap launches to orbit get, it’ll never be cheaper than simply emailing some source code up to the International Space Station (ISS). With that in mind, there are several programs which offer students the closest thing to booking passage on a Falcon 9: the chance to develop software that can be run aboard the Station. At the 2018 World Maker Faire in New York we got a chance to get up close and personal with functional replicas of the hardware that’s already on orbit, known in space parlance as “ground units”.

On display was a replica of one of the SPHERES free-flying satellites that have been on the ISS since 2006. They are roughly the size of a soccer ball and utilize CO2 thrusters and ultrasonic sensors to move around inside of the Station. Designed by MIT as a way to study spaceflight techniques such as docking and navigation without the expense and risk of using a full scale vehicle, the SPHERES satellites are perhaps the only operational spacecraft to have never been exposed to space itself.

MIT now runs the annual “Zero Robotics” competition, which tasks middle and high school students with solving a specific challenge using the SPHERES satellites. Competitors run their programs on simulators until the finals, which are conducted using the real hardware on the ISS and live-streamed to schools.

We also saw hardware from “Quest for Space”, which is a company offering curricula for elementary through high school students which include not only the ground units, but training and technical support when and if the school decides to send the code to the matching hardware on the Station. For an additional fee, they will even work with the school to design, launch, and recover a custom hardware experiment.

Their standard hardware is based on off-the-shelf platforms such as Arduino and LEGO Mindstorms EV3, which makes for an easy transition for school’s existing STEM programs. The current hardware in orbit is setup for experiments dealing with heat absorption, humidity, and convection, but “Quest for Space” notes they change out the hardware every two years to provide different experiment opportunities.

Projects such as these, along with previous efforts such as the ArduSat, offer a unique way for the masses to connect with space in ways which would have been unthinkable before the turn of the 21st century. It’s still up for debate if anyone reading Hackaday in 2018 will personally get a chance to slip Earth’s surly bonds, but at least you can rest easy knowing your software bugs can hitch a ride off the planet.

Maker Faire NY: Infinite Autonomous 3D Printing

Although it’s not an idea that has yet trickled down to $200 printers drop-shipped from China, one of the most innovative ideas in the 3D printing world in the last few years is putting plastic down on a conveyor belt. Yes, MakerBot was doing it back in 2010, but we’re not going to talk about that. Printing on a conveyor belt instead of a static bed allows you to easily print multiples of an object autonomously, without any human interaction. If you’re really clever, you could rotate the hot end 45° and build a piece of plastic that is infinitely long, like the printer [Bill Steele] built, the Blackbelt, or ‘the CAD files might exist somewhere’ Printrbot infinite build volume printer.

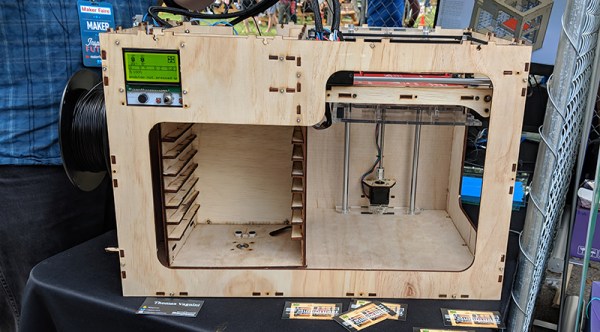
At this year’s World Maker Faire, we didn’t see an infinite printer, but we did catch a glimpse of an idea that could reliably take 3D printers into production. It’s a Multiprinter Autonomous 3D Printer, designed and built by [Thomas Vagnini].

The idea of using 3D printers for production and manufacturing is a well-studied problem. Lulzbot has a heated room filled with printers they use to manufacture all their machines. Prusa’s manufacturing facility is similarly well-equipped. However, both of these setups require helper monkeys to remove a part from the bed and set the machine up for the next print.

Instead of a strictly manual process, [Thomas]’ machine uses a sort of cartridge-based system for the printing bed. The glass beds are stored in a cassette, and for the first print, the printer pulls a bed onto the heated build plate through a system of conveyors. When the print is finished, the part and the bed ar fed into a rotating cassette, where it can be removed by a tech, prepped for the next print, and placed back in the ‘bed feeder’. It’s a system that brings the manual intervention cycle time of a 3D printer down to zero. If you’re producing hundreds of parts, this will drastically speed up manufacturing.

While it is a relatively niche idea, this is a very well-designed machine. It’s all laser cut, uses core-XY mechanics, and with the right amount of tuning, it does exactly what it says it will do. It’s not for everybody, but that’s sort of the point of manufacturing parts on a 3D printer.

Giant Connect Four Pits You Against The Computer

You can build a Connect Four solver in software, but it won’t be all that much fun. Now apply that same automation to a 15-foot-tall plywood version of the classic board game and you’ve just created a smile-making-machine for everyone within eyesight. Behold the Mono-Purpose Automated Robot Versed In Connnect4 (Marvin) which Ben and Jonathan dreamed up on their way home from Maker Faire last year, and made into their exhibit this year.

On the physical side of things they got really creative in lifting the discs and sorting them into the column chosen by the software brain of the game. A chain travels along one side with fingers every few feet. The fingers travel along the channel, lifting the discs. Those fingers are a couple of bolts, with some metal filler, all epoxied into one solid unit.

At the top of the disc elevator, and at the top position of each column in the gaming board, there are IR reflectance sensors which send feedback to the Arduino that drives the hardware. This proved a major issue during setup the day before the Faire. The reflectance sensors are just blasting out IR and not using a carrier signal. In direct sunlight, the detector was in a constant state of being tripped. After some trial and error, the logic for the sensors was flipped to detect the absence of sunlight by placing black plastic behind that top row of the board and putting duct tape over the IR emittors.

There’s a router and laptop rolled into the system. The Arduino makes an HTTP request to software on the laptop. In addition to determining where the next move should be made, the laptop is connected to a large screen which shows the current state of the gaming board. This is a head-to-head, human versus machine game. The human player drops their discs from the top of the board using a paint roller that hooks into a hole at the center of the disc. This way the player’s disc passes by the sensors, triggering the machine’s next move.

It’s a clever build and due to the sheer size it’s pretty awesome they were able to get it to the Faire from Philadelphia. Don’t miss the video after the break that shows off the fun and excitement of this gaming giant.

Continue reading “Giant Connect Four Pits You Against The Computer”

Maker Faire NY: Where Robots Come Out To Play

There was an unbelievable amount of stuff on display at the 2018 World Maker Faire in New York. Seriously, an unreal amount of fantastically cool creations from all corners of the hacker and maker world: from purely artistic creations to the sort of cutting edge hardware that won’t even be on the rest of the world’s radar for a year or so, and everything in between. If you’ve got a creative bone in your body, this is the place for you.

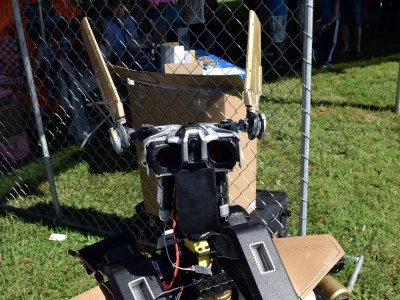
But if there was one type of creation that stood out amongst all others, a general “theme” of Maker Faire if you will, it was robotics. Little robots, big robots, flying robots, battling robots, even musical robots. Robots to delight children of all ages, and robots to stalk the darkest corners of their nightmares. There were robots for all occasions. Probably not overly surprising for an event that has a big red robot as its mascot, but still.

There were far too many robots to cover them all, but the following is a collection of a few of the more interesting robotic creations we saw on display at the event. If you’re the creator of one of the robots we didn’t get a chance to get up close and personal with in our whirlwind tour through the Flushing Meadows Corona Park, we only ask that you please don’t send it here to exact your revenge. We’re very sorry. (Just kidding, if you have a robot to show off drop a link in the comments!)

Continue reading “Maker Faire NY: Where Robots Come Out To Play”

That TRS Jack On Your Graphing Calculator Does More Than You Think

It’s not Apple IIs, and it’s not Raspberry Pis. The most important computing platform for teaching kids programming is the Texas Instruments graphing calculator. These things have been around in one form or another for almost three decades, and for a lot of budding hackers out there, this was the first computer they owned and had complete access to.

As hacking graphing calculators is a favorite for Maker Faires, we were pleased to see Cemetech make it out to this year’s World Maker Faire in New York last weekend. They’re the main driving force behind turning these pocket computers with truly terrible displays into usable computing platforms.

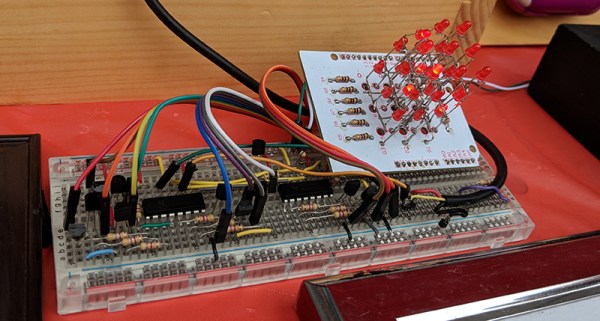
As you would expect from any booth, Cemetech brought out the goods demonstrating exactly what a graphing calculator can do. The most impressive, at least from a soldering standpoint, is their LED cube controlled by a graphing calculator. The electronics are simple, and just a few 595s and transistors, but this LED cube is taking serial data directly from the link cable on a graphing calculator. Of course, the PCB for the LED cube is designed as an Arduino shield for ease of prototyping, but make no mistake: this is an LED cube controlled by a calculator.

If you can send serial data to a shift register from a graphing calculator, that means you can send serial data to anything, bringing us to Cemetech’s next great build featured this year. It’s an N-gauge model train, with complete control over the locomotive.

There’s a lot more to controlling model trains these days than simply connecting a big ‘ol variac to the tracks. This setup uses Direct Cab Control (DCC), a system that modulates commands for locomotives while still providing 12-15V to the tracks. There’s a good Arduino library, and when you have that, you can easily port it to a graphing calculator.

Cemetech is one of the perennial favorites at Maker Faire, and over the years we’ve seen everything from the Ultimate TI-83+ sporting an RGB backlight and a PS/2 port to a game of graphing calculator Whac-A-Mole. It’s all a great example of what you can do with the programmable computer every 90s kid had, and an introduction to computer programming education, something Cemetech is really pushing out there with some hard work.