IPhone Charger Teardown Shows Astounding Miniaturization.

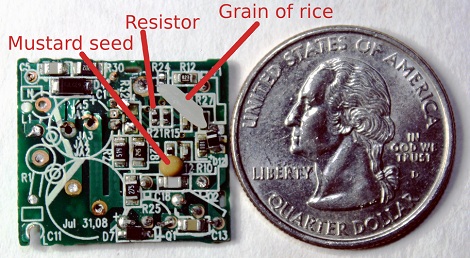
There’s no question that Apple has their industrial design down pat; comparing a cell phone charger made by Blackberry or Motorola to the tiny 1-inch-cube Apple charger just underscores this fact. [Ken Shirriff] posted a great teardown of the Apple iPhone charger that goes through the hardware that makes this charger so impressive.

Like most cell phone chargers and power supplies these days, Apple’s charger is a switching power supply giving it a much better efficiency than a simple ‘transformer, rectifier, regulator’ linear power supply. Inside the charger, mains power is converted to DC, chopped up by a control IC, fed into a flyback transformer and converted into AC, and finally changed back into DC, and finally filtered and sent out through a USB port.

The quality of the charger is apparent; there’s really no way this small 1-inch cube could be made any smaller. In fact, if it weren’t for the microscopic 0402 SMD components, it’s doubtful this charger could be made at all.

Comparing the $30 iPhone charger of a cheap (and fake) iPhone charger, the budget charger still uses a flyback transformer but there are serious compromises of the safety and quality. The fake charger doesn’t use a power supply controller IC and replaces the four bridge diodes for a single diode to rectify the AC; a very efficient cost-cutting measure, but it does lead to a noisier power supply.

There’s also the issue of safety; on the Apple charger, there is a (relatively) huge physical separation of  ~340 VDC and your phone. With the off-brand charger, these circuits are separated by less than a millimeter – not very safe, and certainly wouldn’t be UL approved.

It’s worth pointing out that [Ken] compares a similar $7 Samsung charger favorably to the $30 Apple charger. Both are functionally identical, but Apple also has their  marketing down pat, to say the least.

Tip ‘o the hat to [George] for sending this in.

EDIT: In case a 1-inch cube wasn’t impressive enough, check out the euro version of the iPhone/iPad charger. It supplies 1A @ 5V, and isn’t much thicker than the USB port itself. Thanks [Andreas] for bringing this to our attention. If anyone wants to do a teardown of the euro version, send it in on the tip line.


Building A 6502 In Minecraft

We’ll admit that we haven’t been following Minecraft like we used to; its been a while since we’ve seen something amazing in Minecraft, but [eloraam]’s 6502 emulator (part of her RedPower Minecraft mod) takes the cake.

The RedPower mod adds a lot of industrial technology to Minecraft. Pumps, solar panels, and pneumatic tubes to move blocks around are the staple of this mod, but with the addition of a fully emulated 6502 computer, Minecraft moves from an anachronistic medieval-themed steampunk aesthetic to a full-on machine age, mainframes everywhere style.

The heart of the 6502 portion of the RedPower mod are three craftable blocks; a CPU, a monitor, and a disk drive. All these blocks are connected together with ribbon cables and can interact with other blocks in the Minecraft universe. The CPU is an emulated 6502, with a few instructions borrowed from the 65816 and the addition of MUL and DIV. It’s possible to program this computer in assembly, but [eloraam] a Forth interpreter with the OS to make programming a little easier.

It’s been almost two years since we first saw the beginnings of a CPU made in Minecraft, but this mod takes everything to the next level. In actuality, this isn’t very different from the game [notch] is currently working on; both feature an emulated 80’s era computer that can do all your in-game bidding. We can’t imagine anything better to get us hooked on Minecraft again, and we’ve got to commend [eloraam] for some seriously awesome work.

After the break is a 23-minute tutorial on the functions of the RedPower CPU, as demonstrated by Minecraft aficionado [direwolf20].

Continue reading “Building A 6502 In Minecraft”

Making Real-life Portals With A Kinect

[radicade] wanted to know what real life portals would look like; not something out of a game, but actual blue and orange portals on his living room wall. Short of building a portal gun, the only option available to [radicade] was simulating a pair of portals with a Kinect and a projector.

One of the more interesting properties of portals is the ability to see through to the other side – you can look through the blue portal and see the world from the orange portal’s vantage point. [radicade] simulated the perspective of a portal using the head-tracking capabilities of a Kinect.

The Kinect grabs the depth map of a room, and calculates what peering through a portal would look like. This virtual scene is projected onto a wall behind the Kinect, creating the illusion of real-life orange and blue portals.

We’ve seen this kind of pseudo-3D, head tracking display before (1, 2), so it’s no surprise the 3D illusion of portals would carry over to a projected 3D display. You can check out [radicade]’s portal demo video after the break.

Continue reading “Making Real-life Portals With A Kinect”

DIY Spring And Plate Reverb

If you’re running your own recording studio, you’re going to need a lot of gear that seems excessively esoteric to the non-musically inclined. A rack full of synth gear looks just like any other cabinet of technology you would find in a server room. Electronic music is, for the most part, very utilitarian looking, but there are a few pieces that add a very nice aesthetic touch to any studio. [Peter] made two great looking pieces of hardware – both reverbs – that significantly add to the decor of his studio. As a bonus, they also sound really good.

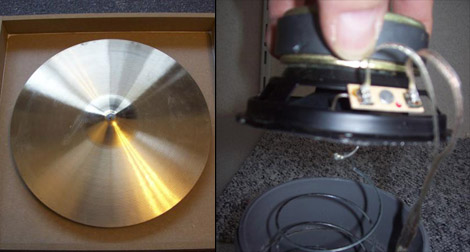
[Peter]’s spring reverb (Dutch, Google translate) works just the same as any other spring reverb; a speaker puts some music into a slightly stretched spring, and this sound is picked up by another transducer at the opposite end. For this build, [Peter] used a Slinky and a piece of PVC pipe left over from a bathroom remodel. Adding a few jacks, pots, and a preamp, [Peter] had a very nice and extremely large spring reverb.

The plate reverb (translation) is also a staple of pro recording studios around the globe. This reverb is somewhat similar to a spring reverb, except the spring is replaced with a tuned metal plate. [Peter] used a cymbal from a drum set for this piece of kit. Two speakers are attached to the back of the cymbal, one feeds a sound into the cymbal, the other speaker picks up those sounds and sends it to the mixing board.

There’s a lot of really cool musical DIY projects over on [Peter]’s site, along with a few audio demos for each of his DIY projects. We’ve included his reverb demos after the break, feel free to give those a listen.

Thanks go to [geekabit] for sending this one in.

Continue reading “DIY Spring And Plate Reverb”

Printing Circuitry On A RepRap

Over on the RepRap blog, [Rhys] has been experimenting with molten metal to build circuits with the RepRap.

Last June, [Rhys] found a neat alloy made of Tin, Bismuth, and a little bit of Indium that melts at around 130° C, and has just the right properties to be extruded with a standard RepRap setup. The results were encouraging, but the molten metal quickly dissolved the brass and aluminum nozzles [Rhys] was pushing liquid metal through.

The solution to this problem was solved by anodizing the heck out of a RepRap nozzle to make a hard, protective oxide layer. Already [Rhys] has logged hundreds of hours squirting molten metal out of his RepRap with no signs of any damage to the nozzle.

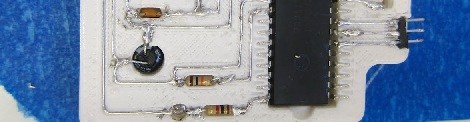
Since [Rhys] figured out how to print in metal, he whipped up an extremely minimal Sanguino board. You can see this RepRapped PCB running a LED blink program after the break. Now to work on the RepRap pick and place…

Continue reading “Printing Circuitry On A RepRap”

Improvised Weapons Roundup

There’s something special about improvised weapons built for the upcoming zombie apocalypse. Whether it’s a Lousiville Decapitron or a shotgun revolver, we’re always fascinated by homemade weapons. Here’s a few that rolled into the tip line over the last few weeks:

You call that a knife?

[Joerg Sprave], a.k.a. that German guy on YouTube that has fun with slingshots, built a spinning steak knife saw thing. Basically, it’s eight steak knives attached to a wheel and driven with an electric drill. It’s not a terribly complex build, but it does give off a zombie apocalypse/first person shooter melee weapon vibe.

Battery cannon, because why not

Why use potatoes when you can use D-cell batteries? [CasterTown] on YouTube put together a small propane-powered spud gun that can put a battery through a car door. This isn’t the first time we’ve seen batteries used as ammo, but it’s still an extremely powerful build.

Oh man the 60s were cool.

Back in the 60s, safety wasn’t a huge concern. Any 10-year-old could walk into a dime store and buy Jarts – a game consisting of kids throwing sharp spikes at each other. Also, magazines had descriptions of how to build a freaking mortar in a backyard. Able to make a 20-foot grouping at 1900 feet, this would probably merit a visit from a SWAT team today. Needless to say, don’t try this at home.

Don’t do this. Please.

Last but not least is [Rocketlab] and [SadisticTheory]’s $15 flamethrower. It’s just a gas tank from a 2-stroke engine, a 12 volt battery and a pump. Common sense requires us to mention this build is very, very illegal (apparently it is legal)and extremely unsafe. Don’t replicate this build.

Actually, we take that back. You shouldn’t build any of these weapons because they’re very dangerous. Just think of these as a neat thing to look at. Let other people hurt themselves. You may complain about how unsafe these weapons are in the comments.

A Color Maximite For Glorious 3-bit BASIC

[Kilian] sent in a link to a color version of a tiny educational computer. It’s called the Quantumite and it’s designed to be a throwback to the early 80s microcomputers we all grew up on.

The Quantumite is a clone of the Maximite, the tiny single board computer / BASIC interpreter designed by [Geoff Graham]. Both the Quantumite and Maximite are meant to be a throwback to the amazingly simple microcomputers of the early 80s, giving the 8-year-olds of today the simplicity of a BASIC compter most Hackaday readers had back in 1980s.

Both the Maximite and Quantumite are powered by the same 32-bit PIC microcontroller and have connections for a composite or VGA monitor, SD card, and PS/2 keyboard. Unlike the Maximite, the Quantumite can display 8 colors on its screen; a great addition that somehow seems even more retro than a monochrome display.

As far as getting the younglings to learn programming, we couldn’t think of a better tool than the ‘boot straight into a programming language’ Maximite. With a retro-impressive 3 bits of color, it’s sure to be a hit with the schoolchildren this computer is targeted at.