A Rocking And Walking BEAM Robot

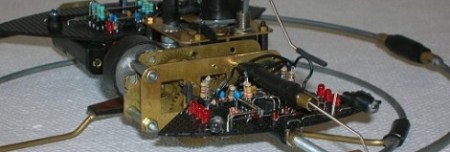
We’ve seen a few minimalist robots in our time, but very few compare to [Thomas Rinsma]’s amazingly agile BEAM robot. It’s absolutely fascinating to watch this little robot crawl around on its circular legs.

BEAM robots are extremely simple robots built without a microcontroller of any kind. The idea that extremely simple circuits built from logic chips and amplifiers came from the fruitful mind of [Mark Tilden] while studying insectoid robots at Los Alamos National Laboratory. The first BEAM robot – a small walker made out of a Sony Walkman – impressed a lot of mid-90s makers and tinkerers. Although interest in these robots died out, there are communities around the web for BEAM builders to get together and show off their creation.

Most BEAM robots use four to six legs as a means of locomotion. [Thomas]’ robot only uses two metal rings to get around; an extremely simple design and also the most fluid gait we’ve seen from a BEAM robot. You can check out the video of [Thomas]’ build walking around after the break.

Tip ‘o the hat to [mefeder] for sending this one in.

Continue reading “A Rocking And Walking BEAM Robot”

Giving A Powerpoint Presentation With An Apple ][

When [Vince] saw a coworker give a presentation with an iPad, he thought to himself what a tremendous waste of computing resources he was witnessing; an iPad is just as powerful as an early Cray supercomputer, and displaying slides isn’t a computationally intensive task. We’re assuming [Vince]’s train of thought went off the rails at that point, because he came up with a neat way to give a presentation with an Apple ][.

To get his slides onto his Apple ][, [Vince] created a tool to convert the text and images for a presentation to an Applesoft BASIC program. Yes, six-color images are supported in a wonderful 280×192 resolution. The presentation was transferred onto a CompactFlash card and loaded onto the Apple with the help of a CFFA card, making it much faster to load images during the presentation than a 5.25″ disk would allow.

Of course, after the presentation some of [Vince]’s coworkers wanted to play Oregon Trail, a request easily handled by the voluminous CF card loaded with Apple ][ programs. You can check out video demo/walkthrough of his presentation after the break.

Continue reading “Giving A Powerpoint Presentation With An Apple ][“

Electric Imp Connects Projects To The Internet

If you’re planning a build that communicates wirelessly to that ‘Internet of things’ we’ve been hearing about, you might want to check out the Electric Imp. This tiny little card connects your project to the Internet without all the hassle of configuring an embedded wireless device.

Inside the Electric Imp is a good bit of hardware: an ARM CortexM3, and an 802.11b/g/n wi-fi module that will connect to your wireless network automatically. There are also a few pins left over for serial, I2C, SPI and PWM applications.

Instead of manually configuring the DNS and WPA encryption, the Electric Imp does all of this automatically. We have no idea how the Electric Imp configures itself, but we’d bet it’s something along the lines of plugging the SD card-sized Imp into a computer and piggybacking off the computer’s credentials. The Imp also uses a cloud service, but we’ll bet once Imps are out in the wild, you’ll be able to use them with your own network.

The Electric Imp card itself will sell for about $25, but there are also dev kits to turn the Imp into an Arduino-compatible board. If everything goes as planned, the Imp will be released sometime this summer; we’ll probably see a few Electric Imp projects finished before August.

EDIT: [Kevin] over at Electronic Imp wrote in and told us about the configuration process:

We have an iOS and Android app where the user enters their wireless network’s SSID and the password, then they hold the screen up to the Imp. There’s a photosensor in the Imp that picks up the phone’s flashing and configures the device optically, without the need of plugging it in to a computer, setting up a temporary network for config, or any other cumbersome mechanisms.

We’re basically looking at a much cooler version of the Timex Datalink here. Awesome.

3D Gesture Tracking With LIDAR

[Reza] has been working on detecting hand gestures with LIDAR for about 10 years now, and we’ve got to say the end result is worth the wait.

The build uses three small LIDAR sensors to measure the distance to an object. These sensors work by sending out an infrared pulse and recording the time of flight for a beam of light to be emmitted and reflected back to a light sensor. Basically, it’s radar but with infrared light. Three of these LIDAR sensors are mounted on a stand and plugged into an Arduino Uno. By measuring how far away an object is to each sensor, [Reza] can determine the object’s position in 3D space relative to the sensor.

Unlike the Kinect-based gesture applications we’ve seen, [Reza]’s LIDAR can work outside in the sun. Because each LIDAR sensor is measuring the distance a million times a second, it’s also much more responsive than a Kinect as well. Not bad for 10 years worth of work.

You can check out [Reza]’s gesture control demo, as well as a few demos of his LIDAR hardware after the break.

Continue reading “3D Gesture Tracking With LIDAR”

Controlling A TV With A Microcontroller

Here’s two builds that print text to a TV with only two pins:

Still Alive with an Arduino

After seeing all the builds that play Still Alive, [Bob] decided to take a 1972 amber monitor and recreate the cut scene at the end of PortalThe build uses the TVout library for Arduino. There were a few problems with running the Unix and Still Alive animations at the same time, so [Bob] flips a bit in the EEPROM at the end of the command line animation and restarts into GLaDOS’ report. You can check out the old school color monitor here

ATMega Video Text Generator

[Stian] didn’t think his build was good enough for Hackaday, but his friend [Mikael] thought otherwise. [Stian] wrote a library to generate an NTSC video signal in real time. It’s a text-based build with 37×17 character resolution and only requires about 3kB of RAM. As a bonus, it only takes up two pins on [Stian]’s ATMega128.

You can check out the videos for both these builds after the break.

Continue reading “Controlling A TV With A Microcontroller”

Sell Your Projects With Club Jameco

Everyone’s favorite electronic component distributor, Jameco, rolled out a new way for you to make a few bucks off of your projects. It’s called Club Jameco and looks like a great place to design, sell, and learn about new projects from around the Internet.

The premise behind Club Jameco is simple. You send Jameco a short description of one of your projects. If the folks at Jameco think your project will sell, they’ll post it on Club Jameco for some feedback while you write up the instructions and the BOM. Once your project is done, Jameco will build it, sell it, and send you a nice royalty check in the mail.

Already there are some pretty neat projects up on Club Jameco like a build your own transformer kit and a photodiode geiger counter. We’re sure Hackaday readers have a few interesting projects up their sleeves, so we’ll wait patiently until we see them on Club Jameco.

Tip ‘o the hat to [War_Spigot] and [PUNiSH3R] for sending this one in.

Turning An Oscilloscope Into A Logic Analyzer

Sooner or later, you’re going to need a logic analyzer. If you don’t have a Bus Pirate or Logic Sniffer lying around, [Joonas] has a great MacGyverism that turns an oscilloscope into the simplest logic analyzer ever.

The basic premise of the build is tying four digital lines to the analog input of an oscope. This is done with a 74HC126 buffer that provides a high impedance input for the logic probes and outputs the four-bit status of each logic channel. With a few resistors in an R-2R network, the state of four digital lines can be easily read.

[Joonas] included the source code to turn his Picoscope 2000 into a logic analyzer, but there’s no reason why this couldn’t be done with any digital scope that has a serial output. Not bad for a very, very simple logic analyzer – just one chip and a handful of resistors – that costs less than $5.