Google Scrubs Brillo, Reveals Android Things

Another week goes by and another new IoT platform surfaces. Google has announced Android Things, a build of the mobile operating system designed for smart devices rather than the latest slab of mobile eye-candy. The idea is that the same Android tools, framework and APIs that will already be familiar to app developers can be used seamlessly on IoT Things as well as in the user’s palm.

Of course, if this is sounding familiar, it’s because you may have heard something of it before. Last year they announced their Project Brillo IoT platform, and this appears to be the fruit of those efforts.

So you may well be asking: what’s in it for us? Is this just another commercial IoT platform with an eye-watering barrier to entry somewhere, or can we join the fun? It turns out the news here is good, because as the project’s web site reveals, there is support for a variety of Intel, NXP, and Raspberry Pi development boards. If you have a Raspberry Pi 3 on your bench somewhere then getting started is as simple as flashing a disk image.

The Things team have produced a set of demonstration software in a GitHub repository for developers to get their teeth into. Never one to miss an opportunity, the British Raspberry Pi hardware developer Pimoroni has released an Android Things HAT laden with sensors and displays for it to run on.

The IoT-platform market feels rather crowded at times, but it is inevitable that Android Things will gain significant traction because of its tight connections with the rest of the Android world, and its backing by Google. From this OS will no doubt come a rash of devices that will become ubiquitous, and because of its low barrier to entry there is every chance that one or two of them could come from one of you. Good luck!


Catching A Rogue Train With Data

If you have been a regular traveler on one of the world’s mass transit systems over the last few decades, you will have witnessed something of a technological revolution. Not necessarily in the trains themselves, though they have certainly changed, but in the signalling and system automation. Nineteenth and twentieth century human and electromechanical systems have been replaced by up-to-date computers, and in some cases the trains even operate autonomously without a driver. The position of every train is known exactly at all times, and with far less possibility for human error, the networks are both safer and more efficient.

As you might expect, the city-state of Singapore has a metro with every technological advance possible, recently built and with new equipment. It was thus rather unfortunate for the Singaporean metro operators that trains on their Circle Line started to experience disruption. Without warning, trains would lose their electronic signalling, and their safety systems would then apply the brakes and bring them to a halt. Engineers had laid the blame on electrical interference, but despite their best efforts no culprit could be found.

Eventually the problem found its way to the Singaporean government’s data team, and their story of how they identified the source of the interference makes for a fascinating read. It’s a minor departure from Hackaday’s usual  hardware and open source fare, but there is still plenty to be learned from their techniques.

They started with the raw train incident data, and working in a Jupyter notebook imported, cleaned, and consolidated it before producing analyses for time, location, and train IDs. None of these graphs showed any pointers, as the incidents happened regardless of location, time, or train.

They then plotted each train on a Marey chart, a graph in which the vertical axis represents time  and the horizontal axis represents stations along a line (Incidentally Étienne-Jules Marey’s Wikipedia entry is a fascinating read in itself). Since it represents the positions of multiple trains simultaneously they were able to see that the incidents happened when two trains were passing, hence their lack of correlation with location or time. The prospect of a rogue train as the source of the interference was raised, and analyzing video recordings from metro stations to spot the passing train’s number they were able to identify the unit in question. We hope that the repairs included a look at the susceptibility of the signalling system to interference as well as the faulty parts on one train.

We’ve been known to cover a few stories here with a railway flavor over the years. Mostly though they’ve been older ones, such as this film of a steam locomotive’s construction, or this tale of narrow gauge preservation.

[via Hacker News]

[Main image source: Singapore MRT Circle line trains image: 9V-SKA [CC BY 3.0], via Wikimedia Commons]

Tiny-TS: Just How Small Can A Playable Synethesiser Get?

The early electronic synthesizers were huge machines, racks of electronic modules that filled entire rooms. Integration of electronics over time successively reduced them, first to the size of a large piece of furniture, then to  tabletop consoles, to standalone keyboards, and to small MIDI black boxes taking their instructions from another instrument or a computer. The original mass of discrete electronics had been reduced to a pile of ICs, then chipsets, then finally single ICs and software implementations on microcomputers.

It’s thus possible to make a synthesizer these days that is pretty small. If you can fit a microcontroller in it, you can fit a synth into it. But how about a playable synthesizer? One with a keyboard, on which you can give a recital? How small can you make one of those? [Jan Ostman] has a contender for the smallest playable synthesizer prize with his Tiny-TS, a credit-card synthesiser with a one-octave capacitive keyboard and analog controls for synthesis parameters.

The heart of the synth is an ATMega328, for which he provides the software. The parameters adjustable by a series of pots are listed as DCO: Coarse pitch and Double, DCF: Filter peak and ENVmod, and ENV: Attack and Release affecting amplitude. You can build your own, or he tells us that he has the project up as a Kickstarter campaign if you fancy the chance of buying one ready-made.

In case you are wondering, it doesn’t sound too bad. Some minimalist synths sacrifice the breadth of sounds they can create, but not this one. He takes it through its paces in a YouTube video which we’ve put below the break.

Continue reading “Tiny-TS: Just How Small Can A Playable Synethesiser Get?”

A Beautiful Morse Key From A Hard Drive Actuator

Morse code, or CW, is a subject that divides the amateur radio community from top to bottom. For some it’s a faded anachronism, while for others it’s the purest form of the art. With it no longer in significant commercial or military use it is radio amateurs who keep it alive, and those for whom it is a passion devote considerable effort to its continuing use.

With well over a century of history behind it there are a huge array of morse keys available to the CW enthusiast. From vintage telegraph keys through WW2 surplus military keys to sideways “bug” keys and modern boutique handcrafted keys, many operators will amass a collection for the love of it, and regularly use them all.

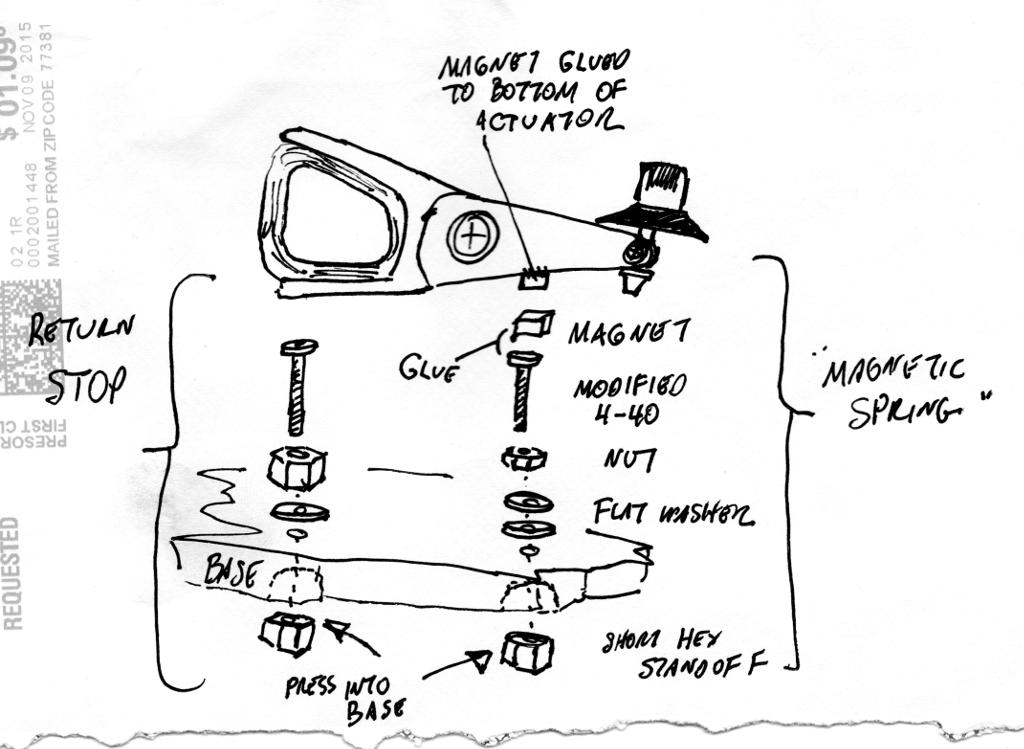
Just one of the hand-drawn illustrations for this project.

Other operators create their own keys, either crafting them from raw materials or using whatever materials they have at hand. Keys have been made from every conceivable piece of junk that will conduct electricity, and made contacts to all parts of the world.

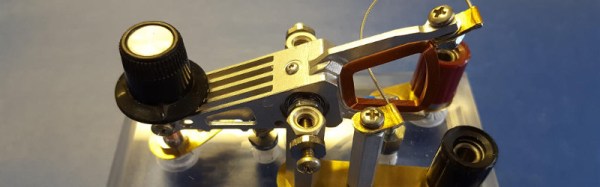
[H. P. Friedrichs, AC7ZL] has produced such a home-made key from surplus material, but it has nothing of the junkbox about it. He’s used the head actuator from a surplus hard drive as the arm of a straight key, and the result is an item of beauty.  The actuator bearing is the pivot point, and the business end of the key replaces the hard drive’s heads. The spring is provided by the repulsive force between magnets, the connection at the rear is provided by a piece of guitar string, and the contacts themselves are taken from a surplus power relay. Even his write-up is a thing of beauty, a compelling read with hand-drawn illustrations. If you are not a Morse enthusiast it’s still an engaging project.

We’ve featured many keys here over the years, and this isn’t the first one using a hard drive actuator, as this mint tin paddle shows. Among others we’ve linked you to a collection of unorthodox keys, and of course shown you a vintage telegraph key with a Raspberry Pi decoder.

Amiga Zorro HDMI Graphics Card Hits The Market

If you were a computer enthusiast in the late 1980s or early 1990s, the chances are that one of your objects of desire would have been a Commodore Amiga. These machines based on the 68000 line of processors and a series of specialized co-processors offered the best compromise between performance and affordability at the time, with multitasking, a GUI, and graphics capabilities that were streets ahead of their competition.

The Amiga story is littered with tales of what might have been, as dismal marketing and lacklustre product refreshes caused it to lurch from owner to owner and eventually fade away from the mainstream in the mid 1990s. But it’s been one of those products that never really died, as a band of enthusiasts have kept a small market for its software and hardware alive.

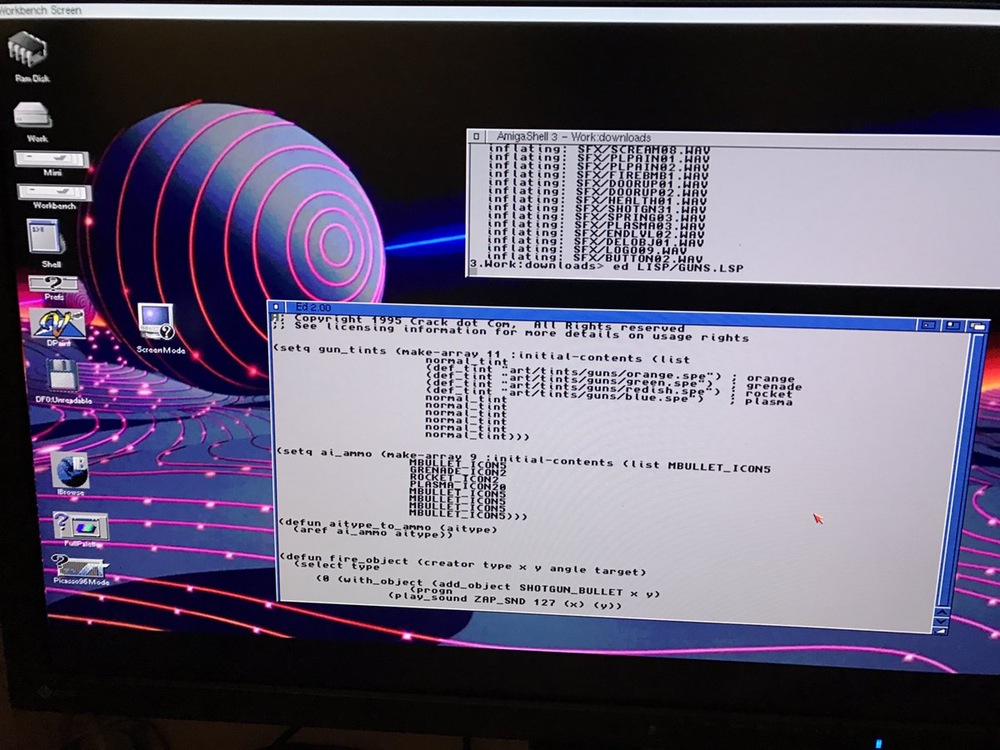
Workbench as you may not have seen it before.

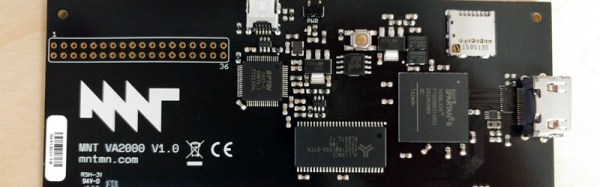
Earlier this year we showed you a prototype of an unusual graphics card, a modern GPU implemented on an FPGA board that brought up-to-date HDMI monitor support to the Zorro expansion slots found in the big-box Amigas. It’s thus very interesting today to find that the board made it to market, and that you can buy one for your Amiga if you have a spare 189 Euros (now sold out but taking pre-orders for another production run). Producing any niche electronic product is a significant challenge, so it is always positive to see one that makes it.

As well as HDMI output the board features a micro SD card slot that is mountable as an Amiga volume, and an expansion header that is toured as “Hacker friendly”. Best of all though, the whole board is open-source with all resources on a GitHub repository, so as well as reading our coverage of the prototype you can immerse yourself in its internals if that is your thing.

It’s always good to see a new piece of hardware for an old computer see the light of day, though it’s fair to say this development won’t revive the Amiga platform in the way that the Raspberry Pi has for RiscOS. Still, the mere fact of an open-source Zorro FPGA implementation being released should mean that other cards become possible, so we await developments with interest.

[via forums.xilinx.com]

Thermoelectric Paint Opens Prospect Of Easier Energy Harvesting

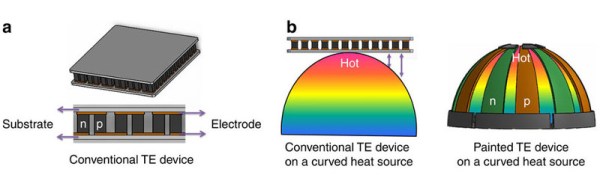
We will all be used to the thermoelectric effect in our electronic devices. The property of a junction of dissimilar conductors to either generate electricity from a difference in temperature (the Seebeck effect), or heating or cooling the junction (the Peltier effect). Every time we use a thermocouple or one of those mini beer fridges, we’re taking advantage of it.

Practical commercial thermoelectric arrays take the form of a grid of semiconductor junctions wired in series, with a cold side and a hot side. For a Peltier array the cold side drops in temperature and the hot side rises in response to applied electric current, while for a Seebeck array a current is generated in response to temperature difference between the two sides. They have several disadvantages though; they are not cheap, they are of a limited size, they can only be attached to flat surfaces, and they are only as good as their thermal bond can be made.

Researchers in Korea have produced an interesting development in this field that may offer significant improvements over the modules, they have published a paper describing a thermoelectric compound which can be painted on to a surface. The paint contains particles of bismuth telluride (Bi2Te3), and an energy density of up to 4mW per square centimetre is claimed.

Continue reading “Thermoelectric Paint Opens Prospect Of Easier Energy Harvesting”

RainCube Spreads Its Umbrella

There are times when a mechanism comes to your attention that you have to watch time and time again, to study its intricacies and marvel at the skill of its designer. Sometimes it can be a complex mechanism such as a musical automaton or a mechanical loom, but other times it can be a device whose apparent simplicity hides its underlying cleverness. Such a moment came for us today, and it’s one we have to share with you.

RainCube is a satellite, as its name suggests in the CubeSat form factor and carrying radar instruments to study Earthly precipitation. One of the demands of its radar system is a parabolic dish antenna, and even at its 37.5 GHz  that antenna needs to be significantly larger than its 6U CubeSat chassis.

The unfolding parabola in action.

It is the JPL engineers’ solution to this problem that is the beautiful mechanism we want to show you. The parabola is folded within itself and tightly furled round the feedhorn within the body of the satellite. As the feedhorn emerges, first the inner sections unfurl and then the outer edge of the parabola springs out to form the dish antenna shape. Simultaneously a mechanism of simplicity, cleverness, and beauty, one we’d be very proud of if it were our creation.

There is nothing new in collapsible parabolas used in spacecraft antennas, petal and umbrella-like designs have been a feature of some of the most famous craft. But the way that this one has been fitted into such a small space (and so elegantly) makes it special, we hope you’ll agree.

[via space.com]