Speed Up Filming With This Jawdropping 8-Axis Camera Crane

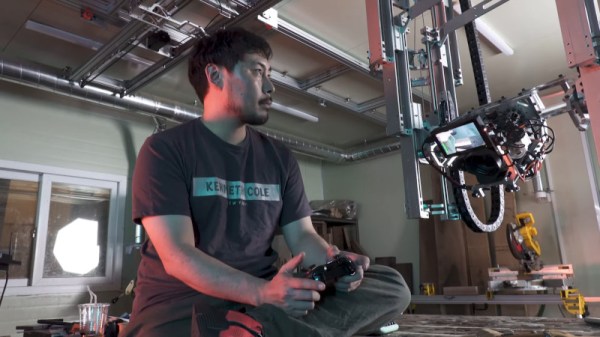
These days, it can feel like a project doesn’t exist unless you’ve posted a video on the Internet about it. [mingul] was in the process of producing his own videos, but found having to repeatedly move and set up the camera tiring. Naturally, a completely overkill eight-axis motion control robot was the solution. Video embedded below the break.

The scale of the build is something to behold. With 4.5 m travel on the X-axis, 6.5 m on the Y, and 2.1 m on the Z, it’s capable of traversing the full length of [mingul]’s workshop. Tilt, pan, and roll axes all feature 540 degrees of rotation, and there’s motors to control zoom and focus on the camera, too. Through software like Dragonframe, it’s possible to program complicated camera moves, and techniques like the classic dolly zoom are a cinch with such a versatile rig. It’s also possible to control the movement in real-time with a wireless Xbox controller.

[mingul] reports the build took a full three months of CNC machining, 3D printing and assembly. It’s a big step above a simple motorized camera slider, but we all have to start somewhere.

Continue reading “Speed Up Filming With This Jawdropping 8-Axis Camera Crane”

Building Video Pong With Discrete Components

Pong is a classic from the very dawn of the video game era. Recreating it remains a popular exercise for those new to coding. However, its simple logic makes this game particularly suited to an all-hardware build; something which [Glen] tackles with aplomb.

Not content to take the easy way out, [Glen] went for a particularly hardcore method of construction. The game uses absolutely zero integrated circuits in its construction. Instead, it relies upon the services of 431 bipolar transistors, 6 JFETs and 826 diodes. Everything is laced together on protoboard, connected with a neatly organised nest of colored wires. Schematics are available for the curious.

It’s a full featured build, too. Video output is in color, scores are displayed at the top of the screen, and there’s even stereo panning for the sound effects. It just goes to show what some humble components can do when put to work in the right way. We’ve seen some of [Glen]’s work before too, for example in this op-amp bouncing ball device. Video after the break.

Continue reading “Building Video Pong With Discrete Components”

Laser Crown Shines At Night

Sometimes you need something really flashy to complete an outfit. Whether it’s a sparkly pair of earrings or a stylish necklace, accessories are key to competing on the fashion battlefield. For those who want to bring some serious firepower, [p3nguin’s] laser crown might be just what the doctor ordered.

At the outset, we should state the crown only uses lasers in its construction, for cutting felt and acrylic. The light source is a Neopixel ring from Adafruit, capable of bringing the vibrant colors without risk of eye damage. The ring is then assembled with a series of snap-together acrylic parts and a felt cap, with slots for hair pins to keep the crown in place on the wearer’s head. A Trinket drives the show, with a LiPo battery used as a lightweight power supply.

It’s a nice build that’s sure to draw plenty of attention. We see some great wearables around these parts; this EL jacket is a particular favorite. Video after the break.

Continue reading “Laser Crown Shines At Night”

Writing Characters Straight To The Linux Framebuffer

These days, working with a display in software is fairly easy. Thanks to the convenience of the modern OS, we’re blessed with graphical user interfaces, where things such as buttons and windows and text are all taken care of for us. Of course, once you start to wander off the beaten track, particularly in embedded systems with no GUI, things can get a little more difficult. For these situations, [JSBattista] wrote some code to blast text directly to the Linux framebuffer.

It’s a project borne out of necessity. Working with a Raspberry Pi with no X server, it was found that the console text size made it difficult to display data. By writing directly to the framebuffer, it would be possible to display text of a larger size without having to implement a full GUI, and overheads could be kept to a minimum.

Working in this manner comes with some limitations. Glyphs are taken from an array in bitmap format, rather than font files. In this case, a font akin to that of the Alien sentry gun interface was chosen, for an attractive sci-fi look. Lowercase characters are currently unimplemented. Testing thus far has been on Raspberry Pi and Beaglebone non-GUI systems, with performance varying depending on platform.

It’s a project we suspect might prove useful to the developers of lightweight embedded systems. It’s something that may take some tweaking and experimentation to implement, but the hacker set rarely shy away from a challenge. If you’re eager to get down and dirty with some heavy programming, this tutorial on Linux graphics will help.

Name Stone Helps You Greet Coworkers

When starting a new job, learning coworkers names can be a daunting task. Getting this right is key to forming strong professional relationships. [Ahad] noted that [Marcos] was struggling with this, so built the Name Stone to help.

The Name Stone consists of some powerful hardware, wrapped up in a 3D printed case reminiscent of the Eye of Agamotto from Doctor Strange. Inside, there’s a Jetson Nano – an excellent platform for any project built around machine learning tasks. This is combined with a microphone and camera to collect data from the environment.

[Ahad] then went about training neural networks to help with basic identification tasks. Video was taken of the coworkers, then the frames used to train a convolutional neural network using PyTorch. Similarly, a series of audio clips were used to again train a network to identify individuals through the sound of their voice, using MFCC techniques. Upon activating the stone, the device will capture an image or a short sound clip, and process the data to identify the target coworker and remind [Marcos] of their name.

It’s a project that could be quite useful, given to new employees to help them transition into the new workplace. Of course, pervasive facial recognition technology does have some drawbacks. Video after the break.

Continue reading “Name Stone Helps You Greet Coworkers”

The Benefits And Pitfalls Of Using PCBs As An Enclosure

[Mastro Gippo] found himself in a pickle recently, with the development of an enclosure for the Prism electric vehicle charger. The body had been sorted out, but the front cover needed work. It had to be visually appealing, and ideally should provide the user feedback on the charging process. After some thought, [Mastro] decided to explore the possibilities of using a PCB as a part of a commerical product enclosure.

For a variety of reasons, using a specially designed PCB was an attractive solution for the team’s enclosure. Wanting something cost effective, easily customizable, and something that would help with emissions compliance, a PCB seemed like a great idea. With this in mind, [Mastro] prepared a series of prototypes. These feature see-through sections for LEDs to shine through, as well as a capacitive button and gold-plated logo. The fact that the front cover is a PCB makes the integration of the electronic components a cinch.

Before heading into full production, [Mastro] began to question why this technique isn’t used more often. Deciding to research further, [Bunnie Huang] was tapped to provide some advice on the concept. Noting that there can be issues with lead content, as well as the fact that PCBs aren’t often produced with proper regard to aesthetics, there were some pitfalls to the idea. Additionally, ESD testing can be difficult, while the in-built capacitive button would face issues in wet conditions.

None of these are showstoppers however, and [Mastro] has persevered, combining the front cover PCB with an adhesive plastic sheet for added protection. We fully expect that if more manufacturers explore this route, it may be a more viable technique in future. It’s also a great example of knowing when to ask others for help – it’s not the first time we’ve learned from [Bunnie’s] broad experience!

Walking Arm Trebuchet Is Different, But Effective

For many of us, our first encounter with the famous trebuchet was Age of Empires II, or perhaps a documentary on historical siege engines. However, many people continue to pursue builds of their very own, exploring designs new and old. The walking arm trebuchet is a good example, which uses an unconventional design to great effect.

The design eschews a rigid frame, instead consisting of simply an arm and a triangular leg assembly. The arm is held upside down, and is launched by allowing the trebuchet to collapse forward to rest on the triangular leg. The triangular leg is fitted with spikes which dig into the ground, and the arm then pivots around, launching the projectile. The design is reportedly quite efficient, similar to a floating arm trebuchet, with a very simple design. Performance was so good, it netted a clean sweep of the 2018 Vermont Pumpkin Chuckin’ festival.

There’s a wide variety of ways to go about building a trebuchet, and we’ve featured some before. You can even instrument your payloads to quantify performance. Video after the break.

Continue reading “Walking Arm Trebuchet Is Different, But Effective”