A Crystal Radio Amplifier In A Jar

The cool thing with crystal radios is that they are solely powered by the incoming radio waves. However, it usually means listening to your AM radio station with an earpiece and even then, depending on the antenna length, ground connection, and radio station, it can be quite hard to hear.

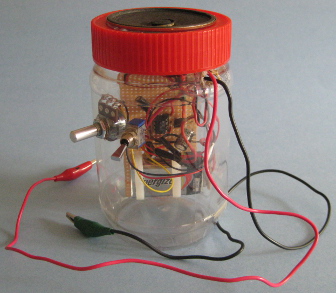
Even though it is cheating, [Steven] decided to make an amplifier for all the different crystal radios he had made over the years. His design, based on an LM386 amplifier was firstly tested on a breadboard and then permanently soldered onto a perfboard. To make the complete system easy to transport, he opted for a peanut butter jar where he embedded the speaker in the cap. The on/off switch and volume controls are mounted on the side, and easy alligator clips are used for the antenna connection.

The final result is not the one shown in the picture above as [Steven] painted the jar black, giving it a sweet look.

Building The Electronics For A Tesla Coil… And Watercooling Them

A few years ago [Patrick] was offered the Tesla coil of a friend of a friend. This was an opportunity too good for him to pass up.

He then began the creation of an Off-Line Tesla Coil (OLTC), where no supply transformer is used. The incoming mains supply is rectified and directly fed into the tank capacitor.

[Patrick] therefore had to build a huge capacitor bank and more importantly his own primary coil, made with a 1.6mm (0.064″) copper sheet to handle the immense current involved. Air cooling the electronics was sufficient until he started using his three phase input supply. As more power involves more heat, a waterblock was designed to cool the main transistor.

Patrick’s write-up is very detailed and worth the read. Once you’re finished with it, we advise you to browse through his website, where a lot more cool projects are described.

How To Debug A Faulty Memory Board

ram

While this is not exactly a hack or a fail, it definitely is an inspiring example on how to debug a faulty card.

[Quinn] is one of the very few hobbyists out there that designed her own 6502 based computer. For the young readers of Hackaday, the MOS 6502 was introduced in 1975 and has been used in the Aple // line, the Commodore 64, the Vic-20, the Atari computers, the Nintendo Enterntainment System and others.

[Quinn]’s homemade new RAM board had been working for many weeks until it started to show some weaknesses by only sporadically passing the boot RAM test. Assuming the RAM was the problem, she started by making a more advanced memory test, which showed errors at random addresses.

She didn’t have any more of the same memory chips on hand which could be used with a fresh PCB. Determined to power through the issue, she etched a new board with a new memory design. Unfortunately it also gave memory errors at boot. Only one culprit was left, which is shown in the picture above. It’s a small sizing error in the board artwork which was just enough to cause a misalignment on the connector.

The article contains many details about her debugging process, so it definitely is worth the read.

Controlling Real World Objects From Your Lucid Dream For $15

[Kyle Fredericks] tipped us about his first electronics project, a cheap and smart sleep mask that uses a vibration sensor to detect rapid eye movements.

As some of you may know, REM sleep is the part where you dream the most vividly and actively. If some external stimulation (sound, movement) is sent to you at this moment, it may help you take control of your dream by becoming aware of it. If not, your brain will create dream scenarios that incorporate this stimulus.

The interesting part of the concept is that the vibration sensor calibrates itself at the stage 2 sleep, when no eye movement occurs. This later allows a very accurate detection of the REM sleep stage, triggering a shelf stereo. Secondary buttons are even included in the mask sides.

[Kyle Fredericks] went to great lengths to document every step of the project, making it a perfect first step to learn electronics for beginners out there.

A $5 ARM Development Board

Most of you know that there are plenty of ARM powered development boards out there, so you may not be really sure what a new one can still bring to the table.

With a $5 price tag, the open hardware McHck (pronounced McHack) is meant for quickly building projects on a small budget. The board created by [Simon] is based on a Freescale Cortex M4 microcontroller, and can be plugged directly into one’s computer. As a Direct Firmware Update (DFU) bootloader is present on the microcontroller, there is no need for external programming equipment.

The board has unpopulated footprints that allow users to add other functionalities that may be required for their future projects: a Real Time Clock (RTC), a Boost regulator for single cell battery operation, Buck and linear regulators, a Lithium Polymer (LiPo) battery charger and even an External Flash storage.

The Bill of Materials can be found on the project wiki and the McHck community will soon launch a crowdfunding campaign to send the 5th version of the board to all the hobbyists that may be interested.

And if you’re curious, you can also have a look at all the other boards that Hackaday featured these last months: the browser based IDE arm boardquad-core ARM dev board and the Matchbox ARM.