Using Fishing Wire To Hold In Pin Headers Is A Nifty Trick

Working on a breadboard, one can get used to the benefits of being able to readily plug and unplug jumper wires to reconfigure a project. One could only dream of doing so with PCBs, right? Wrong! [Stewart Russell] recently shared a tip on Twitter on how to do just that, with the help of a little fishing wire.

The wire can be neatly threaded through the board to enable quick hookups.

The trick is simple: on any old development board that uses 0.1″ pitch headers, simply weave some fishing line through the plated through-holes in the PCB. Then, regular jumper wires can be inserted just like on a breadboard. The fishing wire has just enough give to allow the jumper wires to be jammed in, holding them steady and in good contact, while still allowing them to be easily removed.

[Hackspace Magazine] has raved about the trick, noting great success using 0.38 mm fishing line. Alternative methods involve using toothpicks, though we suspect solution is likely messier and less reliable.

If you’ve got your own tricks for prototyping quickly using development and breakout boards, be sure to share them below in the comments. Alternatively, send your best stuff to us on the tipsline!

Review: Inkplate 6PLUS

While the price of electronic paper has dropped considerably over the last few years, it’s still relatively expensive when compared to more traditional display technology. Accordingly, we’ve seen a lot of interest in recovering the e-paper displays used in electronic shelf labels and consumer e-readers from the likes of Amazon, Barnes & Noble, and Kobo. Unfortunately, while these devices can usually be purchased cheaply on the second hand market, liberating their displays is often too complex a task for the average tinkerer.

Enter the Inkplate. With their open hardware ESP32 development board that plugs into the e-paper displays salvaged from old e-readers, the team at e-radionica is able to turn what was essentially electronic waste into a WiFi-enabled multipurpose display that can be easily programmed using either the Arduino IDE or MicroPython. The $99 Inkplate 6 clearly struck a chord with the maker community, rocketing to 926% of its funding goal on Crowd Supply back in 2020. A year later e-radionica released the larger and more refined Inkplate 10, which managed to break 1,000% of its goal.

For 2021, the team is back with the Inkplate 6PLUS. This updated version of the original Inkplate incorporates the design additions from the Inkplate 10, such as the Real-Time-Clock, expanded GPIO, and USB-C port, and uses a display recycled from newer readers such as the Kindle Paperwhite. These e-paper panels are not only sharper and faster than their predecessors, but also feature touch support and LED front lighting; capabilities which e-radionica has taken full advantage of in the latest version of their software library.

With its Crowd Supply campaign recently crossing over the 100% mark, we got a chance to go hands-on with a prototype of the Inkplate 6PLUS to see how e-radionica’s latest hacker friendly e-paper development platform holds up.

Continue reading “Review: Inkplate 6PLUS”

An ESP32 Development Board For Sailors

[Matti Airas] wanted to have a better electronics platform for making his boat smarter, more connected, and safer. He found traditional marine electronics expensive and not suited for hacking and tinkering. There was also the issue of lack of interoperability between device generations from the same supplier and between different brands. This led him to design the Sailor Hat with ESP32 — a marine specific, open source hardware development board.

Applications include all kinds of sensor and control interfaces for the boat, such as measurement of fuel or water level, engine RPM, anchoring chain length counter, or setting up smart lighting or smart refrigeration control. The board is designed to work with the traditional NMEA 2000 standard, as well as with Signal K. NMEA 2000 is standardized as IEC 61162-3, but isn’t open source or free. Signal K, on the other hand, is free and open source, and can co-exist alongside NMEA 2000.

The marine environment can be pretty harsh with extremes of temperature, rain, humidity, condensation and vibration. Boats, just like automobiles, have a notoriously noisy electrical environment and [Matti] has paid special attention to noise and surge suppression throughout the board. The board can work with either 12 V or 24 V bus systems since the on board DC-DC converter is rated up to 32 V input. Connections between the board and the outside world need to be very robust, so it is designed to accept various types of connectors depending on how robust you want it to be.

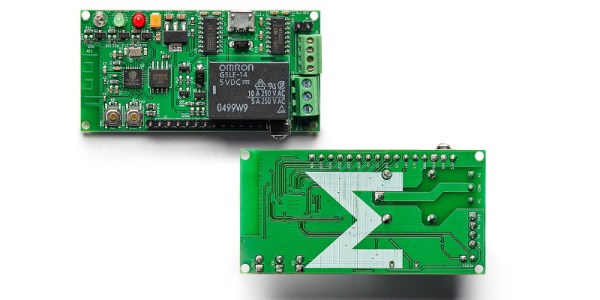
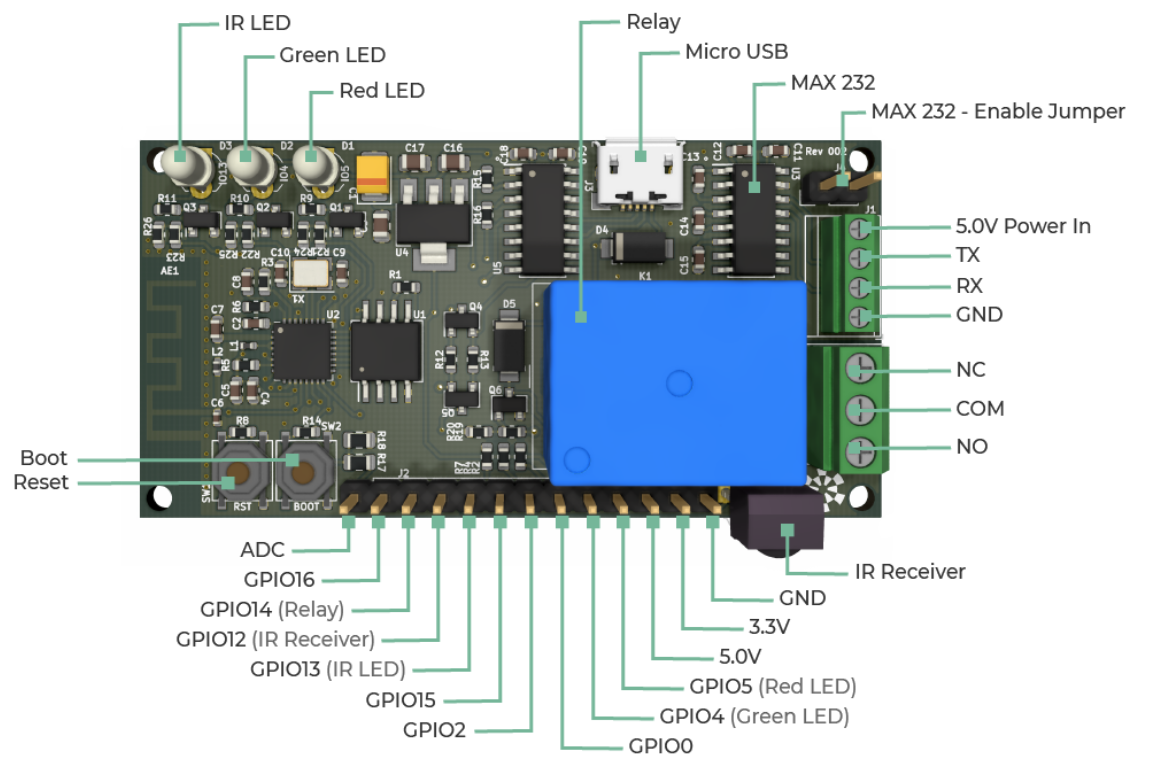
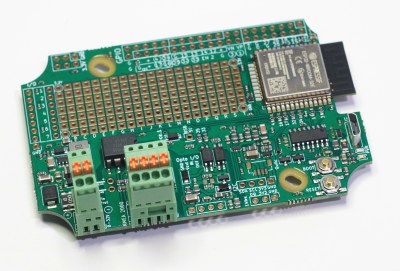
The Sailor Hat is based around a standard ESP32-WROOM-32 module. Interfaces include a CAN bus transceiver, opto-coupled input and output, I2C, 1-wire and QWIIC interfaces, USB Micro-B programming conector, plus a couple of buttons and LEDs. All of the ESP32 GPIO pins are terminated on a GPIO header, with jumper options to disable terminations to the standard interfaces and instead route them to the GPIO header as needed. Additionally, there’s a generous prototyping area to add additional hardware to the board. Hardware design files are hosted on the project repository on GitHub.

On the software side, there are several frameworks that can be used, with PlatformIO, SensESP, ESPHome and Visual Studio Code being the recommended choices. Or you could use any of the widely available SDK’s for the ESP32 platform — Espressif SDK, Arduino Core for ESP32, MicroPython, NodeMCU or Rust.

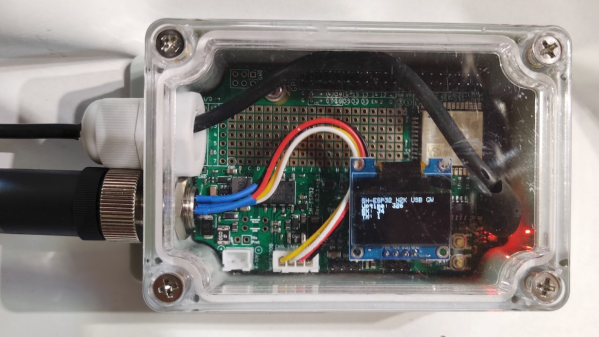
[Matti]’s NMEA 2000 USB gateway example is a good way to get a grip on hardware assembly and software installation required to build a practical project using the Sailor Hat. The board is designed to withstand a harsh electrical environment. But it’s mechanical installation obviously requires greater care if it has to survive marine applications. The Sailor Hat can be installed in commonly available, 100x68x50 mm or larger plastic waterproof enclosures, rated for IP65 or higher. The bulkhead connectors and cable glands also need to be appropriately rated, and the enclosure may possibly need a IP68 rated ventilation plug to take care of environmental cycling within the enclosure.

This ESP8266 Dev Board Has A Surprising Story Behind It

If you’re looking to get started with the ESP8266, there’s no shortage of development boards out there to select from. But we don’t think you’ll find one with a more unique a backstory than the open source ME-ESP8266. That’s because Malouf, the company that makes the $20 USD board, is a home goods company better known for their pillows and bed frames.

So how do you go from mattress toppers to microcontrollers? Well, as unlikely as it might seem, the missing element is Toys R’ Us. Or more specifically, the liquidation of Toys R’ Us. A Texas distribution center Malouf purchased from the iconic toy retailer included an automated conveyor belt system to move product through the gargantuan building, but unfortunately, they couldn’t get it to work with their existing system. The company decided to use their in-house team of engineers to solve the problem, and the ME-ESP8266 was born.

It turns out that an ESP8266 board developed to move bedding around an old Toys R’ Us warehouse has a lot of useful features for hackers and makers. It’s got an integrated relay, 16 MB of flash storage, an IR receiver, beefy screw terminals, and a 2.54mm-pitch GPIO pin header. There’s even a MAX232 on the board so it can talk to RS-232 devices. The hardware is compatible with the standard Arduino IDE as a “Generic ESP8266 Module”,  so you’ll have no problem using existing libraries and example code.

Now under normal circumstances, the public would never know about this sort of behind the scenes engineering. But instead of keeping their new ESP board to themselves, the team at Malouf got the go ahead from the company’s Chief Technology Officer (CTO) to release it as an open source project. Even more impressive, they got the company to put the board into production so it could be sold to the public. So today we not only learned that bedding companies have CTOs, but that they can be exceptionally open-minded.

Our hats off to the engineers at Malouf and the forward thinking brass that green lit production of the ME-ESP8266. It’s not the first interesting development to come from the liquidation of Geoffrey’s kingdom, but it just might be the most useful.

Pi Compute Module Is Love-child Of Raspberry And Arduino

The Raspberry Pi compute module is a powerful piece of hardware, especially for the price. With it, you get more IO than a normal Pi, plus the ability to design hardware around it that’s specifically tailored to your needs rather than simply to general-purpose consumers. However, this comes at the cost of needing a way to interface with it since the compute module doesn’t have the normal IO pins or ports, but [Timon] has come up with a handy development board for this module called the Piunora which solves a lot of these prototyping issues.

The development board expands the compute module to the familiar Arduino-like form factor, complete with IO headers, USB ports, and HDMI output. It doesn’t stop there, though. It has an M.2 connector, some built-in LEDs, a camera connector, and a few other features. It also opens up some other possibilities that would be difficult or impossible with a standard Pi 4, such as the ability to run the Pi as a USB gadget rather than as a host device which simplifies certain types of development, which is [Timon]’s intended function.

As a development board, this project has a lot of potential for the niche uses of the compute module when compared to the standard Raspberry Pi. For embedded applications it’s much easier to deploy, with the increased development costs as a tradeoff. If you’re still unsure what to do with the compute module 4, we have some reading for you. And Timon’s previous project is a great springboard.

Turning The Raspberry Pi Into A MCU Programmer

Once you graduate beyond development boards like the Arduino or Wemos D1, you’ll find yourself in the market for a dedicated programmer. In most cases, your needs can be met with a cheap USB to serial adapter that’s not much bigger than a flash drive. The only downside is that you’ve got to manually wire it up to your microcontroller of choice.

Unless you’re [Roey Benamotz], that is. He’s recently created the LEan Mean Programming mAchine (LEMPA), an add-on board for the Raspberry Pi that includes all the sockets, jumpers, and indicator LEDs you need to successfully flash a whole suite of popular MCUs. What’s more, he’s written a Python tool that handles all the nuances of getting the firmware written out.

After you’ve configured the JSON file with the information about your hardware targets and firmware files, they can easily be called up again by providing a user-defined ID name. This might seem overkill if you’re just burning the occasional hex, but if you’re doing small scale production and need to flash dozens of chips, you’ll quickly appreciate a little automation in your process.

Of course, if you’re just trying to flash some code in a pinch, there are some more expedient options out there. We’re particularly fond of using a development board to program the bare MCU.

Continue reading “Turning The Raspberry Pi Into A MCU Programmer”

Bluetooth Development Board Goes The Distance

Have you ever come across an interesting chip or component that you wanted to experiment with, only to find that there doesn’t seem to be a development board for it? Spinning up your own board is a lot easier today than it has been in the past, but it’s still a bit of a hassle to do it just for your own personal use. This is why [Nikolaj Andersson Nielsen] has decided to release RFCat, his custom long-range Bluetooth development board, onto the community.

The board is based around a module from MeshTek that’s essentially an amplified version of the Nordic nRF52832. According to [Nikolaj], this gives the module 30 times the transmit power of the base model chip.

RFCat is compatible with the Arduino IDE and uses the Adafruit nRF52 bootloader, making it easy to write your own code to take advantage of all this new-found power. Primarily you’d be programming the board over USB-C, but it also supports Serial Wire Debug (SWD) and over-the-air updates that can be triggered with a physical push button on the device.

If you want to get an RFCat of your own, it’s available on Tindie now. The amplified modules were originally intended for building Bluetooth mesh networks, but we’re sure there are other interesting applications out there just waiting to be discovered.

Continue reading “Bluetooth Development Board Goes The Distance”