Acrylic Light Puzzle Has A Point

[JBV Creative] recently became a proud owner of a laser cutter and, like most of us, started to think about what they could make with it. The answer was simple, a clever little piece of art or puzzle made of stacked acrylic.

He created some text and extruded it from a single point, but not every part intersected with every plate, giving each plate an indecipherable appearance. This allows a small light source (like the LED likely on the back of your phone) to cast a shadow on the wall. With some 3D printed brackets and spacers, it was mounted to a nice piece of cherry plywood. Overall, the technique is quite simple and easy to understand. [JBV Creative] didn’t include more detail on the process, which is a shame because it looks like a beautiful effect to recreate for some puzzles.

These glowing coasters are fantastic if you’re looking for engraved acrylic with a light source. Or this puzzle that lights up as the pieces are placed.

Continue reading “Acrylic Light Puzzle Has A Point”

Standing Desk With A Clever Flair

Standing desks (also known as sit-stand desks) are somewhat polarizing. The height is adjustable, but the idea is that you move between sitting and standing while you work. Hundreds of manufacturers are out there, but they’re all the same. Two metal legs that extend and one or more motors to move the legs up and down. [JAR Made] tried to make something slightly different for their standing desk with an extending curved surface.

The build started with some gorgeous alder that was milled into square with a track saw and a planer — no jointer was required. However, he wanted long boards and was debating how to butt join the pieces together and decided on pocket holes with dowels to try and clamp the boards together while the glue dried. The resulting product was one that [JAR Made] was unhappy with. He pivoted on his feet by switching Baltic birch plywood for the main desk surface. Which was bent using a kerf-cutting technique (though just using a track saw rather than a CNC bit).

Here is where you can see him learn from his earlier mistakes. He routed a half lap in the plywood for the butt joint to give it more strength and devised a clever clamping mechanism using CA glue and painter’s tape to get good clamping pressure. The alder from earlier came in use to serve as a front edge for the plywood and a groove to hold the sliding piece of plywood that extends and retracts as the desk goes up and down.

Regular old standing desk legs screw into the underside of the desk and allow it to move up and down. Overall, it’s a wonderful build of a gorgeous desk. We love seeing people make mistakes and then pivot and learn from them. Perhaps the next step is to automate the desk to move on its own.

Continue reading “Standing Desk With A Clever Flair”

Taking Distance Based CAD To The Next Level

For those who model CAD models regularly, a pair of calipers is essential as it allows reasonably accurate measurements to fit a specific part. However, [Jason Harris] is taking that concept to the next level with a signed distance function-based CAD tool, SDFX.

For those who don’t know, Signed Distance Functions can tell you from a given point how close the nearest part of the model is. The model is represented as a single function that offers some exciting benefits. For instance, chamfering and fileting are often quite complex in traditional CAD programs and trivial in an SDF setting. SDFX is a golang library that allows you to write golang programs to describe the model. OpenSCAD is a favorite of Hackaday as it is a beautiful parametric code-first CAD package. But the syntax and language are somewhat cludgy, to say the best. The advantage of using golang rather than a DSL is that you can use all the niceties that a full-featured language brings. For example, you can export multiple objects, make network requests, and interface with GUI libraries to recreate something like the customizer for OpenSCAD.

Objects are rendered to STL using Marching squares. Then, they can be printed in whatever slicing software suits your fancy. It’s an excellent project with a great API and almost a hundred examples.

The code is available on GitHub under an MIT License.

Reinterpreting The Lua Interpreter

The idea behind Lua is a beautiful one. A simple and concise syntax offers almost all of the niceties of a first-class language. Moreover, a naive implementation of an interpreter with a giant switch case can be implemented in an afternoon. But assembly is your go-to to get decent performance in a JIT-style interpreter. So [Haoran Xu] started to ask himself if he could achieve better performance without hand-rolled assembly, and after a few months of work, he published a work-in-progress called LuaJIT Remake (LJR).

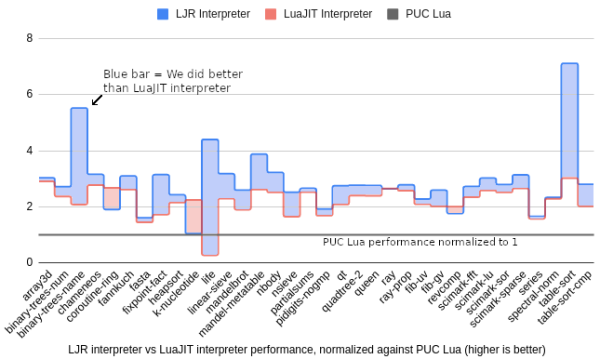
Currently, it supports Lua 5.1, and on a smattering of 34 benchmarks, LJR beats the leading fastest Lua, LuaJIT, by around 28% and the official Lua engine by 3x. [Haoran] offers a great explanation of interpreters that provides excellent background and context for the problem.

But the long and short of it is that switch cases are expensive and hard to optimize for compilers, so using tail calling is a reasonable solution that comes with some significant drawbacks. With tail calls, each case statement becomes a “function” that is jumped to and then jumped out of without mucking with the stack or the registers too much.

However, the calling convention requires any callee-saved registers to be preserved, which means you lose some registers as there is no way to tell the compiler that this function is allowed to break the calling convention. Clang is currently the only compiler that offers a guaranteed tail-call annotation ([[clang::musttail]]). There are other limitations too, for instance requiring the caller and callee to have identical function prototypes to prevent unbounded stack growth.

So [Haoran] went back to the drawing board and wrote two new tools: C++ bytecode semantical description and a special compiler called Deegen. The C++ bytecode looks like this:

void Add(TValue lhs, TValue rhs) {
  if (!lhs.Is<tDouble>() || !rhs.Is<tDouble>()) {
    ThrowError("Can't add!");
  } else {
    double res = lhs.As<tDouble>() + rhs.As<tDouble>();
    Return(TValue::Create<tDouble>(res));
  }
}
DEEGEN_DEFINE_BYTECODE(Add) {
  Operands(
    BytecodeSlotOrConstant("lhs"),
    BytecodeSlotOrConstant("rhs")
  );
  Result(BytecodeValue);
  Implementation(Add);
  Variant(
    Op("lhs").IsBytecodeSlot(),
    Op("rhs").IsBytecodeSlot()
  );
  Variant(
    Op("lhs").IsConstant(),
    Op("rhs").IsBytecodeSlot()
  );
  Variant(
    Op("lhs").IsBytecodeSlot(),
    Op("rhs").IsConstant()
  );
}

Note that this is not the C keyword return. Instead, there is a definition of the bytecode and then an implementation. This bytecode is converted into LLVM IR and then fed into Deegen, which can transform the functions to do tail calls correctly, use the GHC calling conventions, and a few other optimizations like inline caching through a clever C++ lambda mechanism. The blog post is exceptionally well-written and offers a fantastic glimpse into the wild world of interpreters.

The code is on Github. But if you’re interested in a more whimsical interpreter, here’s a Brainf**k interpreter written in Befunge.

Move Aside Planar, I’m Slicing My Cone Way

Fleetwood Mac puns aside, very little has changed about how we “slice” models for printers in the last 30 years. However, [Stefan Hermann] of CNC Kitchen has a demo that tries to change all that by slicing conically.

For the uninitiated in the dark arts of printing in the third dimension, the canonical definition of non-conical slicing has been to bisect the model at layer height intervals and generate the perimeter and the infill, then output that as g-code. This is easy to implement mathematically and works reasonably well, except when you have overhangs of more than about 60 degrees on most printers. The idea of slicing in a cone rather than a plane isn’t entirely novel as we previously covered RotBot, which offers a vertical axis of rotation and a print head at 45 degrees. What is extraordinary is that the technique [Stefan] walks you through is done with a stock printer without a complex 45-degree tilt and is a software modification rather than a hardware tweak.

[Stefan] references earlier work done by [Michael Wüthrich] of ZHAW School of Engineering, who wrote some scripts that apply the transformation. The slicer is SuperSlicer, a fork of the PrusaSlicer, which is itself a fork of slic3r. The modified g-code is exported and can be sent to a printer of your choice. He even has a link to a pre-sliced model to try it out.

Of course, different printers have different clearance levels, but the Prusa Mini he uses has 16 degrees of clearance with the sensor pushed up. The code is on GitHub. It’s fascinating to note how all these techniques and forks interact and build off each other. Whether tilted slices, conical slices, or something else ultimately becomes the de facto standard, we’re looking forward to more options for slicing.

Video after the break.

Continue reading “Move Aside Planar, I’m Slicing My Cone Way”

Dial-Up Internet Over WhatsApp

As we returned from Supercon 2022, we noticed many airlines offer free in-flight messaging. While the messages are handy for complaining about the seat size, it isn’t quite as exciting as access to the internet. In the air, we wondered how hard it would be to tunnel an internet connection over messaging. Funny enough, [Aleix Rodríguez Alameda] has a project that does exactly that by tunneling traffic over Whatsapp.

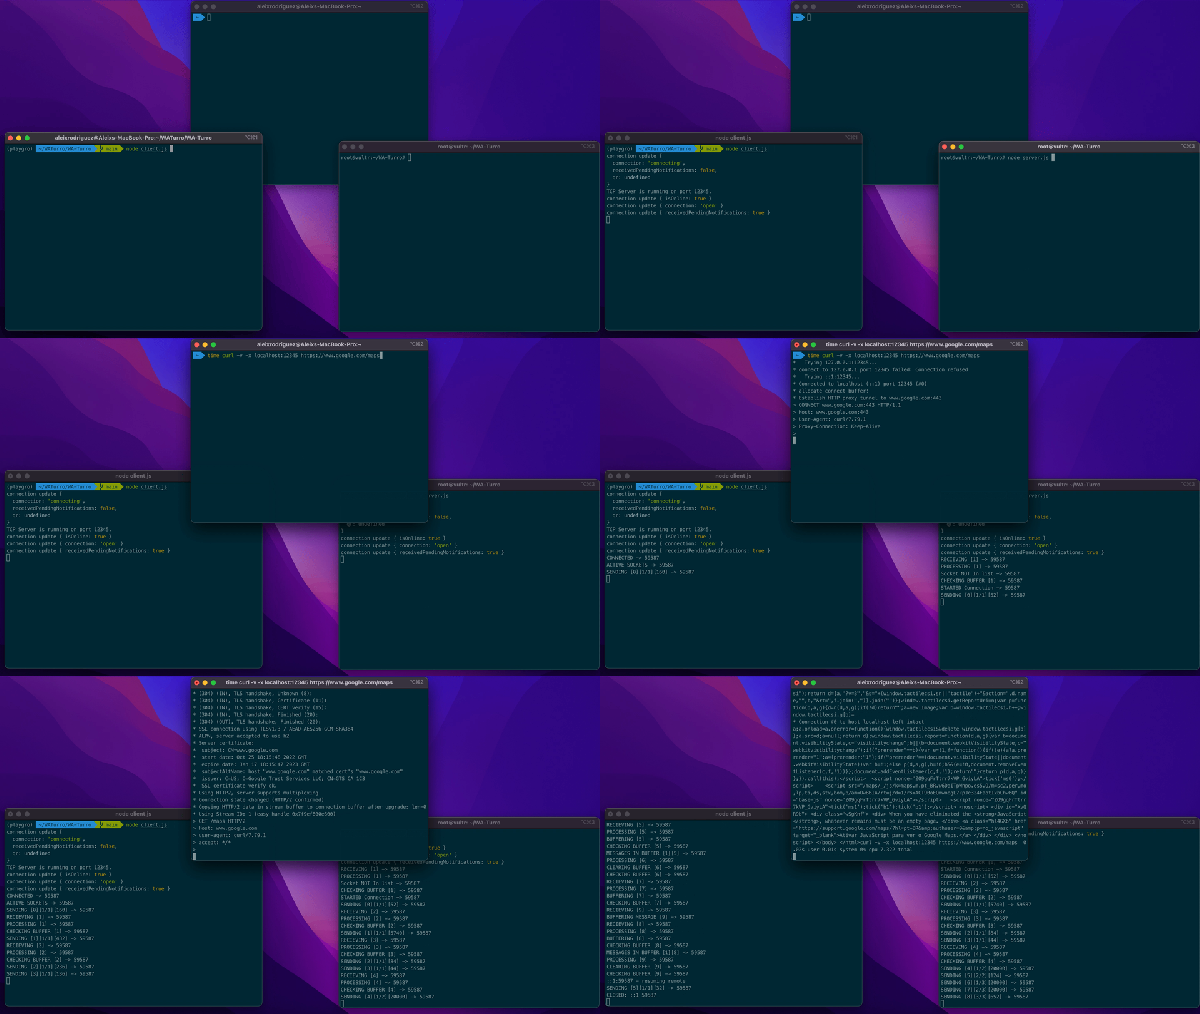
In [Aleix]’s case, cell carriers are pretty stingy with internet data when traveling in South America but often give unlimited WhatsApp data. So, ahead of time, two accounts are set up. A server is on one account and acts as a proxy to the broader internet and listens to messages to the server account. Then when in a restricted access setting, the client connects with a WebSocket and sends messages. The real trick for turning the WhatsApp messages into an internet connection the client can use is exposing a port from a local nodeJS web server. It connects to the WhatsApp API through a WebSocket and then acts as a proxy. Then, you set up traffic to be redirected through that port with curl or Firefox.

Packets are split to prevent you from sending too many messages, as in their testing, [Aleix]’s accounts were banned quickly. You shouldn’t expect massively fast speeds, as 300kbps was pretty typical during testing, which according to Wikipedia, is about what dial-up got with V.44 compression.

Which is around the same speed as TCP/IP tunneled over NRF23L01 radios.

An RP2040 Powered Pick And Place

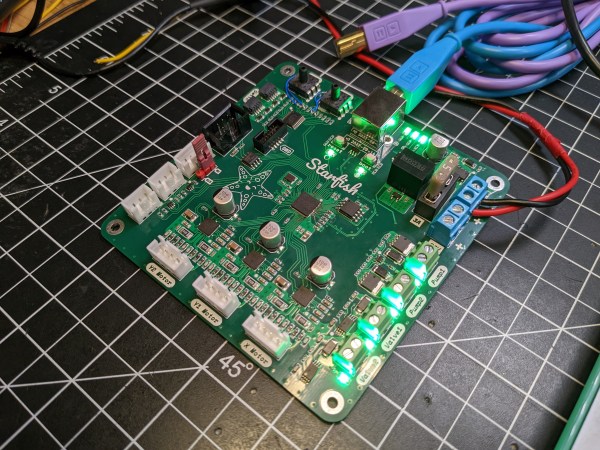
Pick and place machines are a wonder to behold, as they delicately and accurately place part after part. Unfortunately, they have to have a similarly wondrous price tag. Luckily, they aren’t too difficult to make yourself as they share many properties of a 3D printer with some extra constraints. [Stargirl Flowers] released Starfish, an open-source pick-and-place control board based around an RP2040 to help people make their own.

She purchased a LumenPnP, and the itch to tinker became too much to ignore. The STM32 on the stock controller also happened to get fried, leaving an obvious opening to create a custom board. [Stargirl] chose Trinamic TMC2209 motor controllers to drive the three stepper motors. The power circuit is impressively overbuilt with a 3A fuse, a TVS diode for shunting voltage spikes, a P-channel MOSFET for reverse polarity protection, a low-pass filter for AC ripple, and a large 100μF capacitor.

The RP2040 is a good choice since it’s easy to get and has plenty of digital I/O. USB connects the board to the outside work and includes ESD TVS diodes to protect the board when connecting and disconnecting the USB port. Motors for vacuums are controlled by a 74HC2G34 buffer that drives enable lines to two MOSFETs. Solenoids are similar but with a high current peak and a much smaller current to keep them open. The DRV120 fits the bill as it is a single-channel relay with current regulation. I2C vacuum sensors are the same ones on the Lumen motherboard; they just required an I2C multiplexer.

It’s an extremely well-documented project explaining why each part was chosen and why. If you want to create an RP2040 project that needs to last, we consider this a guiding star. It’s all up on GitHub for you to take a look at.

This isn’t the first time we’ve seen RP2040 as part of a motor controller, and we suspect we’ll see more.